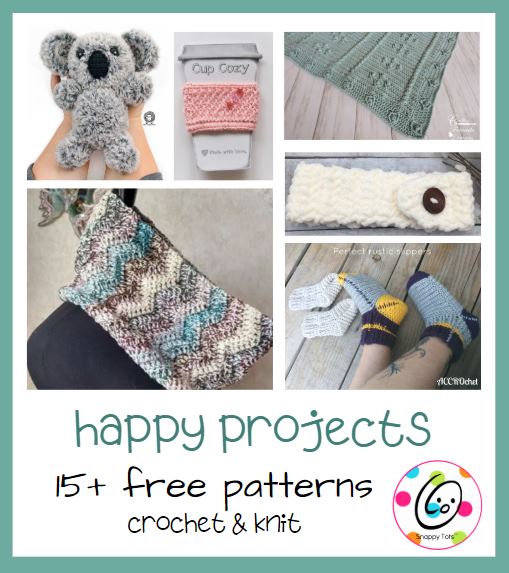
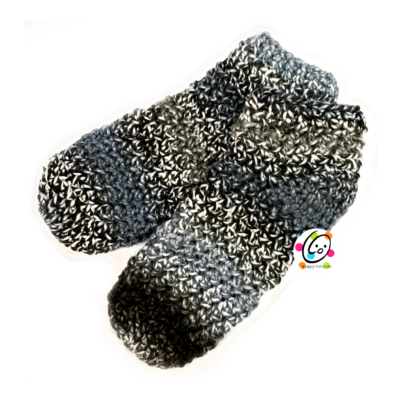
Free pattern: Nancy's Slippers
A nice pair of squishy soft slippers is probably my favorite thing. I have a couple of pairs friends have made me and I keep them in my nightstand, by my work station and in our trailer. I love making them for gifts and it makes me happy to see my parents wearing their slippers.
Last year I made my mom, Nancy, a pair of multi colored slippers. She said they were the best pair I have made her. I love that! This year for Christmas I decided to make her another pair, similar in design, but from a bulky yarn to help them last longer. Red Heart had sent me some of their new “Gemstone” yarn in “Onyx” which was perfect for my mom who LOVES the color black.


The yarn comes in a really big skein and you can easily get two pairs from one skein. It is a pricey yarn so make sure to use a coupon. I KNOW you will LOVE the feel and colors of this yarn, plus it is really nice to work with.
The pattern is written for teen and women, but could also be made for older children too. I will be adding some more sizes soon so the whole family can have a pair.
Nancy’s Slippers
The pattern is available for free below, but you can purchase an ad-free, downloadable PDF of this pattern with all of the photos from my Ravelry shop.
Materials
- Yarn: 150 yards bulky weight
- Sample was made from Red Heart Gemstone
- Miscellaneous: Yarn needle, measuring tape
- Crochet Hook: I
Details
- Sizes: Teen, Women
- Gauge: 2 inches = 4 hdc rounds and 6 hdc sts
Tips
- First stitch of each row is worked into the same stitch as the turning chain unless noted.
- Numbers at the beginning of each line may refer to steps and not indicate number of rows.
- Pattern is worked from toe to heal and then cuff is added. Change colors as desired.
Directions
- These are worked in continuous rounds. Do not join at the end of each round. Place a marker to keep track of the starting of each round.
Make 2
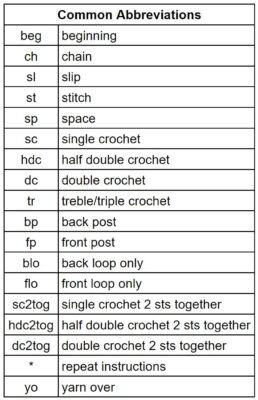
1. With an I hook and bulky weight yarn, start with a magic circle of 7 sc sts (or preferred method of starting a circle of 7 sc sts), pull closed and place a marker. (7sts)
It is REALLY important to make sure the beginning circle is closed tight so there isn’t a hole.
For help with a “magic circle”, check out Moogly’s tutorial.
2. 2hdc in each st to end of round. (14sts)
3. Work the next two rounds between the posts of the previous round. This creates a thicker material. *hdc, 2hdc in next st*, repeat to end of round. (21)
4. *hdc 2, 2hdc in next st*, repeat to end of round. (28sts)
5. Return to work into the stitch. *hdc in FLO, hdc in BLO*, repeat to end of round.
Repeat previous round until slipper is 3.5” shorter than desired length. See size chart at the end of the pattern.
Tip: Keep track of number of rounds worked so you will be able to make the next slipper the same length.
6. This step starts the heel. Sc in next st, sl st in next st. The stitches for steps 6-10 are worked between the posts of the previous round. (WS) Ch 1, turn, sc2tog, hdc12, sc2tog. (14sts)
7. (RS) Ch 1, turn, sc in same st, hdc 12, sc.
8. (WS) Ch 1, turn, sc2tog, hdc 10, sc2tog. (12sts)
9. (RS) Ch 1, turn, sc in same st, hdc 10, sc.
10. (WS) Ch 1, turn, sc2tog, hdc 8, sc2tog. (10sts)
11. This step creates the cuff and is worked around the foot opening. Ch 1, turn. You should be working on the outside/right side of the slipper. Sc2tog, hdc2, hdc2tog, hdc 2, sc2tog. Hdc 5 sts evenly across side of cuff, hdc2tog (where side meets front), *hdc in FLO, hdc in BLO*, repeat 4 more times, hdc in FLO, hdc2tog (where front meets side), hdc 5 sts evenly across side of cuff. Place marker to continue working in the round. (30sts)
12. *FPHDC around next post, BPHDC around next post*, repeat to end of round.
13. Repeat previous round 4 more times.
Finish off and weave in ends.

Pin To Save For Later
Make It For Me Event
This project is part of ELK Design Studios “Make If For Me Event 2020“.