Free Pattern: Little Lovey
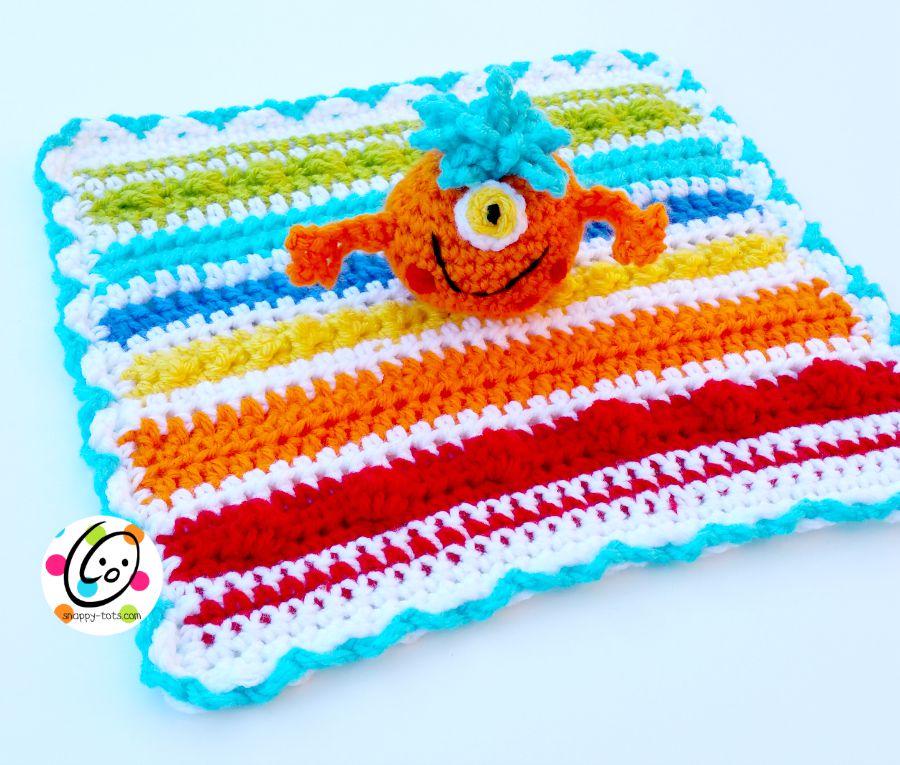
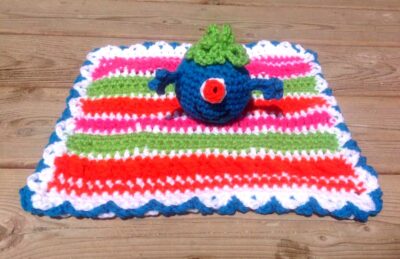
I designed this for my little grandson (11 lbs at 4 mths) because I wanted a colorful, textured little lovey.
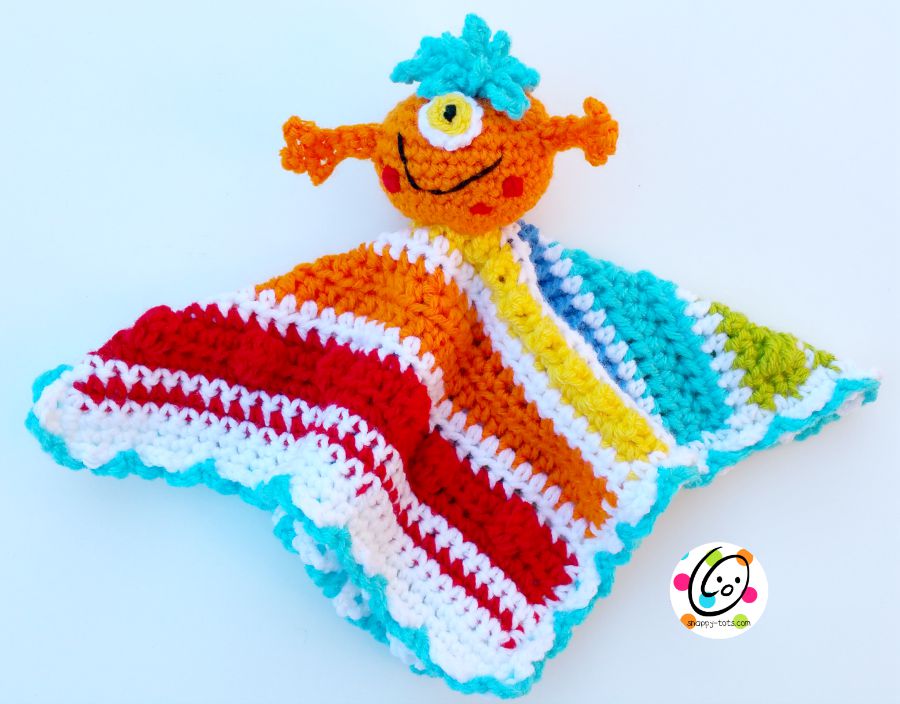
I think this would be a cute little pumpkin with green “hair” on top.
Little Lovey Pattern
Scroll down to view the free pattern or purchase an ad-free, downloadable PDF version from my Ravelry Shop.
“Make Ahead Monday” project. Get this pattern FREE for a limited time: CLICK HERE to download the pdf of this pattern for free until 10/1/23 with coupon code: falliscoming
Make sure you enter the coupon code and it changes to free BEFORE checking out.
Included in pattern: 10” stitch sampler lovey (as shown in photos), plain st lovey for a quicker project, monster, baby size blanket, lapghan size blanket.
Materials
Yarn: Small amounts of worsted weight yarn in colors of choice
Crochet Hooks: H, J
Miscellaneous: yarn needle, sewing needle, black thread or black embroidery floss (for stitching mouth on monster), small amount of stuffing
Gauge: not important for this project
Finished size: 10” square
~~~~~~~~~~~~~~~~~~~~~~~~~~~~~
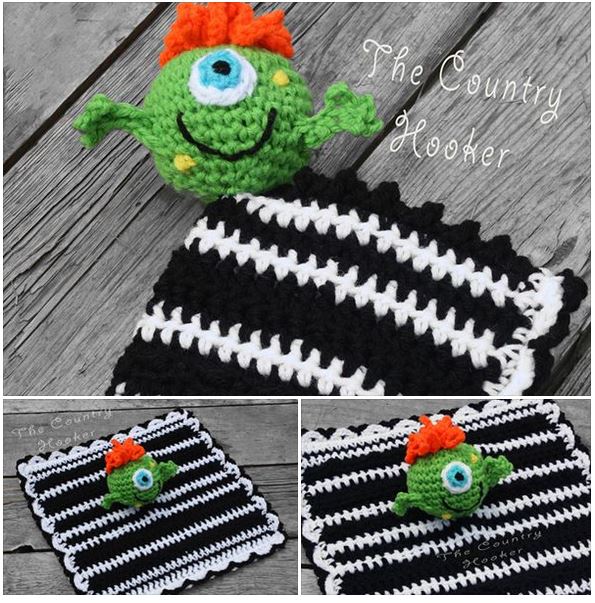
Thank you to Rachel of The Country Hooker and Shaunna Hallsson for making samples of this pattern.
Materials
Yarn: Small amounts of worsted weight yarn in colors of choice
Crochet Hooks: H, J
Miscellaneous: yarn needle, sewing needle, black thread or black embroidery floss (for stitching mouth on monster), small amount of stuffing
Gauge: not important for this project
Finished size: 10” square
SPECIAL STITCHES
Front Post Bobble: Hook will be inserted from side of post, as if working a normal front post st. YO twice, insert hook to work around next post, pull up a loop, YO, pull through 2 loops on hook, YO twice, insert hook around same post, pull up a loop, YO, pull through 2 loops on hook, YO, pull through all loops on hook.
Chunky Hdc: YO twice, insert hook in designated st, pull up a loop, YO and pull through all loops on hook.
Tip: As you pull through the loops, pull through two, slightly rotate hook and pull through the other two loops. That will make it easier to get through the loops.
Link to Tutorial: http://snappy-tots.com/how-to-chunky-hdc-stitch/
Chunky Sl St: YO once, insert hook in designated st, pull up a loop and pull through all loops on hook
Bobble: *YO, insert hook in designated st, pull up a loop, YO, pull through 2 loops on hook*, repeat four times, YO, pull through all 5 loops on hook.
LOVEY BLANKET
Variety of Stitches Version (main sample)
Note: for a more basic lovey, scroll down.
Color changes are written for main sample. Substitute colors as desired.
Each row of lovey blanket ends with 32 sts.
1. With J hook and white yarn, ch 33, sc in 2nd ch from hook and in ea ch across. (32sts)
2. Change to lime green yarn. Ch 1, turn, sc in each st to end of row.
3. Change to white yarn. Ch 1, turn, sc in each st to end of row.
4. Change to lime green yarn. Ch 2, turn, hdc in same st and in each st to end of row.
5. Ch 1, turn, sc 2, *FP Bobble (see “special stitches” on page 2), sc 2*, repeat to end of row.
From this point on, all bobbles should be on the same side of the blanket. (10 bobbles)
Help tips: I LOVE this stitch combo, but you need to watch st placement or you won’t end up with 32sts. After working the bobble, make sure you are leaving one st empty, then work the two single crochet. The empty st belongs to the post you worked the bobble around. Then, when working the next bobble, make sure you have 2 skipped posts between each bobble. These posts belong to the 2 single crochet.
6. Ch 1, turn, sc in each st to end of row.
7. Change to white yarn. Ch 2, turn, hdc in same st and in each st to end of row.

8. Change to turquoise yarn. Ch 2, turn, hdc in same st, work a “chunky hdc“ (see “special stitches” on page 2) in each st until 1 st remains, hdc in last st.
9. Ch 1, turn, sc in same st, “chunky sl st” (see “special stitches” on page 2) in each st until 1 st remains, sc in last st.
10. Ch 2, turn, hdc in same st, work a “chunky hdc“ in each st until 1 st remains, hdc in last st.
11. Change to white yarn. Ch 2, turn, hdc in same st and in each st to end of row.
12. Change to blue yarn. Ch 2, turn, dc in same st and in each st to end of row.
13. Change to white yarn. Ch 2, turn, hdc in same st and in each st to end of row.
14. Change to yellow yarn. Ch 1, turn, sc in same st and in each st to end of row.
15. Ch 1, turn, sc in same st, *tr in next st, sc in next st*, repeat until 1 st remains, sc in last st.
16. Ch 1, turn, sc in same st and in each st to end of row.

17. Change to white yarn. Ch 2, turn, hdc in same st and in each st to end of row.
18. Change to orange yarn. Ch 2, turn, hdc in same st and in each st to end of row.
19-20. Ch 2, turn, hdc in same st and in each st to end of row.
21. Change to white yarn. Ch 2, turn, hdc in same st and in each st to end of row.
22. Change to red yarn. Ch 1, turn, sc in same st and in each st to end of row.
23. Ch 2, turn, hdc in same st, hdc, *hdc, bobble (see “special stitches” on page 2), hdc 3*,
repeat to end of row. Note: there should be 4 hdc sts between bobbles. (6 bobbles)
24. Ch 1, turn, sc in same st and in each st to end of row.
25. Change to white yarn. Ch 1, turn, sc in same st and in each st to end of row.
26. Change to red yarn. Ch 1, turn, sc in same st and in each st to end of row.
27. Change to white yarn. Ch 1, turn, sc in same st and in each st to end of row.
28. Ch 1, turn, sc in same st and in each st until 1 st remains. Work 3sc in last st.
29. This step is worked around outer edge of entire blanket. Pivot piece to the left. Sc evenly along edge of blanket (approximately 32 sts). Work 3sc in last st. Pivot piece to the left. Sc across beginning edge of blanket, with 3sc in last st, pivot piece to the left. Sc evenly along edge of blanket (approximately 32 sts). Work 3sc in last st. Pivot piece to the left. Sc across last row of blanket, sl st in middle st of “3sc”.
Skip to “border” (do not finish off) OR finish off and weave in ends.
Border: Continue from where last st ended. Change to H hook. *ch 3, sk 1, sl st in next st*, repeat all the way around outer edge of blanket. Because st count from step 9 might vary, you might not finish with a full repeat. Change to contrast color (turquoise in sample). Sl st in first skipped stitch. *ch 3, working in front of white loop, sl st in skipped st, ch 3, working in back of white loop, sl st in skipped st*, repeat to end of round, sl st to join. Finish off and weave in ends.
MONSTER
Eye
With H hook and white yarn, create a magic circle of 8 sts (or preferred method for starting a circle of 8 sc sts), pull closed. Finish off, leaving a tail for sewing eye to monster.
With H hook and yellow yarn, create a magic circle of 6 sts (or preferred method for starting a circle of 6 sc sts), pull closed. Finish off, leaving a tail for sewing eye in place.
With yarn needle and yarn tail from yellow piece, sew yellow circle on top of white circle.
With yarn needle and black yarn, stitch a pupil in the center of the yellow circle. Set eye aside.
Body
Instructions start at bottom of monster and end with his hair.
1. With H hook and yarn color of choice (orange in main sample), start with a magic circle of 8
sts (or preferred method for starting a circle of 8 sc sts), pull closed and place marker for
working in the round. (8sts)
2. 2sc in each st to end of round. (16sts)
3. *sc, 2sc in next st*, repeat to end of round. (24sts)
4. *sc 3, 2sc in next st*, repeat to end of round. (30sts)
5-8. Sc in each st to end of round.
9. This round creates the arms. *Sl st around the post of the next st, ch 7, sl st in 3rd ch from
hook (one finger made), ch 3, sl st in 3rd ch from hook (second finger made), ch 3, sl st in 3rd
ch from hook (third finger made). Ch 1, sc3tog (pick up a loop in each st across “palm” of
hand), sc in each of the 4 remaining chains. Sc in next st on body*, sc 17, repeat once (from *
to *) and then sc in each st to end of round.
10. Sc in each st to end of round.
11. *sc 3, sc2tog*, repeat to end of round. (24sts)
12. *sc 2, sc2tog*, repeat to end of round. (18sts)
13. *sc, sc2tog*, repeat to end of round. (12sts)
I prefer to add the face at this point. Slide the loop off the hook.
With yarn needle and yarn tail, sew eye to one side of monster, between the hands. Remember, the opening is where his hair will be so make sure the face is sewn with the eye towards the top.
With a sewing needle and embroidery floss (or thin yarn), stitch the mouth in place.
With yarn needle and yarn (color of choice), stitch a few spots on the monster.
Stuff monster.
14. Put loop back on hook. *sc2tog*, repeat to end of round. (6sts)
15. Change yarn for hair color. *Sc in next st, ch 6, sl st in same st, ch 9, sl st in same st*, repeat to end of round. Finish off yarn, leaving a tail long enough to sew remaining sts together.
With yarn needle and yarn tail, weave in and out of remaining sts. Pull tail to cinch sts together. Secure yarn tail and weave in tail.
With yarn needle and matching yarn, sew bottom of monster to center of blanket.
BASIC LOVEY BLANKET
Note: this lovey blanket is worked in rows of hdc.
Each row of lovey blanket ends with 32 sts.
1. With J hook and white yarn (or yarn color of choice), ch 33, sc in 2nd ch from hook and in ea ch across. (32sts)
2. Ch 2, turn, hdc in same st and in each st to end of row.
Repeat step #2 until piece measures approximately 10” long, changing colors as desired.
Follow steps 28 and 29 from main blanket pattern. Add border from main pattern if desired.
LARGER BLANKETS
Baby: With J hook and ww yarn in choice of color, ch 123, sc in 2nd ch from hook and in each ch across. (122sts)
Finished width before border: approximately 36”
Lap Afghan: With J hook and ww yarn in choice of color, ch 163, sc in 2nd ch from hook and in each ch across. (162sts)
Finished width before border: approximately 60”

