Free Pattern: Snappy Goose Dress
This is a fun dress for everyday, birthdays, and especially for National Polka Dot day (January 22).
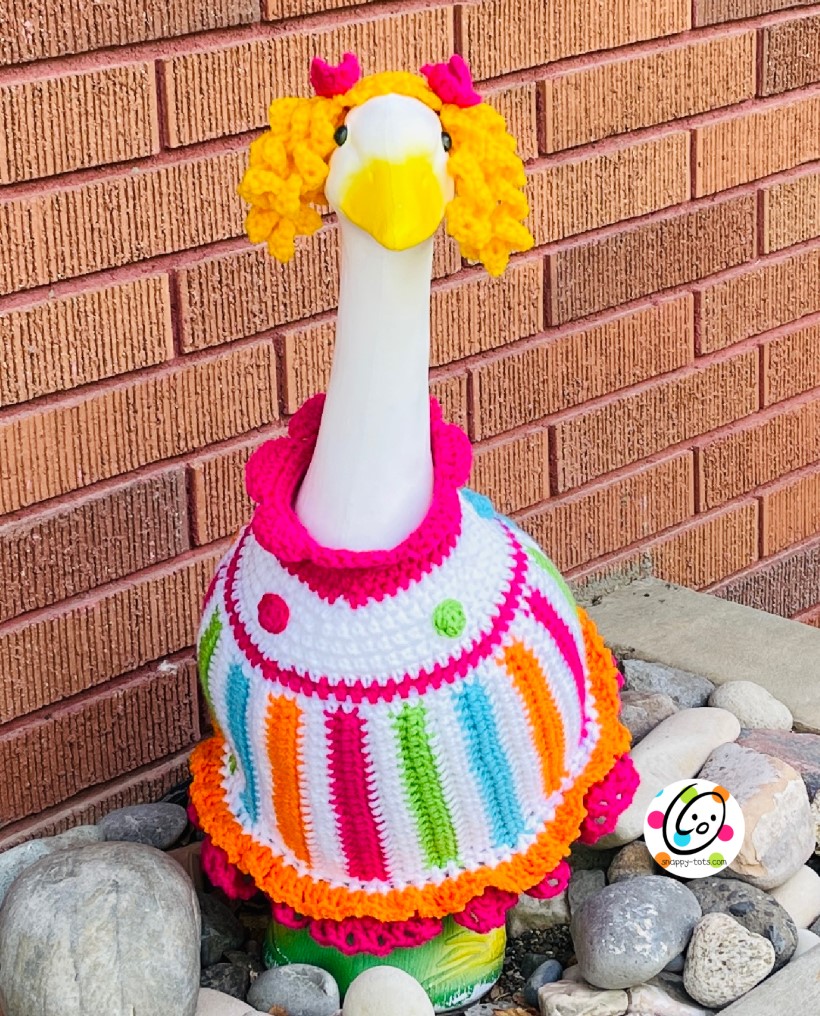
I designed this for my birthday so “Ducke” would have a very snappy, dress. It is so bright and cheerful! I was debating on which hat to make when I decided to make a curly “Miss Snappy” style wig instead.
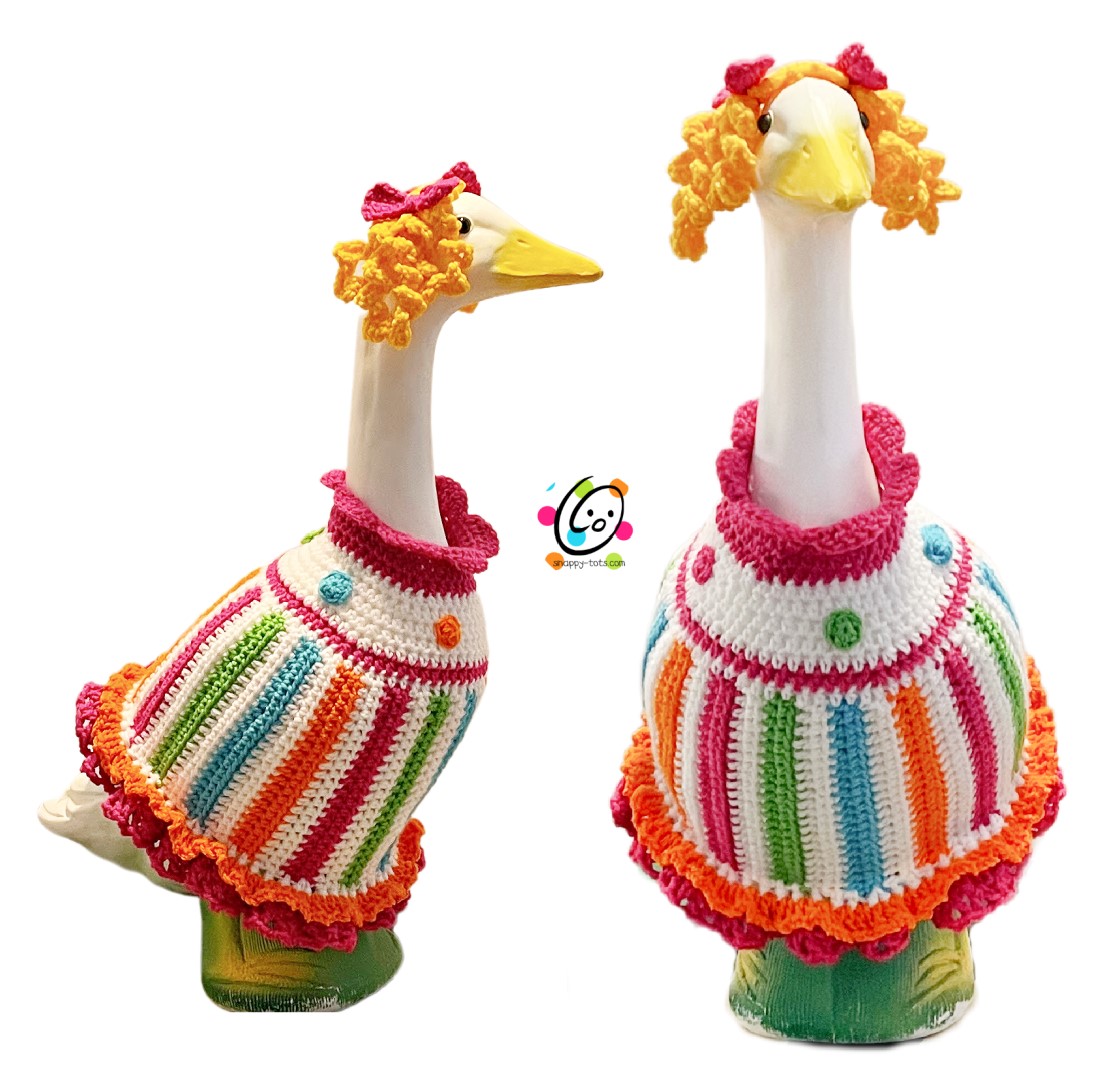
I can’t get over the cuteness!!! This makes me so happy. I hope your goose will love it too.
Watch for more fancy outfits to come each month. You can find the latest “Ducke and Goose” patterns at THIS LINK. See the full list of goose outfits and accessories at THIS LINK.
Where To Get The Goose
This is designed for a 23” goose statue like the one sold by Miles Kimball: https://www.mileskimball.com/buy-large-white-goose-23-h-310493
It is also available from Amazon: https://amzn.to/3AdRWSP
Snappy Goose Dress Crochet Pattern
The pattern for the dress is available to view here on the blog. The wig pattern is also free on my blog at this link: Goose Wigs.
An ad-free, downloadable pdf of the dress is also available to purchase from my shops: Ravelry | Etsy
Materials
- Worsted weight yarn: approximately 200 yards total. Sample colors: Red Heart Super Saver White, Spring Green, Turqua, Pumpkin, Shocking Pink
- Crochet Hook: I (5.5mm)
- Supplies: Yarn needle for weaving in ends
- Gauge: 4” with an I hook = 14 hdc sts and 9.5 rows/rounds
- Finished Measurements (measured flat): striped section – 13.5” across; neck – 6” across; length with ruffle – 12”
Tips
- The first stitch of each row is worked into the same stitch as the turning chain unless noted.
- Numbers at the beginning of each line may refer to steps and not indicate the number of rows/rounds.
- Stitch count remains the same unless noted at end of row/round.
- If you have any questions about this pattern please contact [email protected].
Color Suggestions
- The pattern is written with color changes for the multi-colored sample shown in this pattern. Substitute colors as desired.
- This could be made as a referree shirt, substituting black for each of the colored rows of the striped section. Then leave off the bottom ruffle and top turtleneck section.
- The top section could be all one color and the polka dots omitted.
Directions
This starts with the middle striped section, worked back and forth in rows. It is then joined into a tube and rounds added to the top and bottom.
Tip: Since I kept repeating the white yarn, I did not finish off the white yarn when changing to other colors. I carried it across one edge. This will be hidden when the top round is added.
Option A: Make your own color sequence
If you would prefer to create a different stripe sequence or use just one color, there needs to be a total of 64 rows. I worked stripes of four different colors with white between each stripe for a total of 8 stripes/ 16 rows.
Work steps 1 and 2 from Option B, then change colors as desired for an additional 62 rows or until the piece measures 27” long.
Option B: Same as main sample
1. With an I hook and white ww yarn, ch 21, hdc in the 2nd ch from hook and in each ch across. (20sts)
2. Ch 1, turn, hdc in the same st and in each st to end of row.
3. Change to orange yarn. Ch 1, turn, hdc in the same st and in each st to end of row.
4. Ch 1, turn, hdc in the same st and in each st to end of row.
5. Change back to white yarn. Ch 1, turn, hdc in the same st and in each st to end of row.
6. Ch 1, turn, hdc in the same st and in each st to end of row.
7. Change to pink yarn. Ch 1, turn, hdc in the same st and in each st to end of row.
8. Ch 1, turn, hdc in the same st and in each st to end of row.
9. Change back to white yarn. Ch 1, turn, hdc in the same st and in each st to end of row.
10. Ch 1, turn, hdc in the same st and in each st to end of row.
11. Change to green yarn. Ch 1, turn, hdc in the same st and in each st to end of row.
12. Ch 1, turn, hdc in the same st and in each st to end of row.
13. Change back to white yarn. Ch 1, turn, hdc in the same st and in each st to end of row.
14. Ch 1, turn, hdc in the same st and in each st to end of row.
15. Change to turquoise yarn. Ch 1, turn, hdc in the same st and in each st to end of row.
16. Ch 1, turn, hdc in the same st and in each st to end of row.
17. Change back to white yarn. Ch 1, turn, hdc in the same st and in each st to end of row.
18. Ch 1, turn, hdc in the same st and in each st to end of row.
19. Change to orange yarn. Ch 1, turn, hdc in the same st and in each st to end of row.
20. Ch 1, turn, hdc in the same st and in each st to end of row.
21. Change back to white yarn. Ch 1, turn, hdc in the same st and in each st to end of row.
22. Ch 1, turn, hdc in the same st and in each st to end of row.
23. Change to pink yarn. Ch 1, turn, hdc in the same st and in each st to end of row.
24. Ch 1, turn, hdc in the same st and in each st to end of row.
25. Change back to white yarn. Ch 1, turn, hdc in the same st and in each st to end of row.
26. Ch 1, turn, hdc in the same st and in each st to end of row.
27. Change to green yarn. Ch 1, turn, hdc in the same st and in each st to end of row.
28. Ch 1, turn, hdc in the same st and in each st to end of row.
29. Change back to white yarn. Ch 1, turn, hdc in the same st and in each st to end of row.
30. Ch 1, turn, hdc in the same st and in each st to end of row.
31. Change to turquoise yarn. Ch 1, turn, hdc in the same st and in each st to end of row.
32. Ch 1, turn, hdc in the same st and in each st to end of row.
Repeat steps 17-32 two more times. The rectangle should measure 27” long x 6” wide. If it is not close to 27” please adjust the number of rows. It is important to match this length so it will fit the goose.
Finish off, leaving a tail at the end. Weave in all other yarn tails.
Fold the piece in half with right sides together, matching the short ends together. With a yarn needle, use the end yarn tail to sew the short ends together. Turn the piece right side out.
Top of Dress
Variation idea: For a t-shirt/plain top edge, work the first 3 rounds, finish off and end there.
1. Note: I suggest using the main yarn (white in sample) for this step. The stitches will blend in better than if a contrasting yarn is used. The stitches of the first round are worked into the ends of the stripes.
With an I hook and white yarn, sl st in the end of any row on one edge of the striped tube.
Ch 1, hdc in the same st, hdc one st at the end of each row, sl st to join. (64sts)
Note: if you adjusted the number of rows from the striped section please space the 64 sts evenly across the edge.
2. Do not finish off the white yarn. Change to pink yarn. Ch 1, hdc in the same st, hdc 13, hdc2tog, *hdc 14, hdc2tog*, repeat to end of round, sl st to join. (60sts)
3. Finish off the pink yarn and change back to the white yarn. Ch 1, hdc in the same st, hdc 12, hdc2tog, *hdc 13, hdc2tog*, repeat to end of round, sl st to join. (56sts)
4. Ch 1, hdc in the same st, hdc 11, hdc2tog, *hdc 12, hdc2tog*, repeat to end of round, sl st to join. (52sts)
5. Ch 1, turn, hdc in the same st and in each st to end of row.
6. Ch 1, hdc in the same st, hdc 10, hdc2tog, *hdc 11, hdc2tog*, repeat to end of round, sl st to join. (48sts)
7. Ch 1, hdc in the same st, hdc 9, hdc2tog, *hdc 10, hdc2tog*, repeat to end of round, sl st to join. (44sts)
8. Finish off the white yarn and change to pink yarn. Ch 1, hdc in the same st, hdc 8, hdc2tog, *hdc 9, hdc2tog*, repeat to end of round, sl st to join. (40sts)
9. Ch 1, turn, hdc in the same st and in each st to end of row.
10. Ch 1, hdc in the same st, hdc 5, hdc2tog, *hdc 6, hdc2tog*, repeat to end of round, sl st to join. (35sts)
11. Ch 1, turn, hdc in the same st and in each st to end of row.
12. Ch 1, hdc in the same st, 2dc in the next st, 2dc in the next st, hdc, ch 1, sl st in the next st, *sl st in the next st, hdc in the same st, 2dc in the next st, 2dc in the next st, hdc, ch 1, sl st in the next st*, repeat to end of round, sl st in the base of the first ch to join. (7 petals) Finish off and weave in ends.
Polka Dots (make 5)
With an I hook and worsted weight yarn, create a magic loop of 6 hdc sts (or preferred method of creating a circle of 6 hdc sts), pull closed and sl st to join. (6sts) Finish off, leaving a long tail for sewing in place.
Check placement so the dots will be evenly spaced around the white section.
With a yarn needle, use the yarn tail from each dot to sew them to the white section.
Bottom of Dress
Variation idea: For a t-shirt/plain bottom edge, work the first 3 rounds, finish off and end there.
1. Note: I suggest using the main yarn (white in sample) for this step. The stitches will blend in better than if a contrasting yarn is used. The stitches of the first round are worked into the ends of the stripes.
With an I hook and white yarn, sl st in the end of any row on the opposite edge of the striped tube.
Ch 1, hdc in the same st, hdc in the end of each of the next 6 stripes, 2hdc in the end of the next stripe, *hdc in the end of each of the next 7 stripes, 2hdc in the end of the next stripe*, repeat to end of round, sl st to join. (72sts)
Note: if you adjusted the number of rows from the striped section please adjust st placement as needed to end with 72 sts.
2. Ch 1, BPHDC around each of the next 11 posts, 2BPHDC around the next post*, repeat to end of round, sl st to join. (78sts)
3. This step creates the bottom ruffle (pink in sample). Finish off the white yarn and change to pink yarn. Ch 5, dc in the same st, *(dc, ch 2, dc) in the next st*, repeat to end of round, sl st in the first space to join.
4. Ch 6, dc in the same space, *(dc, ch 3, dc) in the next space*, repeat to end of round, sl st in the first space to join. Finish off and weave in ends.
5. This step creates the top ruffle (orange in sample). With an I hook and orange yarn, sl st in a st on the ridge created on step 2. See photo below. Ch 5, dc in the same st, *(dc, ch 2, dc) in the next st*, repeat to end of round, sl st in the first space to join. Finish off and weave in ends.

Variation

If your goose will be heading to the beach, this could be made as a beach towel.
For this option, work the center striped section from the main instructions as written. Do not sew the ends together.
If you carried yarn across one edge you will want to work one row of sc across that edge of the piece to cover the yarn tails.
The towel could overlap at the top corners and be sewn together.