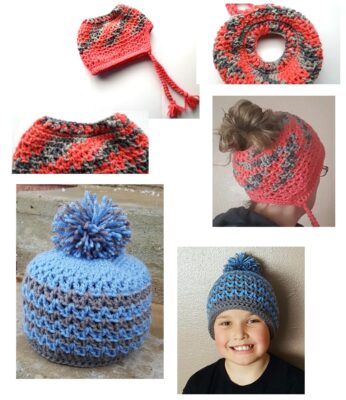
Free Pattern: Alyssa Beanie
Lately I have found myself trying harder than ever to focus on the happy things in life. I’ve even found myself making lists of the good to avoid spiraling into the negative that is so consuming.
Some of the main points: The people I love and who love me. Truly nice, positive people who look to build up others instead of assuming the worst in others. Everyone who takes time to make the world better, even in the smallest ways.
This past week I tackled a part of my world that has been eating away at me year after year. Something I have kept tucked away behind a door in the corner of my basement where no one goes. My craft room. It gets ignored because I always say “I will put that away when I have time…I will clear out the things I don’t use… I will organize my supplies another time…It only affects me and can wait.” BUT It does affect others because it has such a negative impact on me. I never started because it overwhelmed me. My husband was gone last week and I MADE MYSELF totally gut the room. I DID IT!!! Is it perfect? no. Can I find stuff, is it organized, does everything have a place? YES! Does it relieve stress and make me feel better about myself? YES!
How many times do you think “that can wait… others need more of me than I need of myself”?
As I was going through my samples and sorting them into 24.. TWENTY FOUR… BIG totes it was a big BOOST to my self esteem. I loved seeing my creations and the memories attached to so many of them. I have decided to share some of my most favorites with you in hopes they will make you smile and give you a boost.
The Alyssa Beanie
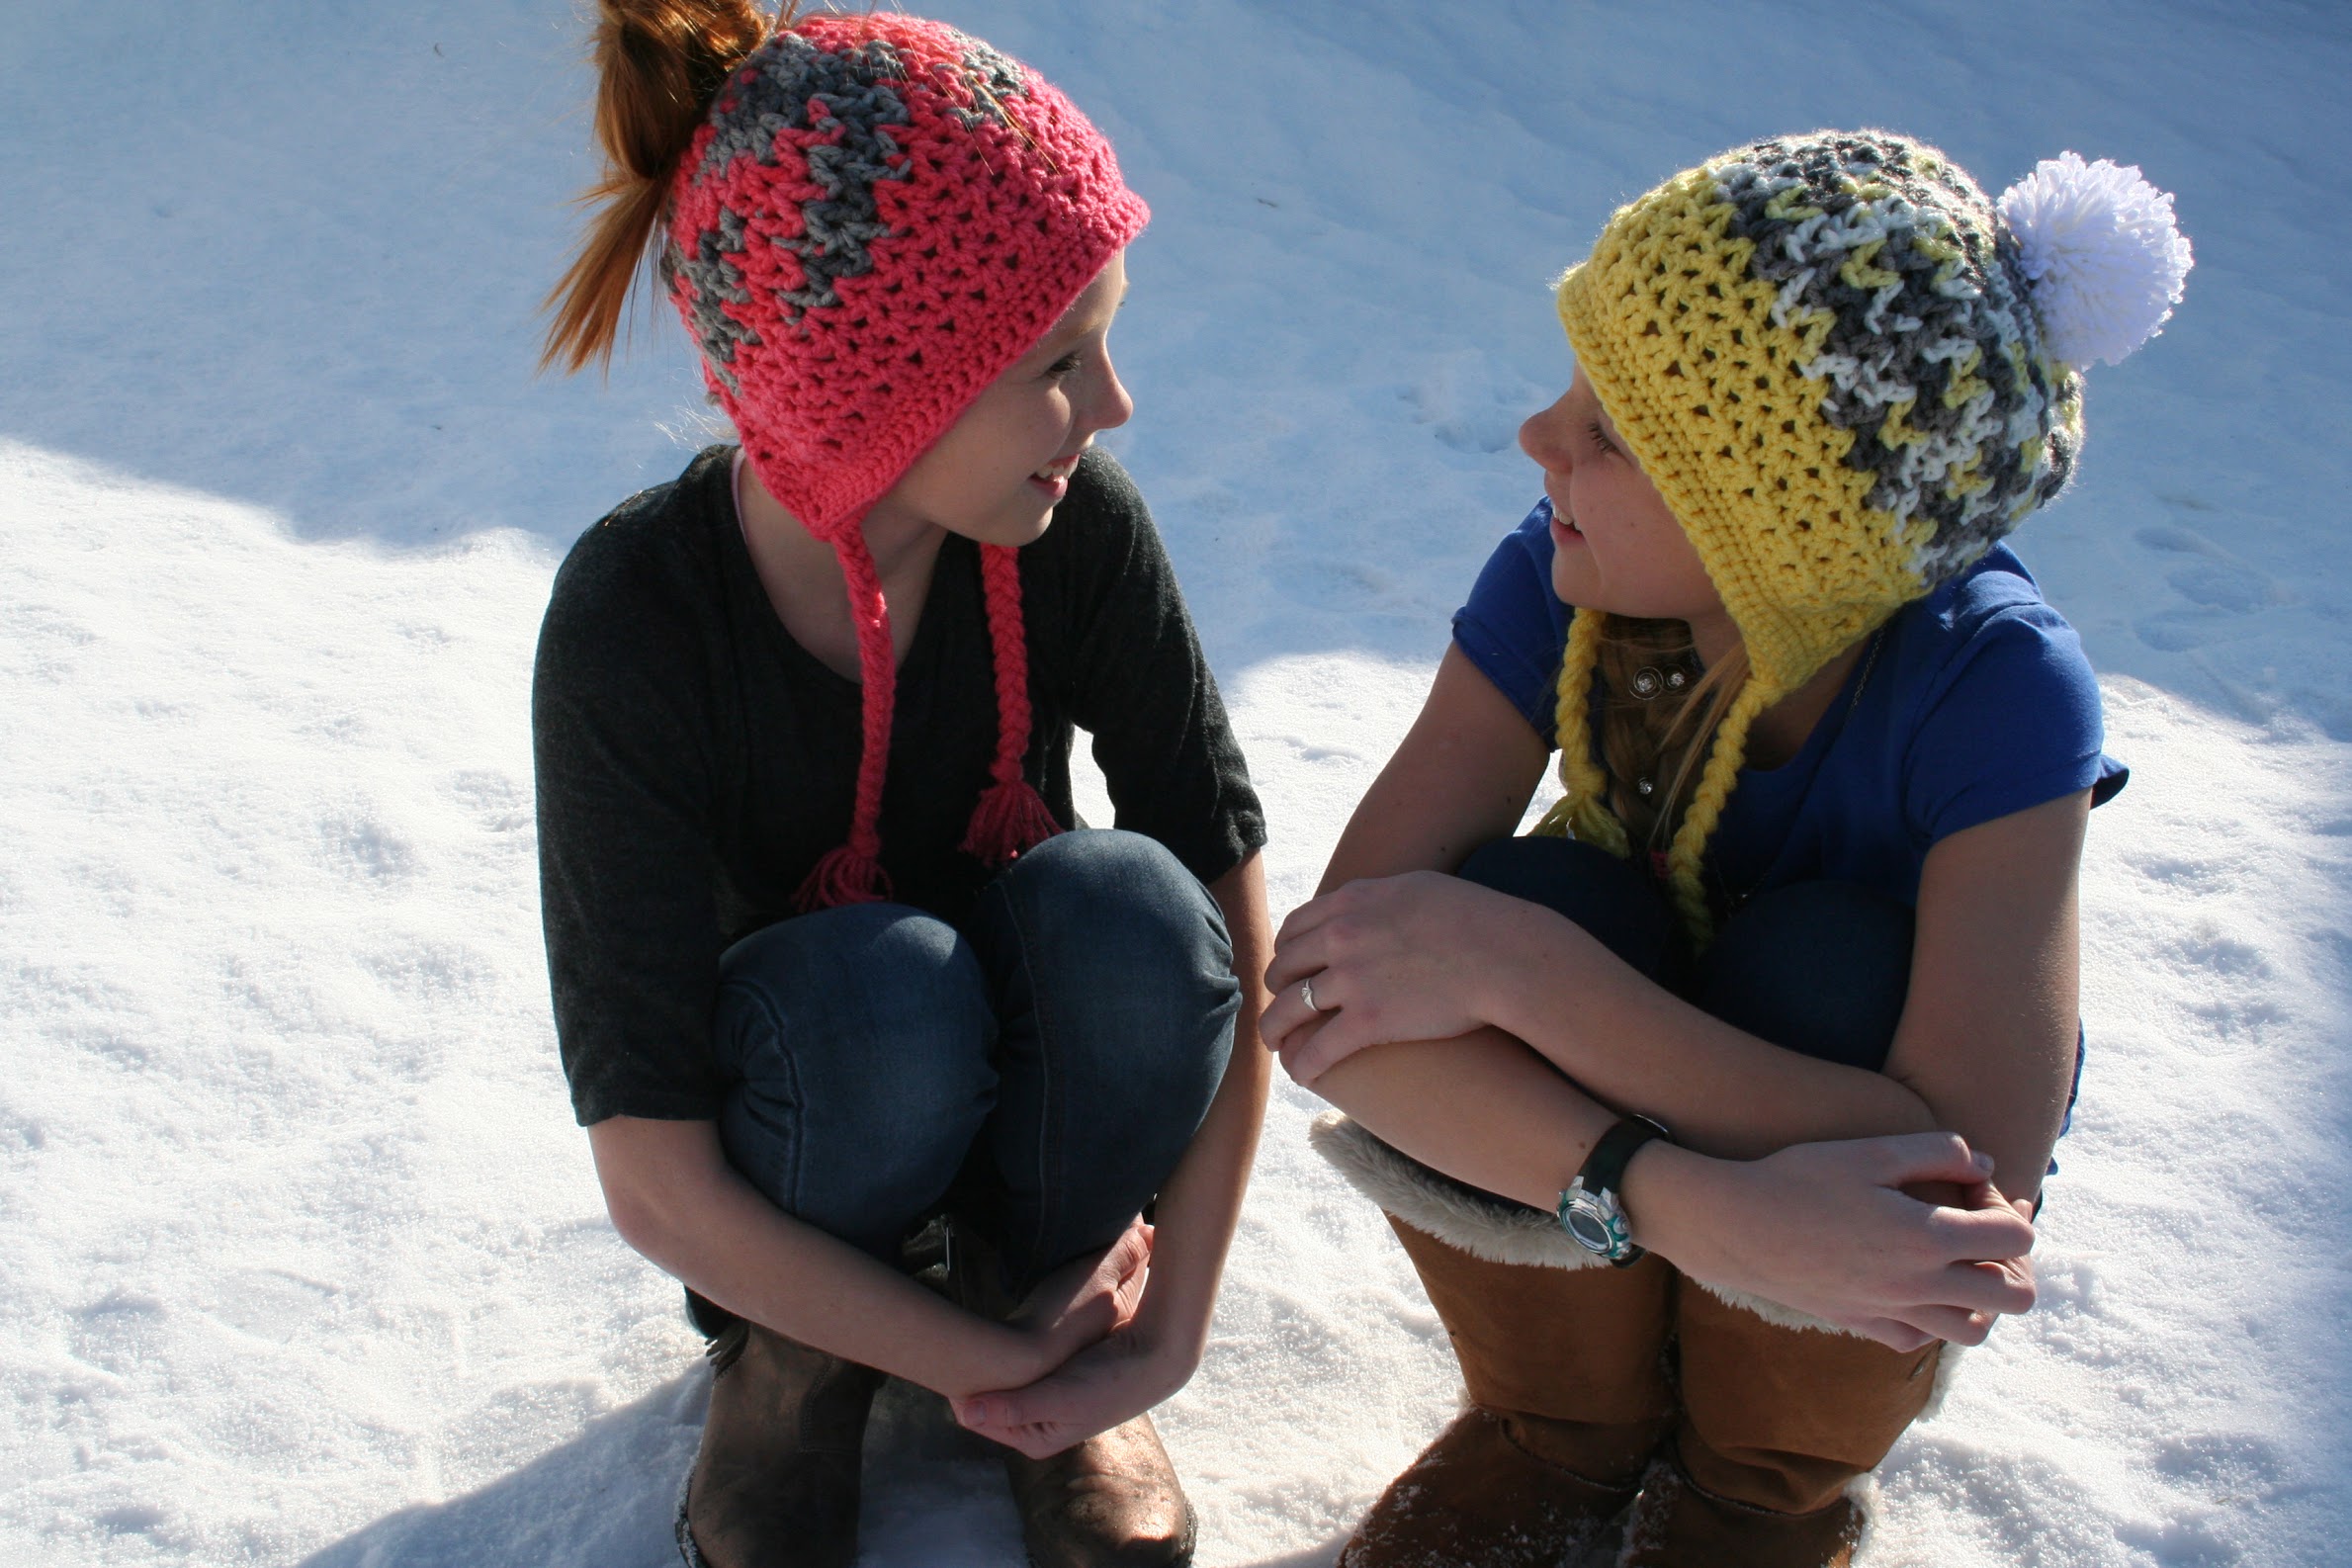
I love this beanie so much. The bottom edge is unique and super cute. There are different options for the top too.

Another reason I love this so much is because of these two adorable young ladies… two sisters who used to live around the corner from me. They are wonderful people, from an outstanding family who would honestly do anything for anyone. They are both in college now. I wish them the very best in life!
Alyssa Beanie Crochet Pattern
“Make Ahead Monday” project. Get this pattern FREE for a limited time: CLICK HERE to download the pdf of this pattern for free until 11/15/23 with coupon code: mam23 Make sure you enter the coupon code and it changes to free BEFORE checking out.
Materials and Details
- Yarn: worsted weight in a variety of colors. Samples were made with one solid and one variegated yarn
- Hooks: I (5.5mm), J (6mm)
- Miscellaneous: Yarn needle
- Gauge with J hook: 4” = 5 clusters and 7 rounds
- Sizes: Toddler, Small Child (2-4 years), Child (5-12 years), Teen/Adult
About This Pattern: The shape of this hat came about by accident while making a hood for another design. It fit more like a beanie than a hood. While trying it on, we decided the fit created a great beanie with the look of earflaps. I love so many things about this beanie, especially the finished edge. It has a loose fit so if you tend to crochet loosely, you may want to use one size smaller hook. I hope you will enjoy making this hat.
Tips for all sizes:
- Stitch count remains the same unless noted at the end of the round.
- Samples were started with a variegated yarn. Switch to a solid color when noted in pattern.
- Please look over entire pattern first.
- This is a loose fitting hat. Plus, the v stitch can end up being pretty loose. Please check gauge and don’t get too loose or you could end up with a pretty big hat.
Toddler And Child Small Sizes
Beanie Instructions for a regular beanie without flaps and braids can be found after this pattern. Choose from one of the following options for the beginning of the hat:
Messy Bun/Ponytail Opening (see photos on page 7)
- With I hook and worsted weight yarn, ch 30. Sl st in last ch from hook to join in a circle. Make sure the chain is not twisted. (30sts)
- Ch 1, *sc 4, 2sc in next st*, repeat to end of round, sl st to join. (36sts)
- Ch 2, *hdc 2, 2hdc in next st*, repeat to end of round, sl st to join. (48sts)
- Ch 2, FPHDC around next post, BPHDC around next post, repeat to end of round, sl st to join. Change to a J hook for Child Small size. Continue with step 7 of main hat instructions below.
Regular Beanie Top Use an I hook for toddler size and a J hook for Child Small.
- With hook and yarn color of choice for top part of hat, start with a magic circle of 8 sts (or preferred method for starting a circle of 8 sc sts), join with a sl st and pull closed. (8sts)
- Ch 1, 2sc in each stitch to end of round, sl st to join. (16sts)
- Ch 1, *sc, 2sc in next st*, repeat to end of round, sl st to join. (24sts)
- Ch 1, *sc 2, 2sc in next st*, repeat to end of round, sl st to join. (32sts)
- Ch 1, *sc 3, 2sc in next st*, repeat to end of round, sl st to join. (40sts)
- Ch 1, *sc 4, 2sc in next st*, repeat to end of round, sl st to join. (48sts) 4.75” across. Continue with step 7 of main hat instructions below.
Main Hat
- Ch 2, hdc in each st to end of round, sl st to join.
- Ch 3, hdc in same st (first V stitch made), sk 1, *(hdc, ch 1, hdc) in next st, sk 1*, repeat to end of round, sl st in 2nd beginning chain to join. (24 v sts)
- Change yarn colors here if desired. Ch 3, dc in same st (first V stitch made), *(dc, ch 1, dc) in v stitch (ch 1 space) below*, repeat to end of round, sl st in 2nd beginning chain to join. 10-13. Ch 3, dc in same st (first V stitch made), *(dc, ch 1, dc) in next v st*, repeat to end of round, sl st in 2nd beginning chain to join. For messy bun version, omit one round from this section.
- Ch 3, dc in same st (first V stitch made), *(dc, ch 1, dc) in next v st*, repeat until 3 v sts remain. This step starts the neck opening. (21 v sts)
- Notice the change in sts from dc to hdc on this row. Ch 3, turn, hdc in same st, *(hdc, ch 1, hdc) in next v st*, repeat to end of row.
- Ch 3, turn, hdc in same st, *(hdc, ch 1, hdc) in next v st*, repeat to end of row.
- Be careful to not work this row too tight. Ch 1, turn. Sc between each v st and in the ch 1 space of each v st. (41sts)
- Do NOT turn. This step starts in the neck opening. 2sc in same space, and in each space down side of neck opening. Sc 9 (one st in each st across neck). 2sc in each space up side of neck opening. Sl st in next st (first st of front opening) to finish off this row. (22sts)
- Ch 1, sc in each st across front opening of hat. This does NOT include the neck opening. (42sts)
- Ch 2, turn. The wrong side of the hat should be towards you at this point. Hdc in each st across front opening of hat. This does NOT include the neck opening.
- Ch 1, turn, BPHDC around each post from previous row.
- Do not turn. This step will be worked from left to right across the front of the hat. With right side of hat facing and top of hat towards you, insert hook between first two posts from previous row. Pull up a loop and pull through loop on hook. Insert hook between next two posts from previous row. Pull up a loop and pull through loop on hook, repeat across front of hat until 1 st remains. Sl st in last st instead of working around the post.
- Ch 1, turn to work along neck edge. Sc 3 sts evenly across edge until sts begin. Sc in each st. Sc 3 sts evenly across last section of neck. (28sts)
- Do NOT ch 1. Turn. Sl st in next st and in each st to end of neck section. See help video for this step: https://youtu.be/ccBgsr8dQcU Please be aware the hat shown in the video is slightly different from your project, but the stitch is done the same. Finish off and weave in ends. Follow instructions further down for adding pompom and braids.
Regular Beanie (with band instead of earflaps and braids) Choose from one of the following options for the beginning of the hat:
Messy Bun/Ponytail Opening (see photos on page 7)
- With I hook and worsted weight yarn, ch 30. Sl st in last ch from hook to join in a circle. Make sure the chain is not twisted. (30sts)
- Ch 1, *sc 4, 2sc in next st*, repeat to end of round, sl st to join. (36sts)
- Ch 2, *hdc 2, 2hdc in next st*, repeat to end of round, sl st to join. (48sts)
- Ch 2, FPHDC around next post, BPHDC around next post, repeat to end of round, sl st to join. Change to a J hook for Child Small size. Continue with step 7 of main hat instructions below.
Regular Beanie Top Use an I hook for toddler size and a J hook for Child Small.
- With hook and yarn color of choice for top part of hat, start with a magic circle of 8 sts (or preferred method for starting a circle of 8 sc sts), join with a sl st and pull closed. (8sts)
- Ch 1, 2sc in each stitch to end of round, sl st to join. (16sts)
- Ch 1, *sc, 2sc in next st*, repeat to end of round, sl st to join. (24sts)
- Ch 1, *sc 2, 2sc in next st*, repeat to end of round, sl st to join. (32sts)
- Ch 1, *sc 3, 2sc in next st*, repeat to end of round, sl st to join. (40sts)
- Ch 1, *sc 4, 2sc in next st*, repeat to end of round, sl st to join. (48sts) 4.75” across. Continue with step 7 of main hat instructions below.
Main Hat
- Ch 2, hdc in each st to end of round, sl st to join.
- Ch 3, hdc in same st (first V stitch made), sk 1, *(hdc, ch 1, hdc) in next st, sk 1*, repeat to end of round, sl st in 2nd beginning chain to join. (24 v sts)
- Change yarn colors here if desired. Ch 3, dc in same st (first V stitch made), *(dc, ch 1, dc) in v stitch (ch 1 space) below*, repeat to end of round, sl st in 2nd beginning chain to join. 10-15. Ch 3, dc in same st (first V stitch made), *(dc, ch 1, dc) in next v st*, repeat to end of round, sl st in 2nd beginning chain to join. For messy bun version, omit one round from this section.
- Be careful to not work this row too tight. Ch 1, sc between each v st and in the ch 1 space of each v st. (48sts)
- Ch 2, Hdc in each st to end of round, sl st to join.
- Ch 1, BPHDC around each post from previous round, sl st to join.
- This step will be worked from left to right across the front of the hat. Insert hook between first two posts from previous row. Pull up a loop and pull through loop on hook. Insert hook between next two posts from previous row. Pull up a loop and pull through loop on hook, repeat to end of round. See help video for this step: https://youtu.be/ccBgsr8dQcU Please be aware the hat shown in the video is slightly different from your project, but the stitch is done the same. Finish off and weave in ends.
Child (5-12 years) and Teen/Adult Sizes
Beanie With Braids Instructions for a regular beanie without flaps and braids can be found after this pattern. Choose from one of the following options for the beginning of the hat:
Messy Bun/Ponytail Opening (see photos on page 7)
- With I hook and worsted weight yarn, ch 30. Sl st in last ch from hook to join in a circle. Make sure the chain is not twisted. (30sts)
- Ch 1, *sc 4, 2sc in next st*, repeat to end of round, sl st to join. (36sts)
- Ch 2, *hdc 2, 2hdc in next st*, repeat to end of round, sl st to join. (48sts)
- Ch 2, FPHDC around next post, BPHDC around next post, repeat to end of round, sl st to join. Change to a J hook for teen/adult size. Continue with step 7 of main hat instructions below.
Regular Beanie Top Use an I hook for child size and a J hook for Teen/Adult size.
- With hook and yarn color of choice for top part of hat, start with a magic circle of 8 sts (or preferred method for starting a circle of 8 sc sts), join with a sl st and pull closed. (8sts)
- Ch 1, 2sc in each stitch to end of round, sl st to join. (16sts)
- Ch 1, *sc, 2sc in next st*, repeat to end of round, sl st to join. (24sts)
- Ch 1, *sc 2, 2sc in next st*, repeat to end of round, sl st to join. (32sts)
- Ch 1, *sc 3, 2sc in next st*, repeat to end of round, sl st to join. (40sts)
- Ch 1, *sc 4, 2sc in next st*, repeat to end of round, sl st to join. (48sts)
Main Hat
- Ch 1, *sc 5, 2sc in next st*, repeat to end of round, sl st to join. (56sts) 5.25” across
- Ch 2, hdc in each st to end of round, sl st to join.
- Ch 3, hdc in same st (first V stitch made), sk 1, *(hdc, ch 1, hdc) in next st, sk 1*, repeat to end of round, sl st in 2nd beginning chain to join. (28 v stitches)
- Change yarn colors here if desired. Ch 3, dc in same st (first V stitch made), *(dc, ch 1, dc) in v stitch (ch 1 space) below*, repeat to end of round, sl st in 2nd beginning chain to join. 11-15. Ch 3, dc in same st (first V stitch made), *(dc, ch 1, dc) in next v st*, repeat to end of round, sl st in 2nd beginning chain to join. For messy bun version, omit one round from this section.
- Ch 3, dc in same st (first V stitch made), *(dc, ch 1, dc) in next v st*, repeat until 3 v sts remain. This step starts the neck opening. (25 v sts)
- Ch 3, turn, dc in same st, *(dc, ch 1, dc) in next v st*, repeat to end of row.
- Ch 3, turn, dc in same st, *(dc, ch 1, dc) in next v st*, repeat to end of row.
- Be careful to not work this row too tight. Ch 1, turn. Sc between each v st and in the ch 1 space of each v st. (49sts)
- Do NOT turn. This step starts in the neck opening. 2sc in same space, and in each space down side of neck opening. Sc 9 (one st in each st across neck). 2sc in each space up side of neck opening. Sl st in next st (first st of front opening) to finish off this row. (22sts at neck)
- Ch 1, sc in each st across front opening of hat. This does NOT include the neck opening. (50sts)
- Ch 2, turn. The wrong side of the hat should be towards you at this point. Hdc in each st across front opening of hat. This does NOT include the neck opening.
- Ch 1, turn, BPHDC around each post from previous row.
- Do not turn. This step will be worked from left to right across the front of the hat. With right side of hat facing and top of hat towards you, insert hook between first two posts from previous row. Pull up a loop and pull through loop on hook. Insert hook between next two posts from previous row. Pull up a loop and pull through loop on hook, repeat across front of hat until 1 st remains. Sl st in last st instead of working around the post.
- Ch 1, turn to work along neck edge. Sc 3 sts evenly across edge until sts begin. Sc in each st. Sc 3 sts evenly across last section of neck. (28sts)
- Do NOT ch 1. Turn. Sl st in next st and in each st to end of neck section. See help video for this step: https://youtu.be/ccBgsr8dQcU Please be aware the hat shown in the video is slightly different from your project, but the stitch is done the same. Finish off and weave in ends. Follow instructions below for adding pompom and braids.
Braids Cut 9 pieces of matching yarn per braid, 18-24” long. The braids are added on the bottom edge of the hat where the front of opening and neck section meet. Use a crochet hook to pull one end of the strands through the st. Pull ends through until yarn is folded in half. Divide into three sections (either group like colors together or mix for a variegated look) and braid to end. Tie a knot approximately 2” from end. Trim ends of braid. Repeat for second braid.
PomPom (for top of hat) Hold one strand of each color and wrap 70 times around the palm of your hand (wrap more times for a thicker pom). Carefully slide the yarn off your hand and wrap an 8” length of yarn around the center, pulling tight and knotting to hold in place. Do NOT cut this piece of yarn. Cut loops of pompom (sometimes I leave a few or all loops uncut for a whimsical pompom). Thread end of the yarn you tied around the pom through a yarn needle. Trim pompom as desired. Tie securely to the top of the hat.
Regular Beanie (with band instead of earflaps and braids)Choose from one of the following options for the beginning of the hat:
Messy Bun/Ponytail Opening (see photos on page 7)
- With I hook and worsted weight yarn, ch 30. Sl st in last ch from hook to join in a circle. Make sure the chain is not twisted. (30sts)
- Ch 1, *sc 4, 2sc in next st*, repeat to end of round, sl st to join. (36sts)
- Ch 2, *hdc 2, 2hdc in next st*, repeat to end of round, sl st to join. (48sts)
- Ch 2, FPHDC around next post, BPHDC around next post, repeat to end of round, sl st to join. Change to a J hook for teen/adult size. Continue with step 7 of main hat instructions below.
Regular Beanie Top Use an I hook for child size and a J hook for Teen/Adult size.
- With hook and yarn color of choice for top part of hat, start with a magic circle of 8 sts (or preferred method for starting a circle of 8 sc sts), join with a sl st and pull closed. (8sts)
- Ch 1, 2sc in each stitch to end of round, sl st to join. (16sts)
- Ch 1, *sc, 2sc in next st*, repeat to end of round, sl st to join. (24sts)
- Ch 1, *sc 2, 2sc in next st*, repeat to end of round, sl st to join. (32sts)
- Ch 1, *sc 3, 2sc in next st*, repeat to end of round, sl st to join. (40sts)
- Ch 1, *sc 4, 2sc in next st*, repeat to end of round, sl st to join. (48sts)
Main Hat
- Ch 1, *sc 5, 2sc in next st*, repeat to end of round, sl st to join. (56sts) 5.25” across
- Ch 2, hdc in each st to end of round, sl st to join.
- Ch 3, hdc in same st (first V stitch made), sk 1, *(hdc, ch 1, hdc) in next st, sk 1*, repeat to end of round, sl st in 2nd beginning chain to join. (28 v stitches)
- Change yarn colors here if desired. Ch 3, dc in same st (first V stitch made), *(dc, ch 1, dc) in v stitch (ch 1 space) below*, repeat to end of round, sl st in 2nd beginning chain to join. 11-18. Ch 3, dc in same st (first V stitch made), *(dc, ch 1, dc) in next v st*, repeat to end of round, sl st in 2nd beginning chain to join. For messy bun version, omit one round from this section.
- Be careful to not work this row too tight. Ch 1, sc between each v st cluster and in the ch 1 space of each cluster. (56sts)
- Ch 2, Hdc in each st to end of round, sl st to join.
- Ch 1, BPHDC around each post from previous round, sl st to join.
- This step will be worked from left to right across the front of the hat. Insert hook between first two posts from previous row. Pull up a loop and pull through loop on hook. Insert hook between next two posts from previous row. Pull up a loop and pull through loop on hook, repeat to end of round. See help video for this step: https://youtu.be/ccBgsr8dQcU Please be aware the hat shown in the video is slightly different from your project, but the stitch is done the same. Finish off and weave in ends.
Messy Bun and Regular Beanie Samples