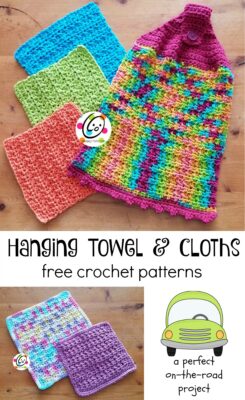
Free Pattern: On the Road Cloths
Cloths are one of my favorite things to make because they are great projects for on the go. Recently, I made these while flying to visit my daughter in Texas.
I hope you will enjoy these projects.
On The Road Cloths
On The Road Dishcloth Crochet Patterns
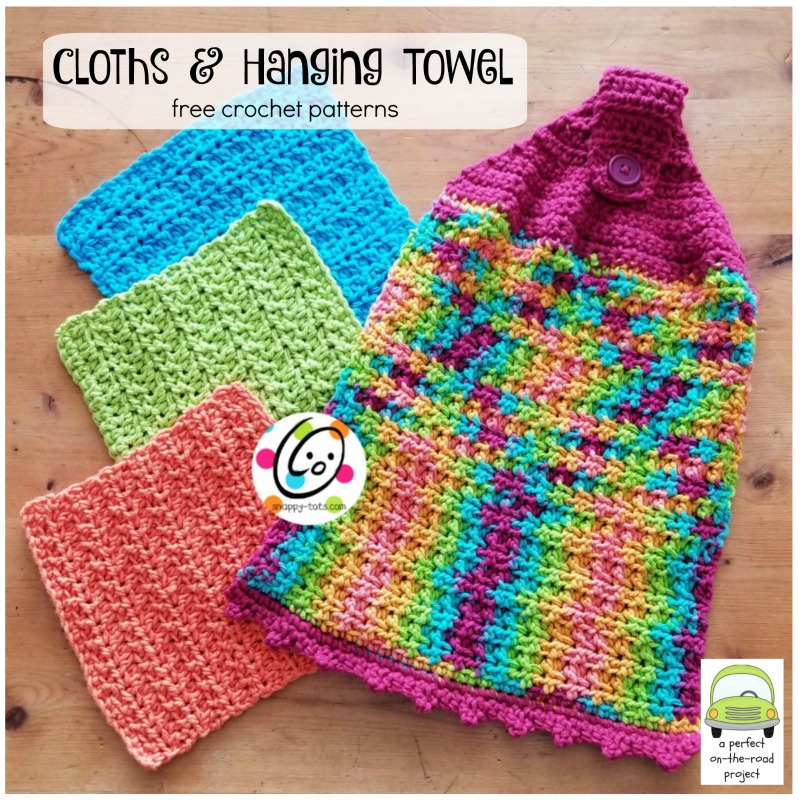
These patterns are available for free below. An ad-free, downloadable PDF of these patterns with all of the photos is available to purchase from my Ravelry Shop: Click HERE

Description
- Simple and customizable cloths. Can be made any size.
- Skill Level: Basic crochet skills are needed and must be able to read a crochet pattern.
Materials
- Cotton Yarn: 80 – 95 yards
- Crochet Hooks: H/5 mm
- Miscellaneous: Yarn needle for weaving in ends
Details
- Finished Measurements: Small – 6.5-7” square (solid cloths in photo); Large – 8.5-9” square (variegated cloth in photo)
Tips
- First stitch of each row is worked into the same stitch as the turning chain.
- Numbers at the beginning of each line may refer to steps and not indicate number of rows.
Disclaimers
This pattern was written for specific yarn weights. When substituting yarns, please choose yarns of similar weight/thickness. Different yarns may produce a different outcome, including size and shape.
Small Cloth
- With an H hook and cotton yarn, ch 26, sc in 2nd ch from hook and in each ch across. (25sts)
- Ch 2, turn, hdc in same st, *hdc in FLO, hdc in BLO*, repeat until 1 st remains, hdc in last st.
- Repeat previous step until cloth is square.
- Ch 1, turn, sc in each st to end of row. If a border will be added do not finish off.
Finish off and weave in ends.
Border (optional)
If you would like to add a border around the outer edge do not finish off the yarn at the end of step 4.
This step is worked around the outer edge of the cloth. Ch 1, sc in same st. Pivot piece to the left. Sc evenly down side to corner. (sc, ch 1, sc) in corner st. Sc in each st across bottom edge of cloth, working (sc, ch 1, sc) in corner. Sc evenly up side to corner, working (sc, ch 1, sc) in corner. Sc in each st across top edge of cloth, sl st to join.
Large Cloth
- With an H hook and cotton yarn, ch 41, sc in 2nd ch from hook and in each ch across. (40sts)
- Ch 2, turn, hdc in same st, *hdc in FLO, hdc in BLO*, repeat until 1 st remains, hdc in last st.
- Repeat previous step until cloth is square.
- Ch 1, turn, sc in each st to end of row. Finish off and weave in ends.
Border (optional)
If you would like to add a border around the outer edge do not finish off the yarn at the end of step 4.
This step is worked around the outer edge of the cloth. Ch 1, sc in same st. Pivot piece to the left. Sc evenly down side to corner. (sc, ch 1, sc) in corner st. Sc in each st across bottom edge of cloth, working (sc, ch 1, sc) in corner. Sc evenly up side to corner, working (sc, ch 1, sc) in corner. Sc in each st across top edge of cloth, sl st to join.
On The Road Hanging Hand Towel

Materials
- Cotton Yarn: 95 yards main color, 30 yards contrast color. Sample yarn: Crafters Secret Hot Spot; Sugar N Cream Wine
- Crochet Hooks: H/5 mm
- Miscellaneous: Yarn needle for weaving in ends, 1” button for closure
Details
- Finished Measurements: 15” long x 9.5” wide
Tips
- First stitch of each row is worked into the same stitch as the turning chain.
- Numbers at the beginning of each line may refer to steps and not indicate number of rows.
Disclaimers
This pattern was written for specific yarn weights. When substituting yarns, please choose yarns of similar weight/thickness. Different yarns may produce a different outcome, including size and shape.
A color pattern was created in the sample totally by chance. I do not know if your project will end up with the same color pooling.
1. With an H hook and cotton yarn, ch 41, sc in 2nd ch from hook and in each ch across. (40sts)
2. Ch 2, turn, hdc in same st, *hdc in FLO, hdc in BLO*, repeat until 1 st remains, hdc in last st.
3. Repeat previous step until cloth is square.
4. Ch 1, turn, *sc2tog, sc 8*, repeat to end of row. (36sts)
5. Ch 1, turn, *sc2tog, sc 7*, repeat to end of row. (32sts)
6. Ch 1, turn, *sc2tog, sc 6*, repeat to end of row. (28sts)
7. Ch 1, turn, *sc2tog, sc 5*, repeat to end of row. (24sts)
8. Ch 1, turn, *sc2tog, sc 4*, repeat to end of row. (20sts)
9. Ch 1, turn, *sc2tog, sc 3*, repeat to end of row. (16sts)
10. Change yarn color if desired. Ch 2, turn, hdc in each st to end of row.
11. Ch 2, turn, *hdc2tog, hdc 6*, repeat once. (14sts)
12. Ch 2, turn, *hdc2tog, hdc 5*, repeat once. (12sts)
13. Ch 2, turn, hdc in each st to end of row.
14. Ch 2, turn, *hdc2tog, hdc 4*, repeat once. (10sts)
15. Ch 2, turn, hdc in each st to end of row.
16. Ch 2, turn, *hdc2tog, hdc 3*, repeat to end of row. (8sts)
17. Ch 2, turn, *hdc2tog, hdc 2*, repeat to end of row. (6sts) 18-27. Ch 2, turn, hdc in each st to end of row.
28. Ch 1, turn, sc 2, ch 3, sk 2, sc 2.
29. Ch 1, turn, sc2tog, sc 2 in space, sc2tog. Finish off and weave in end. Button: with yarn needle and matching yarn, sew button to top of cloth before the skinny section begins.
The side with the button on it is referred to as the “right side” in next step.
Bottom Trim
1. With wrong side facing, use an H hook to attach contrasting yarn to the first stitch on bottom edge. Ch 1, sc in each st to end of row.
2. This step creates the picots/points across the bottom. Ch 1, turn, sc in same st, *sc in next st, ch 4, sl st in 4th ch from hook, sc in next st*, repeat until 1 st remains, sc in last st. Finish off and weave in ends.
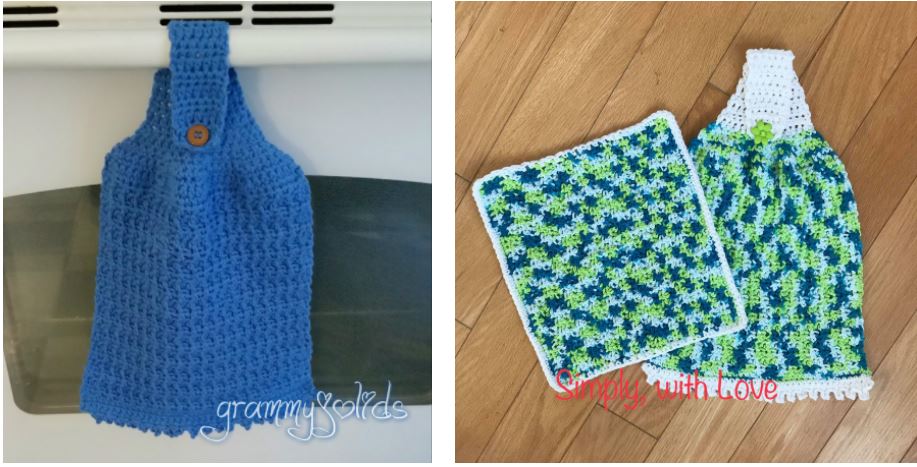
It is fun seeing the different yarn combinations. Thanks to Joanne of GrammyJo Lids and Debbie of Simply, wth Love for sharing their samples.
Pin For Later