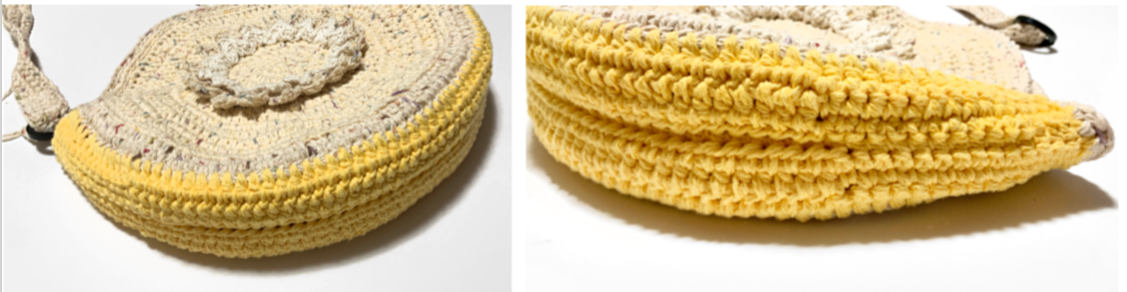
Free Pattern: Sunflower Circle Tote
Earlier this spring I planted sunflower seeds along our fence. I am amazed at how tall they have grown. They were part of the inspiration of this new tote bag.

Fall is my favorite time of year and I love sunflowers. I added a sunflower to this bag to remind us to be strong and hold our heads high.
My parents usually have big, beautiful ones in their yard and this year I actually planted some in my backyard. I love how tall and strong they stand. They have a very solid stem and foundation to keep those heads high. They are a great reminder of the importance of a strong foundation in our lives. Send out those roots, stand tall and hold your head high.
Sunflower Circle Tote Pattern
This pattern is available for free below. An ad-free, downloadable PDF of these patterns with all of the photos is available to purchase from my Ravelry Shop: Click HERE
Materials
- Yarn: 1200-1400 yds worsted weight yarn
- Yarn used in main sample:
- Circles and Gusset: 350 yds Peaches and Cream “Panorama” + 350 yds Peaches and Cream “Oasis”
- Sunflower Yellow Petals: 150 yds Sugar and Cream “Yellow”
- Sunflower Dark Center: 100 yds Peaches and Cream “Brown” + 100 yds Peaches and Cream “Shaded Brown”
- Yarn used in main sample:
- Crochet Hooks: H (5mm), I (5.5mm)
- Notions: Yarn needle for weaving in ends
- Optional: Measuring tape, scissors, 2 hardware pieces for handle attachment (circles, D rings), toggle button for closure
Measurements
- Finished Measurements: Circle – 13” across, Bag – 14” across x 4” wide, Handle – 32” long
- Gauge: not needed for this project.
Tips
- First stitch of each row is worked into the same stitch as the turning chain.
- Numbers at the beginning of each line may refer to steps and not indicate number of rows.
- Stitch count remains the same unless noted at end of row/round.
- The sequence of sts for the increase rounds of the circle vary in order to help create a more rounded outer edge.
- If you have any questions about this pattern please contact [email protected].
Circles (make 2)
Choose from one of the options below:

With flower as part of the circle
If you would like the center of the circle to be a different color (for example, brown), start with that color.
1. With an I hook and 2 strands ww yarn, create a circle of 8 sc sts (or preferred method for starting a circle of 8 sc sts), pull closed and sl st in first st to join. (8sts)
2. Ch 1, 2sc in each st to end of round, sl st to join. (16sts)
3. Ch 1, hdc in same st, 2hdc in next st, *hdc, 2hdc in next st*, repeat to end of round, sl st to join. (24sts)
4. Ch 1, hdc in same st, hdc, 2hdc in next st, *hdc 2, 2hdc in next st*, repeat to end of round, sl st to join. (32sts)
5. Ch 1, hdc in same st, hdc 2, 2hdc in next st, *hdc 3, 2hdc in next st*, repeat to end of round, sl st to join. (40sts)
6. Work this round in BLO. Ch 1, hdc in same st, hdc 2 , 2hdc in next st, *hdc 3, 2hdc in next st*, repeat to end of round, sl st to join. (50sts)
Change yarn color here if the center is a different color from the bag.
7. Work this round in BLO. Ch 1, hdc in same st, hdc 3 , 2hdc in next st, *hdc 4, 2hdc in next st*, repeat to end of round, sl st to join. (60sts)
8. Ch 1, hdc in same st, hdc 4, 2hdc in next st, *hdc 5, 2hdc in next st*, repeat to end of round, sl st to join. (70sts)
9. Sl st in each st to end of round, sl st to join.
10. This step is worked around the previous round. Insert the hook just under the sl st (into the same st the sl sts were worked). Ch 1, sc in the same st, sc 2, 2sc in next st, *sc 6, 2sc in next st*, repeat until 3 sts remain, sc 3, sl st to join. (80sts)
11. Ch 1, 2hdc in same st, hdc 7, *2hdc in next st, hdc 7*, repeat to end of round, sl st to join. (90sts)
12. Ch 1, hdc in same st, hdc 3, 2hdc in next st, *hdc 8, 2hdc in next st*, repeat until 4 sts remain, hdc 4, sl st to join. (100sts)
13. Sl st in each st to end of round, sl st to join.
14. This step is worked around the previous round. Ch 1, sc in same st, sc 8, 2sc in next st, *sc 9, 2sc in next st*, repeat to end of round, sl st to join. (110 sts)
15. Ch 1, hdc in same st, hdc 4, 2hdc in next st, *hdc 10, 2hdc in next st*, repeat until 5 sts remain, hdc 5, sl st to join. (120sts)
16. Ch 1, sc in same st, sc 10, 2sc in next st, *sc 11, 2sc in next st*, repeat to end of round, sl st to join. (130sts)
17. Sl st in each st to end of round, sl st to join. Finish off and weave in ends. Skip to page 5.
Plain (flower can be added as a pocket)
1. With an I hook and 2 strands ww yarn, create a circle of 8 sc sts (or preferred method for starting a circle of 8 sc sts), pull closed and sl st in first st to join. (8sts)
2. Ch 1, 2sc in each st to end of round, sl st to join. (16sts)
3. Ch 1, hdc in same st, 2hdc in next st, *hdc, 2hdc in next st*, repeat to end of round, sl st to join. (24sts)
4. Ch 1, hdc in same st, hdc, 2hdc in next st, *hdc 2, 2hdc in next st*, repeat to end of round, sl st to join. (32sts)
5. Ch 1, hdc in same st, hdc 2, 2hdc in next st, *hdc 3, 2hdc in next st*, repeat to end of round, sl st to join. (40sts)
6. Ch 1, hdc in same st, hdc 2 , 2hdc in next st, *hdc 3, 2hdc in next st*, repeat to end of round, sl st to join. (50sts)
7. Ch 1, hdc in same st, hdc 3 , 2hdc in next st, *hdc 4, 2hdc in next st*, repeat to end of round, sl st to join. (60sts)
8. Ch 1, hdc in same st, hdc 4, 2hdc in next st, *hdc 5, 2hdc in next st*, repeat to end of round, sl st to join. (70sts)
9. Sl st in each st to end of round, sl st to join.
10. This step is worked around the previous round. Insert the hook just under the sl st (into the same st the sl sts were worked). Ch 1, sc in the same st, sc 2, 2sc in next st, *sc 6, 2sc in next st*, repeat until 3 sts remain, sc 3, sl st to join. (80sts)
11. Ch 1, 2hdc in same st, hdc 7, *2hdc in next st, hdc 7*, repeat to end of round, sl st to join. (90sts)
12. Ch 1, hdc in same st, hdc 3, 2hdc in next st, *hdc 8, 2hdc in next st*, repeat until 4 sts remain, hdc 4, sl st to join. (100sts)
13. Sl st in each st to end of round, sl st to join.
14. This step is worked around the previous round. Ch 1, sc in same st, sc 8, 2sc in next st, *sc 9, 2sc in next st*, repeat to end of round, sl st to join. (110 sts)
15. Ch 1, hdc in same st, hdc 4, 2hdc in next st, *hdc 10, 2hdc in next st*, repeat until 5 sts remain, hdc 5, sl st to join. (120sts)
16. Ch 1, sc in same st, sc 10, 2sc in next st, *sc 11, 2sc in next st*, repeat to end of round, sl st to join. (130sts)
17. Sl st in each st to end of round, sl st to join. Finish off and weave in ends.
Sunflower Pocket (optional)
1. With an I hook and 2 strands ww yarn (brown or color of choice), create a circle of 8 sc sts (or preferred method for starting a circle of 8 sc sts), pull closed and sl st in first st to join. (8sts)
2. Ch 1, 2sc in each st to end of round, sl st to join. (16sts)
3. Ch 1, hdc in same st, 2hdc in next st, *hdc, 2hdc in next st*, repeat to end of round, sl st to join. (24sts)
4. Ch 1, hdc in same st, hdc, 2hdc in next st, *hdc 2, 2hdc in next st*, repeat to end of round, sl st to join. (32sts)
5. Ch 1, hdc in same st, hdc 2, 2hdc in next st, *hdc 3, 2hdc in next st*, repeat to end of round, sl st to join. (40sts)
6. Work this round in BLO. Ch 1, hdc in same st, hdc 2 , 2hdc in next st, *hdc 3, 2hdc in next st*, repeat to end of round, sl st to join. (50sts)
Change yarn color here if the center is a different color from the bag.
7. Work this round in BLO. Ch 1, hdc in same st, hdc 3 , 2hdc in next st, *hdc 4, 2hdc in next st*, repeat to end of round, sl st to join. (60sts)
8. Ch 1, sc in same st, sc 4, 2sc in next st, *sc 5, 2sc in next st*, repeat to end of round, sl st to join. (70sts)
Finish off, leaving one strand long enough to sew pocket to bag. Cut the other yarn and weave in end.Set aside. This will be sewn on when bag is complete.
Gusset
The gusset of the bag is worked in half and seamed together at the end.
1. With an I hook, attach 2 strands of yarn (same as circle edge) to any st from step 16 on one circle. This step is worked into the sc sts and not the sl sts from step 17. Ch 1, hdc in same st, hdc 89. (90sts)
2. Ch 1, turn, hdc between each post from previous row.
3. Change to a contrasting color (yellow in sample). Ch 1, turn, hdc between each post from previous row.
4. Ch 1, turn, sc in same st, sc 14, hdc 60 (between posts), sc 15.
5. Repeat previous step for an additional 2 rows.
Finish off and weave in ends.
Repeat for the second circle.

Place the two circles on top of each other, right sides together and gussets lined up.
WIth a yarn needle and matching yarn, sew the two layers together. I used a whipstitch. Make sure this seam is secure. Turn the bag right side out.
Top Of Bag
There is an edging around the top opening of the bag.
1. With an I hook, attach 2 strands of yarn (same as circle edge) to any st at the top edge of the gusset section. As this is worked across the top of each circle, the sts are worked into the sc sts of step 16 (from circle section) and not the sl sts from step 17.
Ch 1, sc in same st and in each st around top edge, working sc2tog at each corner (where gusset and circles meet). (st count will vary)
2. Sl st in each st around, working sc2tog at each corner. Finish off and weave in ends.

Handle
As written, the handle is 32” long when complete. Adjust beginning chain for length if desired.
1. With an I hook and 2 strands of yarn, ch 111, sc in the 2nd ch from hook and in each ch across. (110sts)
2-4. Ch 1, turn, sc in same st to end of row.
Finish off and weave in ends.
Choose one of the options below for attaching the handle:
Directly to bag: With matching yarn, use a yarn needle to sew each end of the handle to the inside edges of the gusset, overlapping approximately 2”.
With hardware: I wanted to continue with the circle theme so I chose round hardware. A D ring could also be used. Wrap one short end of the handle around the hardware. With a yarn needle and matching yarn, sew the end of the handle to itself to hold in place. Repeat for opposite end.
The opposite edge of the hardware could be sewn directly to the bag. I chose to attach mine with a small tab.
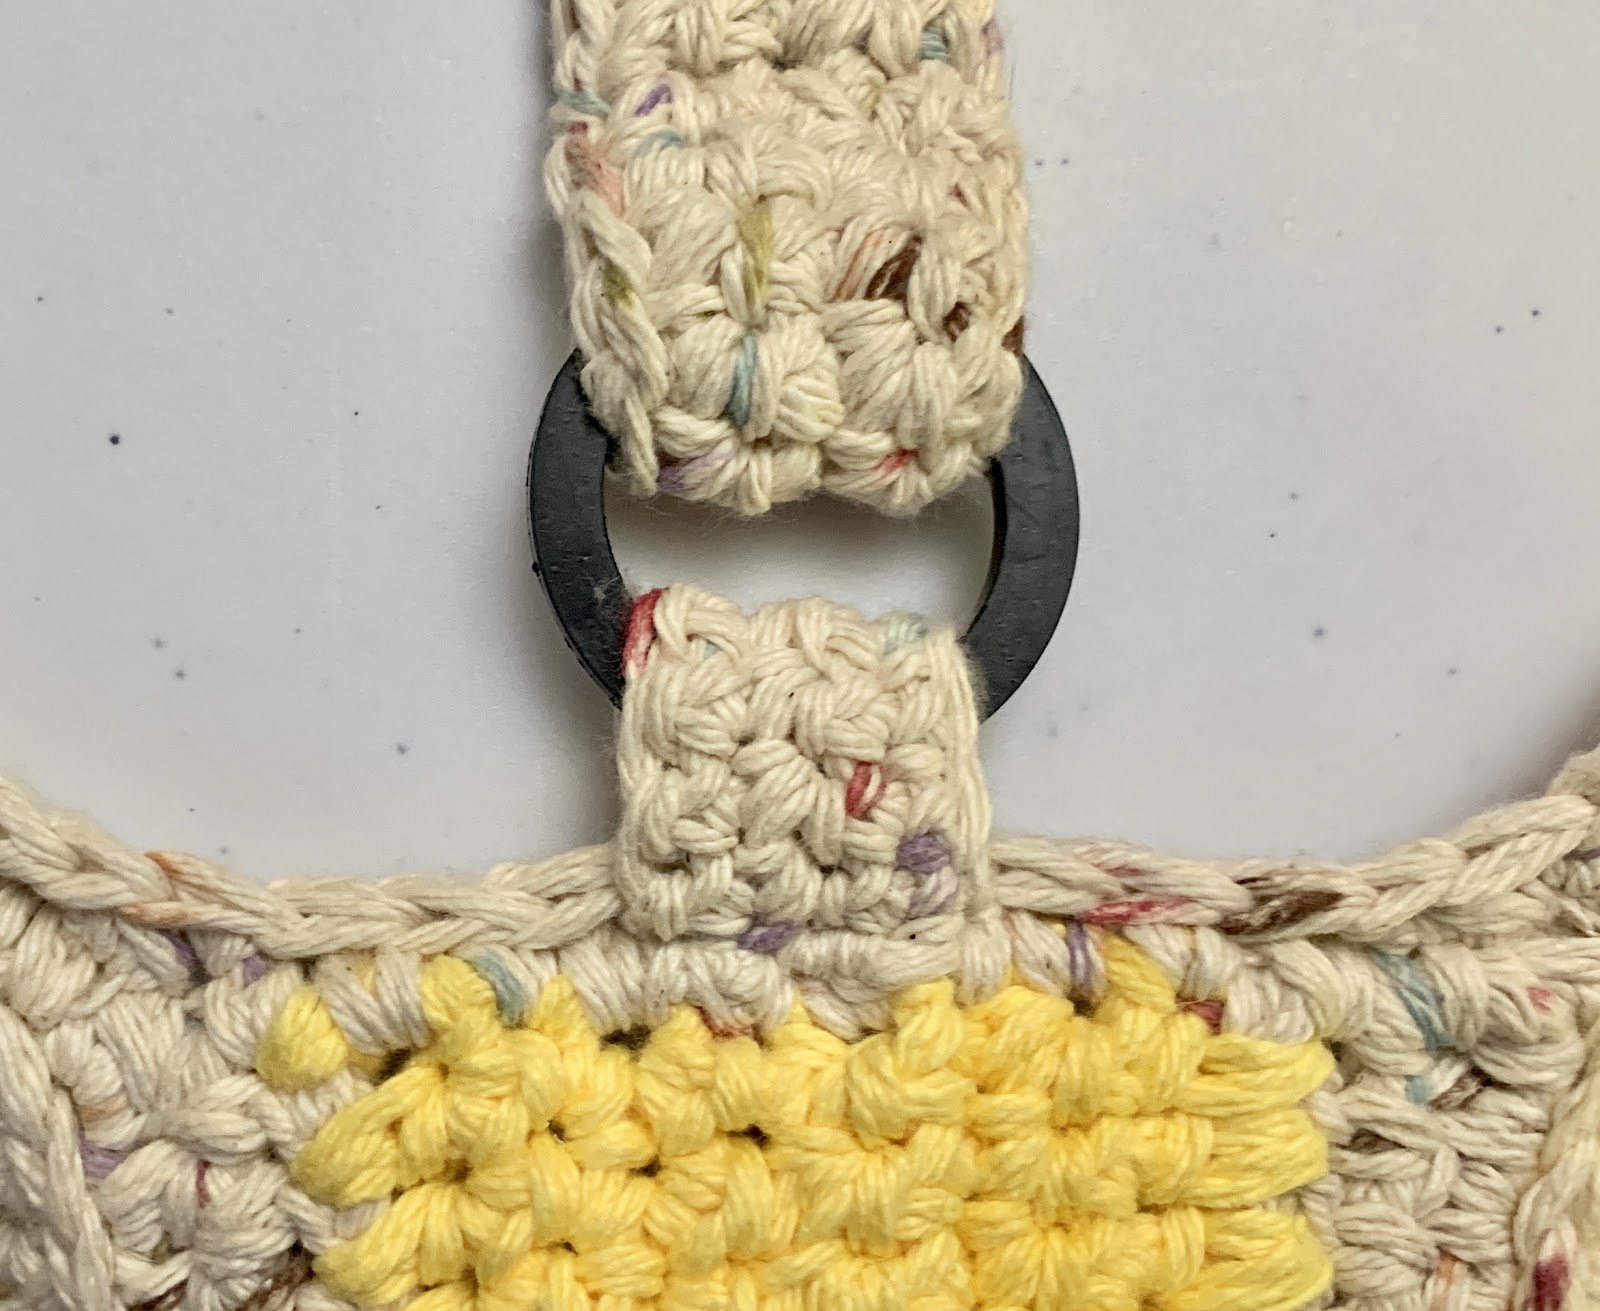
Handle Tabs (make 2)
1. With an H hook and matching yarn, ch 10, sc in 2nd ch from hook and in each ch across. (9sts)
2-4. Ch 1, turn, sc in same st and in each st to end of row.
Finish off, leaving a yarn tail in the end to sew the tab to the bag.
Fold tab in half, matching ends of rows. Fold over the hardware. With a yarn needle, use the yarn tail to sew the short ends to the center, top edge of the gusset.
Repeat for other end of handle.
Finishing the Flowers
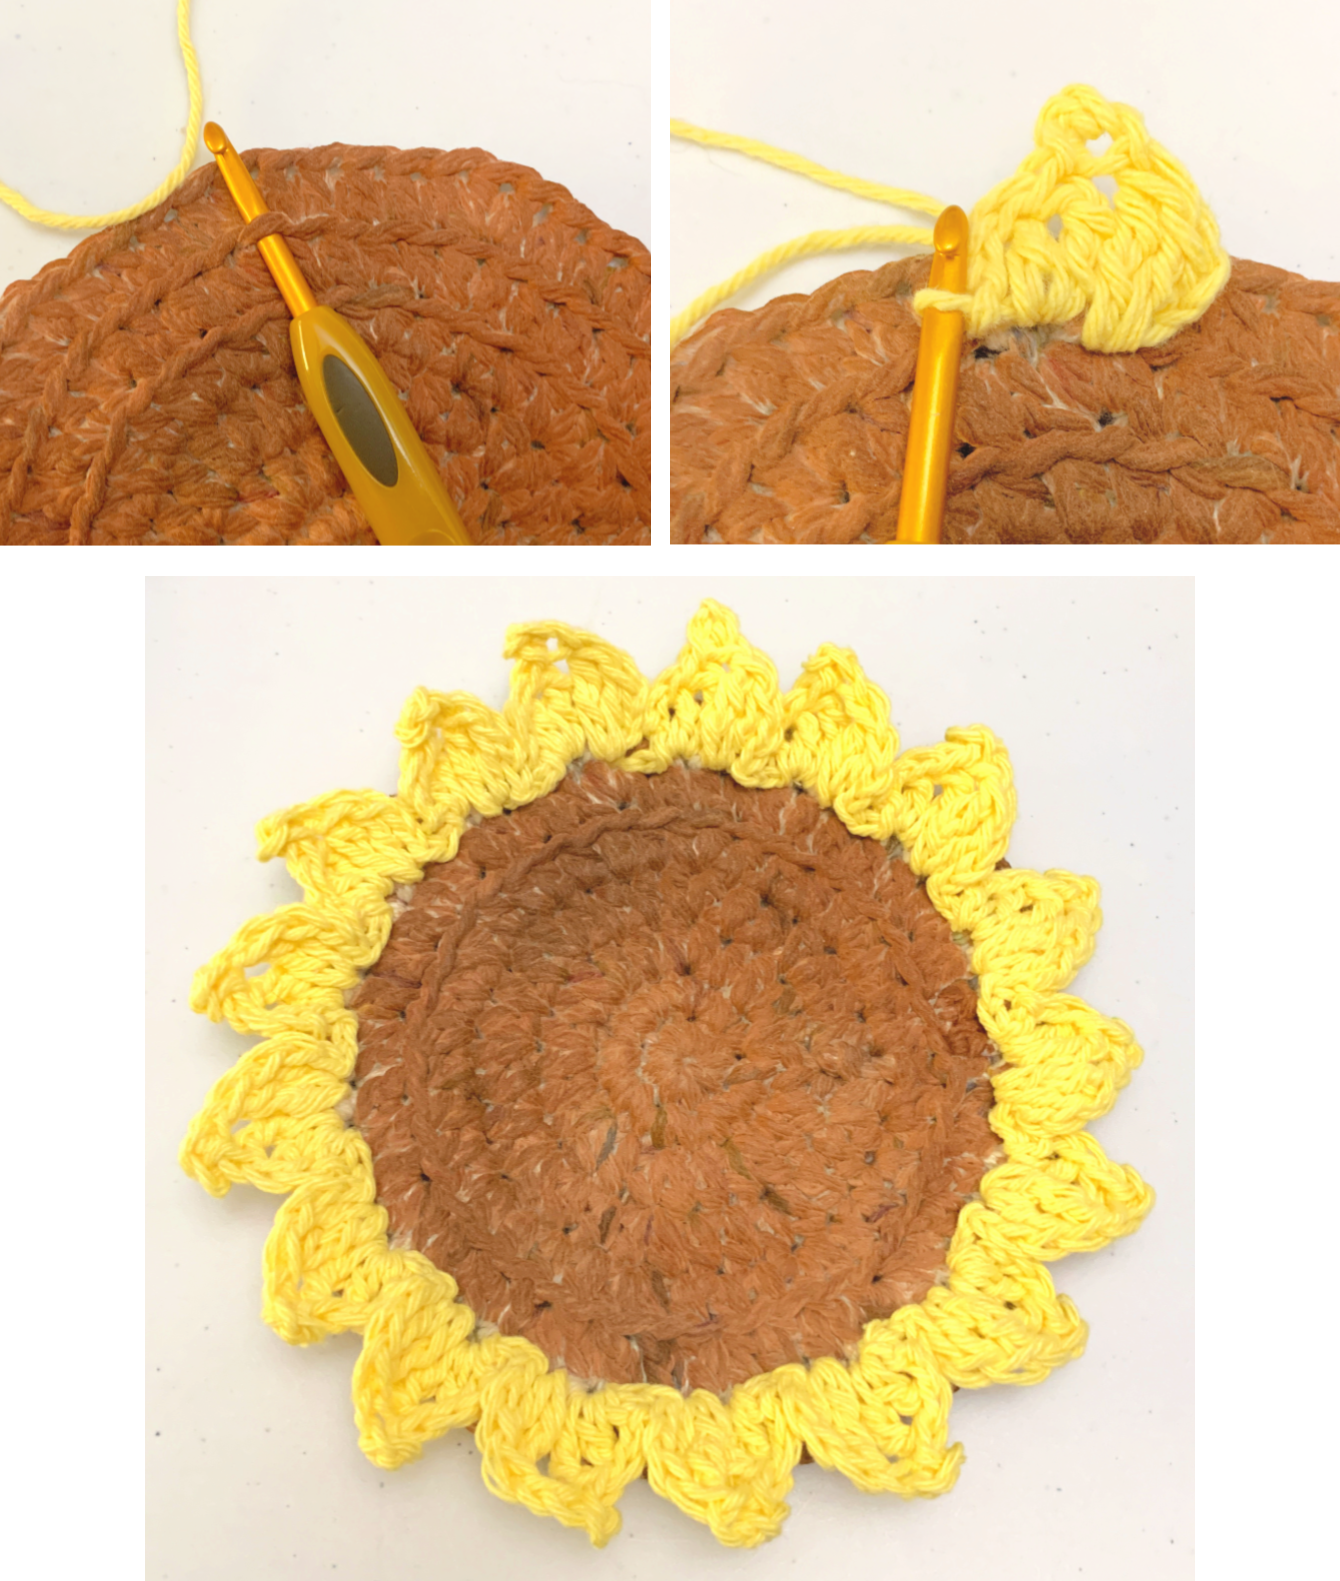
Petals
The back round of petals is worked first.
1. With an H hook, attach one strand of yellow yarn (or color of choice) to one of the front loops from step 7.
2. Ch 2, (dc, tr) in same st, ch 3, sl st in 3rd ch from hook, (tr, dc, ch 2, sl st) in next st, sl st 2, (one petal complete), *ch 2, (dc, tr) in same st, ch 3, sl st in 3rd ch from hook, (tr, dc, ch 2, sl st) in next st, sl st 2*, repeat until 1 st remains, sl st in last st. Finish off and weave in end. (17 petals)
Front Round of Petals
1. With an H hook, attach one strand of yellow yarn (or color of choice) to one of the front loops from step 6.
2. Ch 2, (hdc, dc) in same st, ch 3, sl st in 3rd ch from hook, (dc, hdc, ch 2, sl st) in next st, sl st 2, (one petal complete), *ch 2, (hdc, dc) in same st, ch 3, sl st in 3rd ch from hook, (dc, hdc, ch 2, sl st) in next st, sl st 2*, repeat to end of round, ending with one petal and sl st in same st. Finish off and weave in end. (14 petals)
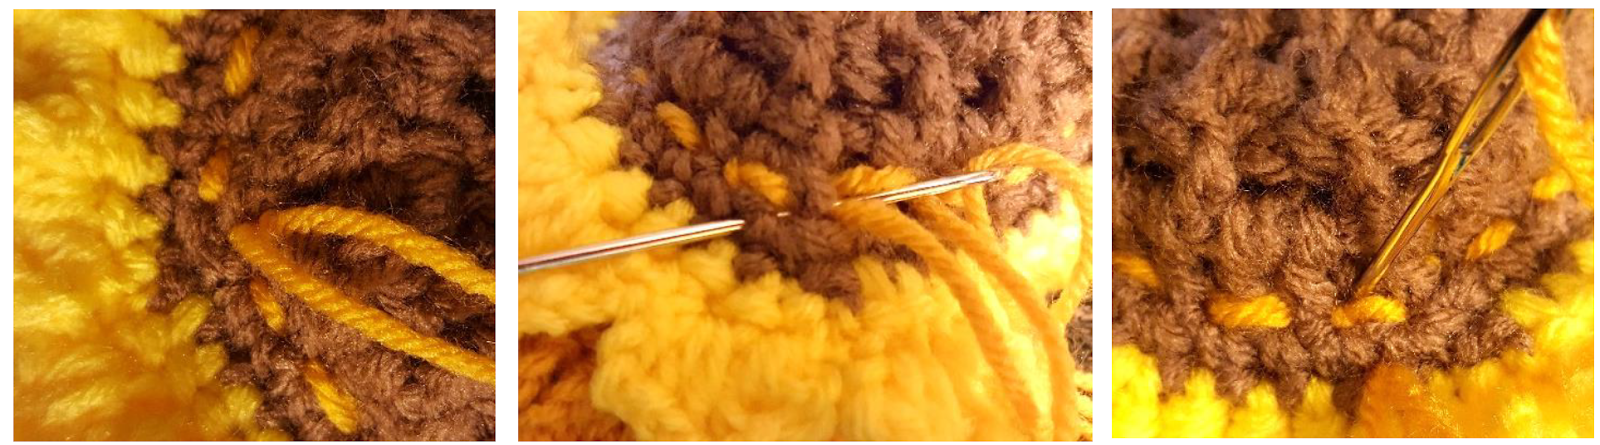
Stitching is added around the inner edge of the flower center. This is done with a double strand of golden yellow. With a yarn needle, weave in and out of the stitches just inside the edge of the brown, before the first round of petals.
After the first round of stitching, a second round is added, but this time work over the first stitch. See photos.
Pocket Assembly: With a yarn needle and yarn tail, sew the other edge of the pocket piece to the bag, leaving the top ⅓ unsewn.
Closure (optional)
I wanted something at the top of the bag to keep the circles together. I used a yarn needle and matching yarn to sew a toggle button to the top, center of one of the circles.
I added a loop to the opposite circle to fit around the toggle button when closed.
Loop:
1. Cut 6 strands of yarn 12” long. Knot all of the strands together, 2” from one end.
2. With the knot on the inside of the bag, pull the loose ends to the right side through the same space.
3. Divide the strands in 3 groups and braid.
4. Pull the end of the braid to the inside of the bag through a space next to the first one. Check length of loop by putting the circles together and slipping it over the toggle button. Adjust length as needed.
5. Tie the end of the braid to the opposite end, securing the knot over the top of the first knot.
6. Trim the yarn ends, leaving at least 1” (longer for a tassle look).
From the inside of the bag, this would be a good place to clip keys or a small pouch.
Pin To Save For Later