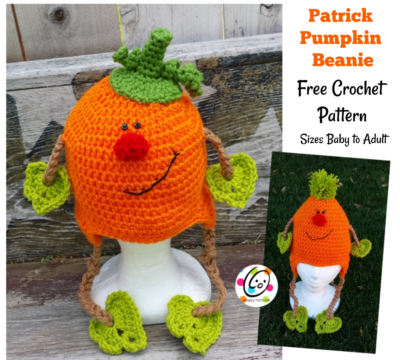
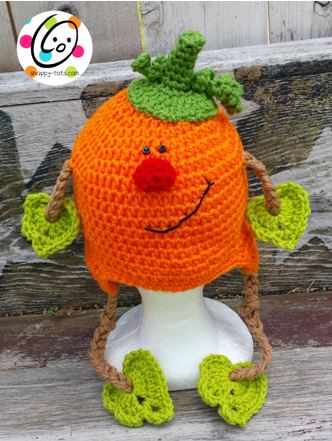
Free Pattern: Patrick Pumpkin Hat
Each year I design new pumpkin hats. I wanted something a little different. This pattern includes all sizes, making it great for the entire family. The base hat makes a great earflap beanie for any of your favorite features too.
Patrick Pumpkin Beanie Pattern
This pattern is available for free below. An ad-free, downloadable PDF of these patterns with all of the photos is available to purchase from my Ravelry Shop: Click HERE
Materials
Yarn: Red Heart Super Saver yarn (worsted weight): Pumpkin (150 yards), Spring Green (40 yards), Guava (20 yards), Warm Brown (20 yards), Cherry (small amount)
Crochet Hooks: G (4-4.5mm), H (5mm), I (5.5mm)
Miscellaneous: yarn needle, sewing needle, thread, ½” button
Gauge: 4″ = 13 hdc and 9 rounds
Sizes: newborn to adult
Directions:
Note: All sizes start the same, and then skip to “body” section when increase round for desired size has been completed.
With I hook and orange yarn, start with a magic circle of 8 sts (or preferred method for starting a circle of 8 sc sts). Place marker to keep track of beginning of round.
- 2sc in each stitch to end of round. (16sts)
- *hdc, 2 hdc in next st*, repeat to end of round. (24sts)
- *hdc 3, 2 hdc in next st*, repeat to end of round. (30sts)
- *hdc 4, 2 hdc in next st*, repeat to end of round. (36sts) 3-6 mths, 3.5” across
- *hdc 5, 2 hdc in next st*, repeat to end of round. (42sts) 6-12 mths, 4.25” across
- *hdc 6, 2 hdc in next st*, repeat to end of round. (48sts) 12-24 mths, 5” across
- *hdc 7, 2 hdc in next st*, repeat to end of round. (54sts) Child/preteen, 5.75” across
- *hdc 8, 2 hdc in next st*, repeat to end of round. (60sts) Teen/Adult, 6.5” across
- *hdc 9, 2 hdc in next st*, repeat to end of round. (66sts) Large adult, 7.25” across
Body:
Hdc in each st around until hat measures desired length. See chart below for sizes.
Sc in each st to end of round.
Earflaps: Start where last round finished. With I hook and yarn color of choice, follow directions below according to size:
3-12mths: Ch 2, hdc 10. Ch 2, turn, hdc2tog, hdc in each st until 2sts remain, hdc2tog. Repeat previous row until 4 sts remain. Ch 2, turn, hdc2tog, hdc 2. Finish off and weave in end.
Fold hat in half to find placement for 2nd earflap. It should start directly across from first flap. Starting on RS of hat, attach yarn and follow directions for earflap.
12-24mths: Ch 2, hdc 12. Ch 2, turn, hdc2tog, hdc in each st until 2sts remain, hdc2tog. Repeat previous row until 4 sts remain. Ch 2, turn, hdc2tog, hdc 2. Finish off and weave in end.
Fold hat in half to find placement for 2nd earflap. It should start directly across from first flap. Starting on RS of hat, attach yarn and follow directions for earflap.
Child/preteen: Ch 2, hdc 14. Ch 2, turn, hdc2tog, hdc in each st until 2sts remain, hdc2tog. Repeat previous row until 4 sts remain. Ch 2, turn, hdc2tog, hdc 2. Finish off and weave in end.
Fold hat in half to find placement for 2nd earflap. It should start directly across from first flap. Starting on RS of hat, attach yarn and follow directions for earflap.
Teen/adult: Ch 2, hdc 14. Ch 2, turn, hdc2tog, hdc in each st until 2sts remain, hdc2tog. Repeat previous row until 4 sts remain. Ch 2, turn, hdc2tog, hdc 2. Finish off and weave in end.
Fold hat in half to find placement for 2nd earflap. It should start directly across from first flap. Starting on RS of hat, attach yarn and follow directions for earflap.
Trim: Attach yarn to center back, ch 1, sc in each stitch around, working 2sc in tip of each ear flap. Finish off and weave in ends. Attach braids if desired.
“Legs”
Cut 12, 30” strands of light brown yarn. Pull one end of all strands through tip of one earflap. Pull through until even with other end and braid. Wrap a 3” piece of matching yarn around braid approximately 2” from end. Trim ends. Tie a loose knot in leg as shown in main photo. Repeat for other side.
“Arms”
Cut 9, 20” strands of light brown yarn. Pull one end of all strands through a stitch on side of hat as shown in main photo. Pull through until even with other end and braid. Wrap a 3” piece of matching yarn around braid approximately 2” from end. Trim ends. Repeat for other side.
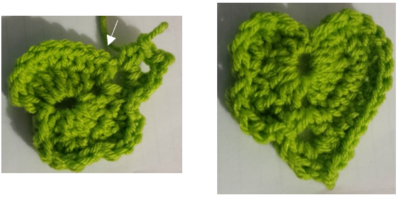
Leaves
These have a whimsical, nonsymmetrical shape.
Make 2 small leaves (stop after step #2) and 2 large leaves.
1. With H hook and green yarn, ch 3, (5dc, ch 2, sl st in 2nd ch from hook, 5dc, ch 3, sl st) all in 3rd ch from hook.
Note: All stitches are worked into the 3rd ch from hook. The last “sl st” is worked into the same ch 3 space and is not a joining sl st.
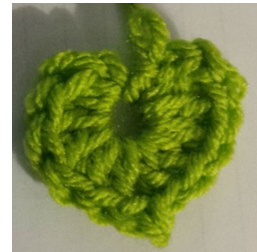
2. (sc, hdc) in top of first dc from previous step (see arrow in photo below left),
(dc, hdc) in next st, sl st in next st, (hdc, dc) in next st, (sc, sl st) in next st. At this point, heart should look like the photo below right.

The next stitches are worked into the space created at bottom point of heart (see arrow in photo below left). (dc, ch 2, sl st in 2nd ch from hook, dc) in space, sc, hdc 2, 2hdc in next st, 2hdc in next st, 2hdc in next st, sc into side of last ch, sl st in space (large opening in middle of heart).
For small leaves, finish off and weave in ends.
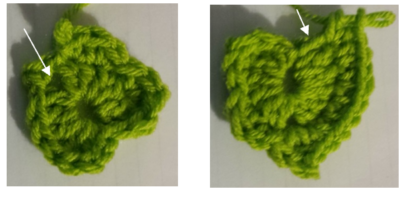
3. Sc 2, 2sc in next st, sc, sl st 2, 2hdc in next st, 2hdc in next st, sl st 2. The next stitches are worked into the space created at bottom point of heart. (hdc, dc, ch 2, sl st in 2nd ch from hook, dc, hdc) in space. For next st placement, see arrow in photo below. Sc 6, 2sc in next st, sc, 2sc in next st, sc, sl st in center, pulling tight. Finish off and weave in ends.
Slip each leaf over an “arm” and tie a knot in the “arm” braid under the leaf. Slip each leaf over a “leg” and tie a knot in the “leg” braid under the leaf.
Face
Eyes: With a sewing needle and black thread, sew a ½” black button to each eye.
Nose:
- With g hook and red yarn, make a magic loop of 6sts (or preferred method for starting a circle of 6sts).
- 2sc in each st to end of round. (12sts)
- *sc2tog*, repeat to end of round. (6sts)
Finish off, leaving a tail for sewing nose to hat.
With yarn needle and yarn tail, sew nose to hat, right below eyes.
Mouth: With yarn needle and black yarn or black embroidery floss, stitch mouth as shown in main photo.
Stem and Vine
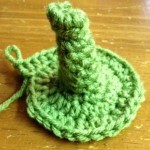
Stem Top:
1. With g hook and green yarn, make a magic loop of 6sts (or preferred method for starting a circle of 6sts).
2. Working in the round, sc 6. (6sts)
3. In BLO (for just this round), sc 6.
4. 2sc in next st, sc 5. (7sts)
5-6. Sc in each st to end of round.
7. 2sc in next st, sc 6. (8sts)
8. *2sc in next st, sc*, repeat once. (12sts)
9. In FLO (for just this round), *2sc in next st, sc*, repeat to end of round. (18sts)
10. *hdc 2, 2hdc in next st*, repeat to end of round. (24sts)
11. *hdc 2, 2hdc in next st*, repeat to end of round. (32sts)
12. Sc in next st, sl st in next. Finish off, leaving a tail for sewing to hat.
With yarn needle and yarn tail, sew stem to top of hat, slightly off center.
Curly Vine: With G or H hook, ch 25, work 2sc in 2nd ch from hook, *sc, 3sc in next st*, repeat to end of chain. Finish off. Use tails to attach vine to base of stem.
Punky Patrick: Add a pompom on top instead of the stem for a pumpkin with some attitude.
Pompom: Hold one strand of green yarn and wrap around the palm of your hand 50-60 times, depending on desired thickness of pom. Carefully slide the yarn off your hand and wrap an 8” length of yarn around the center, pulling tight and knotting to hold in place. Do NOT cut this piece of yarn. Pull each end through two stitches at top of hat. Firmly tie a knot next to the hat. Trim pompom as desired. For sample, I trimmed the pompom into a square shape. A piece of cardboard or pompom maker may also be used.
Pin To Save For Later