Free Pattern: Popcorn Garland
Since I was little, I have always loved real popcorn and cranberry garlands. I thought it was cool that people took the time to make those. One year I decided to give it a try and it didn’t go well. I had cranberry juice all over what little popcorn actually held up through the process. Plus, then, after all of that work, you throw it away and have to start all over the next year. I have seen crocheted versions, but many seemed like a lot of work or needed special beads I was too impatient to find. So, I created a simpler version and I really like how it turned out. You can make this garland as long or short as you like.

National Popcorn Day is January 19th and the perfect time to start a popcorn garland you could work on throughout the year for your tree (that is how long it would take me to get a long enough one made).

Popcorn Garland Crochet Pattern
The pattern is available to follow along below.
Video coming really soon so you can crochet this along with me!
Materials and Details
- Worsted weight yarn: cotton or acrylic white, red
- Crochet Hook: H (5mm)
- Miscellaneous: Yarn needle for weaving in ends
- Gauge: Not needed for this project
- The first stitch of each row is worked into the same stitch as the turning chain.
Length
This can be made any length. The white, popcorn part of the strand is created in one piece. It is worked across the chain and then back across it again. The finished strand ends up half of the length of the first pass.
Special Stitches
Bobble Stitch: *yo, insert hook into chain, yo and pull up a loop (3 loops on hook), yo and pull through 2 loops on hook,*
repeat two more times in the same chain (4 loops on hook), yo, and pull through all 4 loops.
Puff Stitch: *yo, insert hook into chain, yo and pull up a loop* (3 loops on hook), repeat two more times in the same chain (7 loops on hook), yo, and pull through all 7 loops.
Directions
- As written, the popcorn part of the strand (not including hanger loops at each end), measures 8-10” when complete (19-20” after step 3)
- The “ch 6” sections create a flat area for the “berries”.
- Refer to “special stitches” on page 1.
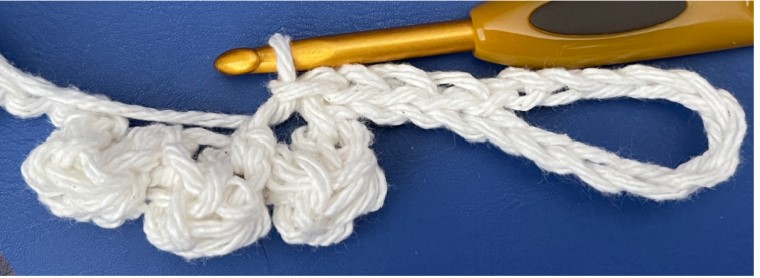
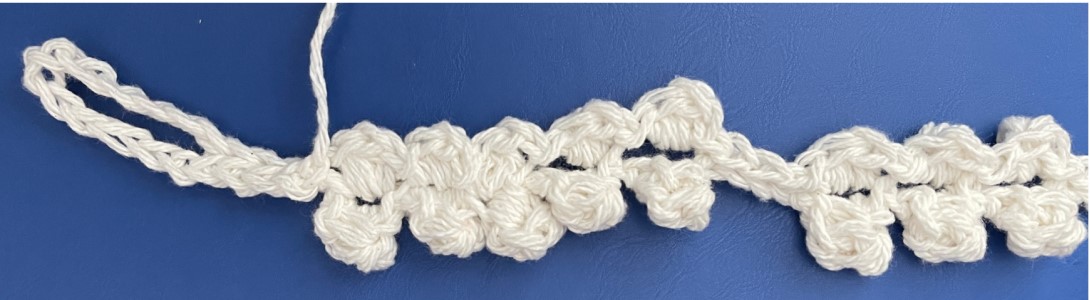
1. With an H hook and white yarn, [*ch 3, bobble in the 3rd ch from hook, (do not ch 1), sl st in the same ch*, repeat four more times (5 bobbles complete), ch 6, bobble in the 3rd ch from hook, (do not ch 1), sl st in the same ch*, repeat two more times (3 bobbles complete), ch 6*], repeat the section in [ ] one time.
This completes one section of the garland. Continue repeating the section in brackets above for additional length.
2. This step creates the first hanger loop. The strand ended with “ch 6”. Ch an additional 10 (total of 16 chains). Sl st in the 12th ch from hook to create the first hanger loop. Sl st in the remaining 4 chains.
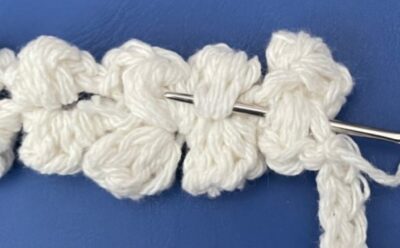
3. This step is worked back across the strand, working into the same chains as the first sts/puff sts.
Sl st into the next st (see photo below), [*ch 1, puff st in the same st, ch 1, sl st in the same st*, repeat two more times (3 puff sts complete), sl st 3, ch 1, puff st in the same st, ch 1, sl st in the same st*, repeat four more times (5 bobbles complete), sl st 3*], repeat the section in [ ] one time.
Continue repeating the section in brackets above to match the first side.
4. This step creates the second hanger loop. The strand ended with “ch 6”. Ch an additional 10 (total of 16 chains). Sl st in the 12th ch from hook to create the first hanger loop. Sl st in the remaining 4 chains.
Finish off, leaving a yarn tail approximately ⅔ the length of the chain.
5. This step will cinch the strand together lengthwise. As we work across the strand, every other set of numbs (right and left) will be flipped over so the nub sizes are mixed up.
We only want to cinch the nubby parts. With a yarn needle, sew a knot before the first puffs. This will keep the yarn before this point from moving.
Insert the yarn needle into the bottom loops of one of the first nubs.
FLIP the next set of nubs over and insert the yarn needle in the bottom loops of one of the nubs. See photo below.
Flip the next set of nubs back over and insert the yarn needle in the bottom loops of one of the nubs. See photo below.

Contine working across this grouping of nubs. Pull the yarn needle through until the nubs cluster closer together. These don’t need to be super tight.
Weave the yarn needle into the strand at the end of the cluster to secure the yarn.
Sl st in each of the next chains.
Repeat to end of strand, making sure to secure the yarn at the end of each cluster so the full strand (and flat areas) won’t be gathered.
Berries (make one per flat area)
1. With an H hook and red yarn, ch 3, sc in the 2nd ch from hook, sc. (2sts)
2. Ch 1, turn, sc 2.
3. Repeat the previous row for an additional 4 rows.
Finish off, leaving a long tail for sewing the berries.
Wrap a berry around a flat spot on the strand. Use a yarn needle and the yarn tail to sew the edges together around the strand.
Pin To Save For Later