

October Crochet Pack

About the Patterns
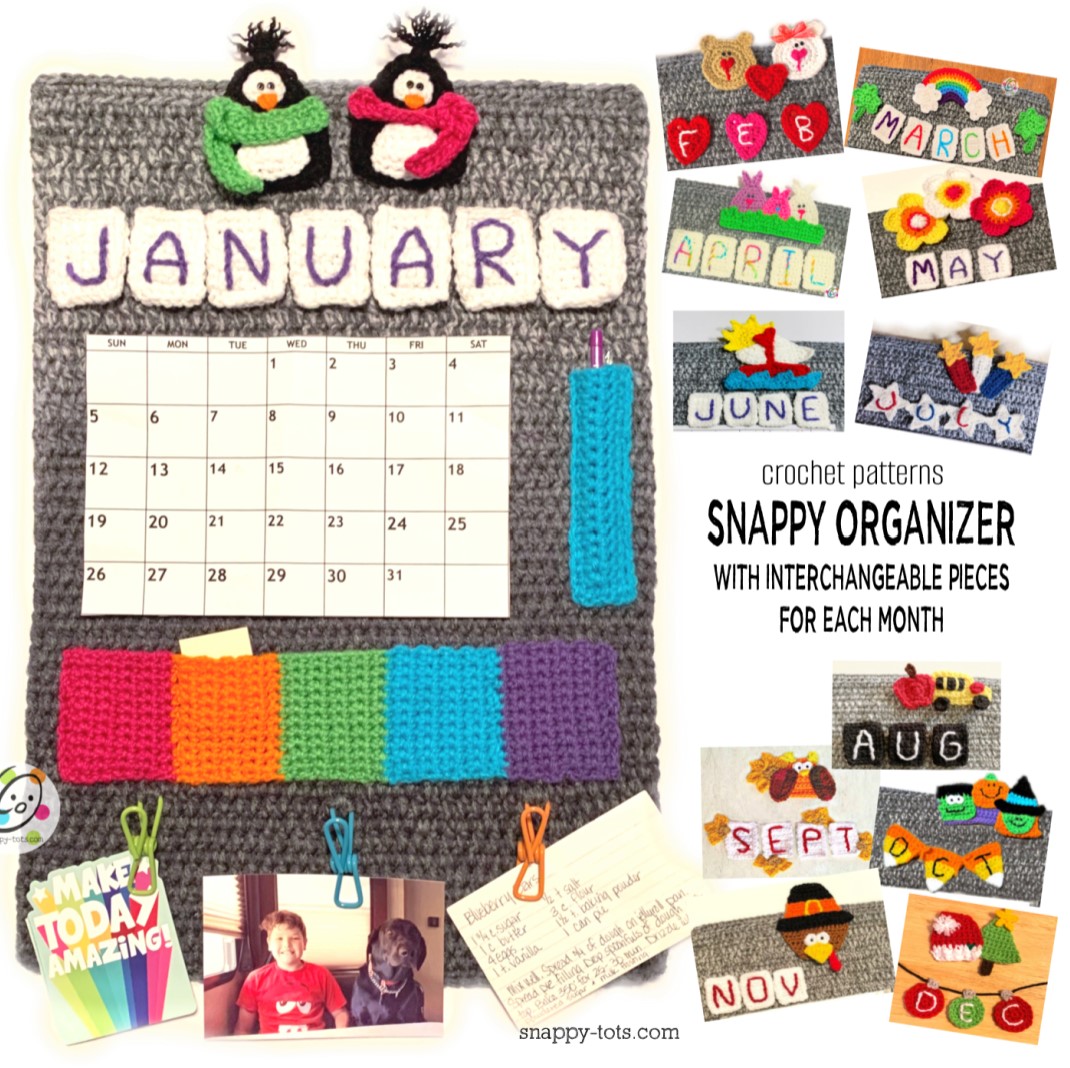
The pattern for the main “Snappy Organizer”, which includes January is available for free at this link, plus there are links to the monthly sets (posted on the 15th of each month for the next month). If you would like to work ahead, the packs of all of the monthly patterns are available to purchase.
All of these patterns are free to view and follow along here on my blog. Ad-free, downloadable pdfs of all of the patterns shown (divided into 4) are also available to purchase from my shops: Ravelry | Etsy
October’s Crochet Patterns
These are designed to be used with the “Snappy Organizer”.
Materials and Details
- Yarn: less than 50 yards each of RHSS Pumpkin, Spring Green, White, Black, Lavender, Gold, Turqua
- Crochet Hook: H (5mm)
- Miscellaneous: Yarn needle, 2 large snaps to match the calendar, 4 tiny black buttons for the eyes, sewing needle, black thread.
Tips
- Numbers at the beginning of each line may refer to steps and not indicate the number of rows.
- Stitch count remains the same unless noted at end of row.
- If you have any questions about this pattern please contact [email protected].
Header Piece
When the pieces are complete, use a yarn needle and matching yarn to sew the three items to the rectangle base.
Purple Rectangle Base
1. With an H hook and purple yarn, ch 22, sc in the 2nd ch from hook and in each ch across. (21sts)
2-7. Ch 1, turn, sc in the same st and in each st to end of row.
Finish off and weave in ends.
Frank
1. With an H hook and green yarn, ch 9, sc in the 2nd ch from hook and in each ch across. (8sts)
2-6. Ch 1, turn, sc in the same st and in each st to end of row.
7. Change to black yarn. Ch 1, turn, (sc, dc) in the same st, *sc in the next st, dc in the next st*, repeat until 1 st remains, (sc, dc) in the last st. (10sts)
8. Ch 1, turn, sc2tog, sc 6, sc2tog. (8sts) Finish off and weave in ends.
Eyes (make 2)
With an H hook and white yarn, create a magic circle of 4 sc sts (or preferred method for creating a circle of 4 sc sts), pull closed and sl st to join. (4sts) Finish off, leaving a tail for sewing in place.
With a yarn needle and yarn tails, sew eyes in place. With a sewing needle and thread, sew a tiny black button to each white eyepiece.
With a yarn needle and black yarn, st the mouth in place.
With a yarn needle and gray yarn, take a few sts at the left edge to create a screw near the hairline.
Pumpkin
1. With an H hook and orange yarn, ch 6, 2sc in the 2nd ch from hook, sc 3, 2sc in the last st. (7sts)
2. Ch 1, turn, 2sc in the same st, sc 5. 2sc in the last st. (9sts)
3-5. Ch 1, turn, sc in the same st and in each st to end of row.
6. Ch 1, turn, sc2tog, sc 5, sc2tog. (7sts)
7. Ch 1, turn, sc2tog, sc 3, sc2tog. (5sts)
8. Finish off the orange yarn. Change to green yarn. Attach green yarn to the 2nd st from the right (on the last row). Ch 1, sc in the same st, sc 2. (3sts)
9. Ch 1, turn, sc2tog, sl st in the last st. Finish off and weave in ends.
With a yarn needle and black yarn, st the face in place.
Witch (3 pieces)
Face
1. With an H hook and green yarn, ch 9, sc in the 2nd ch from hook and in each ch across. (8sts)
2. Ch 1, turn, sc in the same st and in each st to end of row.
3. Ch 1, turn, sc2tog, sc in each st to end of row. (7sts)
4. Repeat previous row 2 more times. (5sts after 2nd row)
5. Ch 1, turn, sc2tog, sc, sc2tog. (3sts) Finish off and weave in ends.
With a yarn needle and black yarn, st the smile in place.
With a sewing needle and black thread, st two tiny buttons in the middle of the face for eyes.
Hair Piece
1. The hairpiece is worked from top to bottom. With an H hook and orange yarn, ch 10, sc in the 2nd ch from hook and in each ch across. (9sts)
2-5. Ch 1, turn, sc in each st to end of row.
6. Ch 1, turn, 2sc in the same st, sc 7, 2sc in the last st. (11sts)
7. Ch 1, turn, sc in the same st and in each st to end of row. Finish off, leaving a long tail in the end.
Fold the bottom edge of the hair back against itself (less than ½”). With a yarn needle, use the yarn tail to sew the bottom edge to the hairpiece to hold it in place. This just helps create some dimension to the hair.
Top of Hat
1. This starts at the tip. With an H hook and black yarn, ch 2, 2sc in the 2nd ch from hook. (2sts)
2. Ch 1, turn, 2sc in the same st, sc. (3sts)
3. Ch 1, turn, sc in the same st, sc 2.
4. Ch 1, turn, 2sc in the same st, sc, 2sc in the last st. (5sts)
5. Ch 1, turn, 2sc in the same st, sc 3, 2sc in the last st. (7sts)
6. Ch 1, turn, 2sc in the same st, sc 5, 2sc in the last st. (9sts)
7. Finish off the black yarn. Change to blue yarn. Ch 1, turn, sc in the same st and in each st to end of row.
8. Ch 1, turn, sc in the same st and in each st to end of row. Finish off and weave in ends.
Hat Brim: With an H hook and black yarn, ch 14, sl st in the 2nd ch from hook and in each ch across until 1 ch remains, sl st in the last st. Finish off, leaving a long yarn tail for sewing to the hat.
Witch Assembly
Place the facepiece on top of the hairpiece. With a yarn needle and matching yarn, sew the top edge of the face to the top edge of the hair.
Sew the bottom edge of the main hat piece to the top edge of the hairpiece. Place the hat brim overlapping the hairpiece and sew in place.
Candy Corn Tiles (make 3 or7)
1. With an H hook and orange yarn, ch 10, sc in the 2nd ch from hook and in each ch across. (9sts)
2. Ch 1, turn, sc in the same st and in each st to end of row.
3. Ch 1, turn, sc2tog, sc 5, sc2tog. (7sts)
4. Finish off the orange yarn. Change to yellow yarn. Ch 1, turn, sc in the same st and in each st to end of row.
5. Ch 1, turn, sc2tog, sc 5. (6sts)
6. Ch 1, turn, sc2tog, sc 4. (5sts)
7. Finish off the yellow yarn. Change to white yarn. Ch 1, turn, sc in the same st and in each st to end of row.
8. Ch 1, turn, sc2tog, sc, sc2tog. (3sts)
9. Ch 1, turn, sc2tog, sl st. Finish off and weave in ends.
Repeat steps to create desired amount of tiles.
With a yarn needle and black yarn, stitch the letters O-C-T or the full month to the tiles.
Assembly
- Attach the tiles to the calendar with brads or desired items. I chose to tie my candy corn tiles together at the corners with matching yarn.
- Snaps: Center the header over the snaps already sewn to the organizer to find placement. Sew two coordinating snap pieces to the back of the header piece so they line up with the snaps on the organizer.
Pin To Save For Later


