

Free Pattern: Pin Up Bunny
This little bunny is something I whipped up a few years ago. It’s a silly little project that is just the right size to hold a plastic egg, a few treats or tiny toy. It also would be a cute soap saver. I am going to make a few bigger pieces as scrubbies.

She is cute out of one yarn too.

Pin Up Bunny Pattern
As a special thank you for being AMAZING, you can download this pattern RIGHT HERE for free. It’s just a quick little project that I hope you will fill with something happy. Take care of you and yours.
Materials and Details
- Yarn: Worsted yarn in 3 shades of color of choice, one contrast color.
- Crochet Hooks: H
- Miscellaneous: yarn needle, two small black buttons, sewing needle and thread
- Gauge: not necessary for this project
- Finished size: 6.5” x 3”
Directions
1. With an H hook and medium colored yarn, ch 15, sc in 2nd ch from hook and in each ch across. (14sts)
2. Ch 1, turn, sc in each st to the end of the row
3. This step starts the long “ear” piece. Ch 11. For the next part, make sure you are working across the chain so you will continue working into the row of sts. Sc in the 2nd ch from the hook and in each chain across, sc in each st to the end of the row. (24sts)
4-9. Ch 1, turn, sc in each st to the end of the .
10. Ch 1, turn, sc 14. There will be sts left unworked. (14sts)
11. Ch 1, turn, sc in each st to the end of the row.
12. Change to light colored yarn. Ch 1, turn, sc in each st to the end of the row.
13. Ch 1, turn, sc in each st to the end of the row.
14. Repeat steps 2-11.
15. Ch 1, turn, sc in each st to the end of the row.
Finish off, leaving a tail for sewing back seam together.
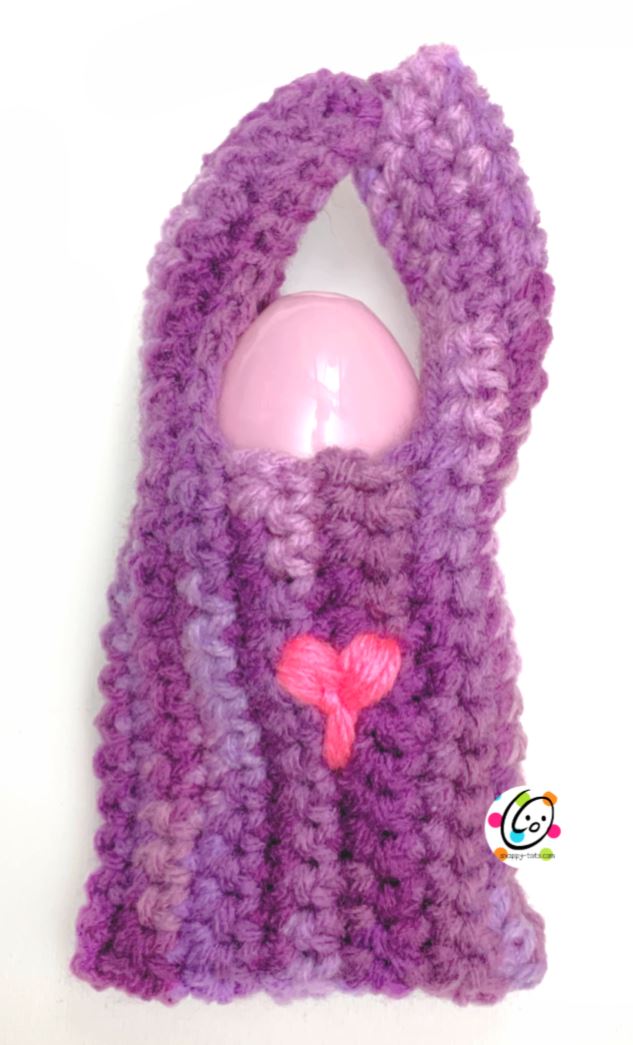
Fold bunny together as shown in the photo below. With a yarn needle, use the yarn tail to sew the beginning and ending rows together. Turn bunny inside out.

Ears: Fold the bunny flat so the long rows are at each edge. Flatten the long rows, matching up the inner edges. With a yarn needle and matching yarns, start approximately 1.5″ from the top edge of the ear on the inner edge and sew the side and top together. See photo below. Repeat for the second ear. Sew the inner tips together if desired.

Nose
For the nose you can use a yarn needle and a long length of yarn to stitch a heart shape and nose line or you can crochet a triangle shape by following the instructions below.
1. With an H hook and yarn color of choice, ch 4, sc in the 2nd ch from the hook, sc 2. (3sts)
2. Ch 1, turn, sc last 2tog. Finish off, leaving a yarn tail to sew nose in place.
With yarn needle and yarn tail, sew nose to bunny.
With sewing needle and black thread, sew eyes to bunny.
With sewing needle and black embroidery floss, stitch mouth in place (optional- not shown in sample).
Finishing the Bunny
Flat Bunny for Garland, Pin, Decoration Option
With yarn needle and matching yarn, sew bottom of bunny closed. Add pin for back if desired.
Drawstring Option – Slip over plastic egg or fill with goodies
With an H hook and yarn color of choice, ch 50. Finish off. Cut each end leaving approximately half inch of yarn. Weave the drawstring in and out of sts, ½ in from the bottom edge of the bunny.
Sample Bunnies


Pin To Save For Later


hi