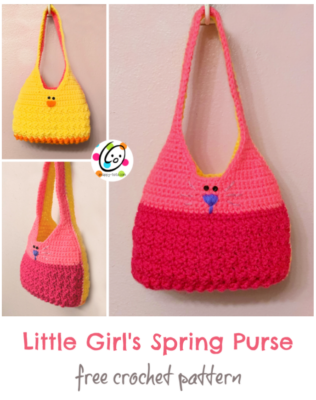
Free Pattern: Little Girl’s Spring Purse
This spring I have been making lots of chicks and bunnies. After seeing the “Spring Bibs“, people requested a purse pattern. I think it turned out really sweet and the perfect size for little girls.

Little Girl’s Spring Purse
An ad-free, downloadable PDF which includes all of the photos and instructions is available for a small fee.
CLICK HERE for the download: Ravelry Listing
Materials – per style
- Yarn: 200 yards Worsted Weight Yarn. Samples were created with Red Heart Super Saver yarn.
- Crochet Hooks: H (5mm)
- Miscellaneous: Yarn needle for weaving in ends, 2 small black buttons per side for eyes, sewing needle, matching thread
Details
- Finished Measurements: 15” tall (including strap), 9” across widest part
Tips
- First stitch of each row is worked into the same stitch as the turning chain.
- Numbers at the beginning of each line may refer to steps and not indicate number of rows.
Directions
Make 2 pieces, either one of each animal of two of the same.
Chick: Start with orange yarn. Bunny: Start with darker color (or green for grass)
1. With an H hook and yarn, ch 24, 2sc in 2nd ch from hook, sc 22, 2sc in last ch. (25sts)
2. Ch 2, turn, 2hdc in same st, *sc in next st, tr in next st*, repeat until 2 sts remain, sc in next st, 2hdc in last st. (27sts)
3. Ch 2, turn, 2hdc in same st, *sc in next st, tr in next st*, repeat until 2 sts remain, sc in next st, 2hdc in last st. (29sts)
4. Ch 2, turn, 2hdc in same st, *tr in next st, sc in next st*, repeat until 2 sts remain, tr in next st, 2hdc in last st. (31sts)
5. Change yarn color (chick: yellow or variegated yellow; bunny: pink or choice of color). Ch 2, turn, hdc in same st, *sk 1, (sc, dc) in next st*, repeat to end of row.
6. Ch 2, turn, hdc in same st, *sk 1, (sc, dc) in next st*, repeat to end of row.
7. Repeat previous row for an additional 6 rows.
8. Ch 1, turn, sc2tog, sc 27, sc2tog. (29sts)
9. Change yarn color (lighter pink for bunny) if desired. Ch 1, turn, sc in same st and in each st to end of row.
10. Repeat previous row for an additional 5 rows.
11. This step starts the first strap. Ch 1, turn, sc2tog, sc 8, sc2tog. Leave remaining sts unworked. (10sts)
12. Ch 1, turn, sc in same st and in each st to end of row.
13. Ch 1, turn, sc2tog, sc 6, sc2tog. (8sts)
14. Ch 1, turn, sc in same st and in each st to end of row.
15. Ch 1, turn, sc2tog, sc 4, sc2tog. (6sts)
16. Ch 1, turn, sc in same st and in each st to end of row.
17. Ch 1, turn, sc2tog, sc 2, sc2tog. (4sts)
18. Ch 1, turn, sc in same st and in each st to end of row.
19. Ch 1, turn, sc2tog, sc2tog. (2sts)
20. Ch 1, turn, sc 2.
21. Repeat previous row for an additional 24 rows.
22. Finish off and weave in ends.
23. This step starts the second strap. Attach yarn to the last st of the last full row (from step 10).
24. Ch 1, sc2tog, sc 8, sc2tog. Leave remaining sts unworked. (10sts)
25. Repeat steps 11-24.
26. Finish off, leaving a tail for sewing strap ends together. Overlap the two short ends. With a yarn needle and yarn tail, sew the two short ends together, making sure the strap is not twisted.
Trim
Inside edge of one purse piece: With the right side of the piece facing you, attach matching yarn to the inner edge. Ch 1, sc in same st and in each st along inner edge, working sc2tog at the bottom 2 corners (where straps meet flat edge). Finish off and weave in ends. Repeat for second purse piece.
Outer edge of one purse piece: With the right side of the piece facing you, attach matching yarn to the outer edge. Ch 1, sc in same st and in each st along outer edge, changing colors to match colors as needed. Sl st to first to to join. Finish off and weave in ends.
Features
Beak/Nose: With a yarn needle and yarn (orange for chick beak, pink for bunny nose), stitch beak/nose in place.
Eyes: With a yarn needle and black yarn, take a few stitches above the nose to create the eyes.
Whiskers (bunny only): With a yarn needle and yarn (color of choice), create three lines on either side of the nose.
Assembly
After both purse pieces are finished, place the two with wrong sides together. With a yarn needle and contrasting yarn, sewing the outer edges together, all the way around.

Pin To Save For Later