

Free Pattern: Hedgie Beanie
Several years ago, a good friend of mine asked if I could make a special hat for her son. He was happy with how it turned out. It is always a good sign when people can at least tell who it is supposed to be, right?
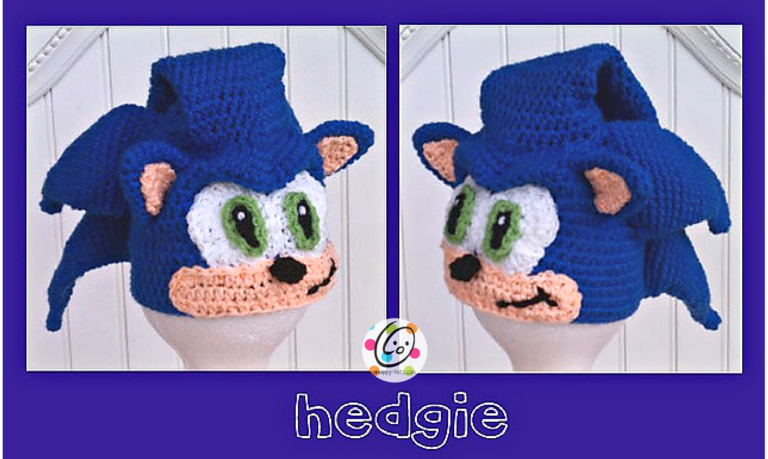
I have had several people ask if I would make the pattern available again so they could make one for their kids. I hope you and your future hedgie will like it too.
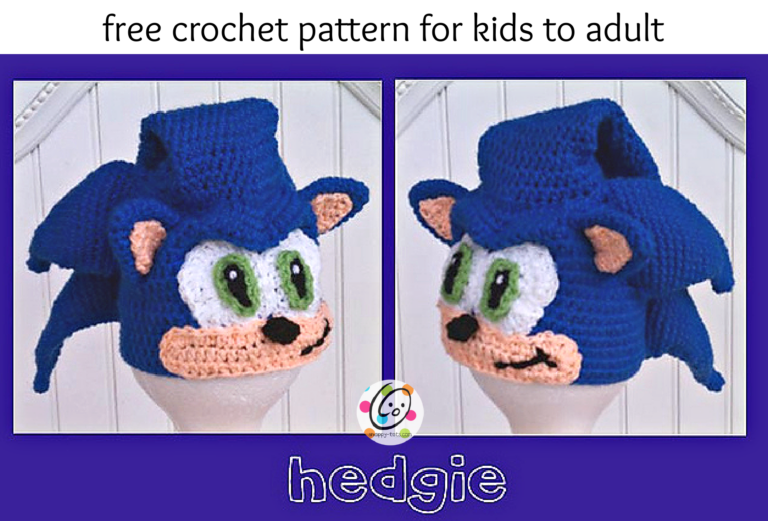
The crochet pattern for this project is available here on my blog for free below. A downloadable, ad-free pdf file of the pattern that includes the instructions and all pictures is available to purchase from my Shopify Shop.
Hedgie Beanie Pattern
Materials and Details
- Yarn: worsted weight yarn in blue, peach, white, black and green Yarn used in sample: Red Heart Blue, Peach, White, Black and Spring Green
- Crochet Hooks: H (5mm), I (5.5mm)
- Miscellaneous: yarn needle
- Gauge: 4″ = 13hdc and 9 rounds
- Sizes: Child to adult.
Tips
- First stitch of each row is worked into the same stitch as the turning chain.
- Numbers at the beginning of each line may refer to steps and not indicate number of rows.
- Stitch count remains the same unless noted at the end of the step.
- Beginning chain of each row/round is not counted as a stitch.
- This hat is created by making a basic beanie first, attaching the hair spikes and then adding the face.
Directions For All Sizes
Follow increases until desired size as listed at the end of the row, then skip to “Body” and continue.
Note: Do not join at the end of each round, unless stated. This hat is worked in continuous rounds until noted in the pattern.
1. With an I hook and blue yarn, start with a magic circle of 8 sc sts (or preferred method of starting a circle of 8 sc sts), pull closed and place a marker for working in the round. (8sts)
2. 2sc in each stitch to end of round. (16sts)
3. *sc 1, 2 sc in the next st*, repeat to end of round. (24sts)
Note: the increase amount changes from 8 sts per round to 6 sts per round from this point forward.
4. *hdc 3, 2 hdc in the next st*, repeat to end of round. (30sts)
5. *hdc 4, 2 hdc in the next st*, repeat to end of round. (36sts)
6. *hdc 5, 2 hdc in the next st*, repeat to end of round. (42sts)
7. *hdc 6, 2 hdc in the next st*, repeat to end of round. (48sts)
8. *hdc 7, 2 hdc in the next st*, repeat to end of round. (54sts) Child/preteen
9. *hdc 8, 2 hdc in the next st*, repeat to end of round. (60sts) Teen/Adult
10. *hdc 9, 2 hdc in the next st*, repeat to end of round. (66sts) Large adult
Body of hat – all sizes
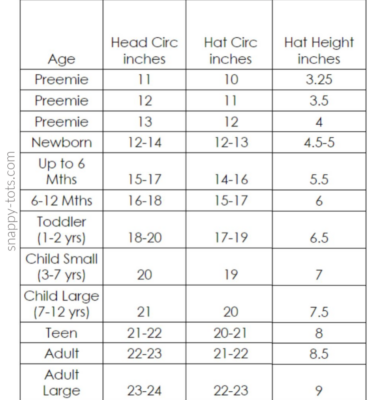
1. When increase rounds for the desired size have been reached, do not join. Remove marker and hdc in each stitch until hat is 1” LONGER than desired length (see chart at the end of the pattern).
Note: The hat is made longer than you would a regular beanie. When constructing the face, approximately 1” of the hat will be gathered to create the ridge above the eyes.
2. At this point, we need to bring down the height of the st so the bottom edge can be finished off. Sc in the next st, sl st in the next st. This is the new beginning of the round. Ch 1, sc in the same st and in each st to the end of the round, sl st to join. Finish off and weave in ends.
Spikes
Lowest spikes (make 2)
1. Leave a long tail in the beginning to use to attach the spike to the hat. With an I hook and blue yarn, start with a magic circle of 5 sc sts (or preferred method of starting a circle of 5 sc sts), pull closed and place a marker for working in the round. (5sts)
2-3. Sc in each stitch to end of round.
4. 2sc in the next st, sc 4. (6sts)
5. Sc in each stitch to end of round.
6. 2sc in the next st, sc 2, 2sc in the next st, sc 2. (8sts)
7. 2sc in the next st, sc 3, 2sc in the next stitch, sc 3. (10sts)
8. 2sc in the next st, sc 4, 2sc in next st, sc 4. (12sts)
9. Sc in each st to end of round.
10. 2sc in the next st, sc 5, 2sc in the next st, sc 5. (14sts)
11. Sc in each st to end of round.
12. *2sc in the next st, sc 6*, repeat once. (16sts)
13-14. Sc in each st to end of round.
15. *2sc in the next st, sc 7*, repeat once. (18sts)
16-17. Sc in each st to end of round
18. *2sc in the next st, sc 8*, repeat once. (20sts)
19-20. Sc in each st to end of round.
21. *2sc in the next st, sc 9*, repeat once. (22sts)
22-23. Sc in each st to end of round.
24. *2sc in the next st, sc 10*, repeat once. (24sts)
25-26. Sc in each st to end of round.
27. *2sc in the next st, sc 11*, repeat once. (26sts)
28-29. Sc in each st to end of round.
Finish off, leaving a long tail.
Middle spikes (make 2)
1. Leave a long tail in the beginning to use to attach the spike to the hat. With an I hook and blue yarn, start with a magic circle of 6 sc sts (or preferred method of starting a circle of 6 sc sts), pull closed and place a marker for working in the round. (6sts)
2. Sc in each st to end of round.
3. 2sc in the next st, sc 5. (7sts)
4. Sc in each st to end of round.
5. Sc, *2sc in the next st, sc 2*, repeat once. (9sts)
6. 2sc in the next st, sc 8. (10sts)
7. *2sc in the next st, sc 4* repeat once. (12sts)
8. Sc in each st to end of round.
9. *2sc in the next st, sc 5*, repeat once. (14sts)
10. *2sc in the next st, sc 6*, repeat once. (16sts)
11. Sc in each st to end of round.
12. *2sc in the next st, sc 7*, repeat once. (18sts)
13. *2sc in the next st, sc 8*, repeat once. (20sts)
14. Sc in each st to end of round.
15. *2sc in the next st, sc 9*, repeat once. (22sts)
16. *2sc in the next st, sc 10*, repeat once. (24sts)
17. Sc in each st to end of round.
18. *2sc in the next st, sc 11*, repeat once. (26sts)
19. *2sc in the next st, sc 12*, repeat once. (28sts)
20-22. Sc in each st to end of round.
23. *2sc in the next st, sc 13*, repeat once. (30sts)
24. Sc in each st to end of round. Finish off, leaving a long tail.
Top spike (make 1)
1. Leave a long tail in the beginning to use to attach the spike to the hat. With an I hook and blue yarn, start with a magic circle of 6 sc sts (or preferred method of starting a circle of 6 sc sts), pull closed and place a marker for working in the round. (6sts)
2. Sc in each st to end of round.
3. 2sc in the next st, sc 5. (7sts)
4. Sc in each st to end of round.
5. Sc, *2sc in the next st, sc 2*, repeat once. (9sts)
6. 2sc in the next st, sc 8. (10sts)
7. *2sc in the next st, sc 4* repeat once. (12sts)
8. Sc in each st to end of round.
Note the change to hdc in the following rounds.
9. *2hdc in the next st, hdc 5*, repeat once. (14sts)
10. *2hdc in the next st, hdc 6*, repeat once. (16sts)
11. Hdc in each st to end of round.
12. *2hdc in the next st, hdc 7*, repeat once. (18sts)
13. *2hdc in the next st, hdc 8*, repeat once. (20sts)
14-15. Hdc in each st to end of round.
16. *2hdc in the next st, hdc 9*, repeat once. (22sts)
17. *2hdc in the next st, hdc 10*, repeat once. (24sts)
18-19. Hdc in each st to end of round.
20. *2hdc in the next st, hdc 11*, repeat once. (26sts)
21. *2hdc in the next st, hdc 12*, repeat once. (28sts)
22-23. Hdc in each st to end of round.
24. *2hdc in the next st, hdc 13*, repeat once. (30sts)
25. Hdc in each st until 2 sts remain, sc in the next st, sl st in the next st. Finish off, leaving a long tail.
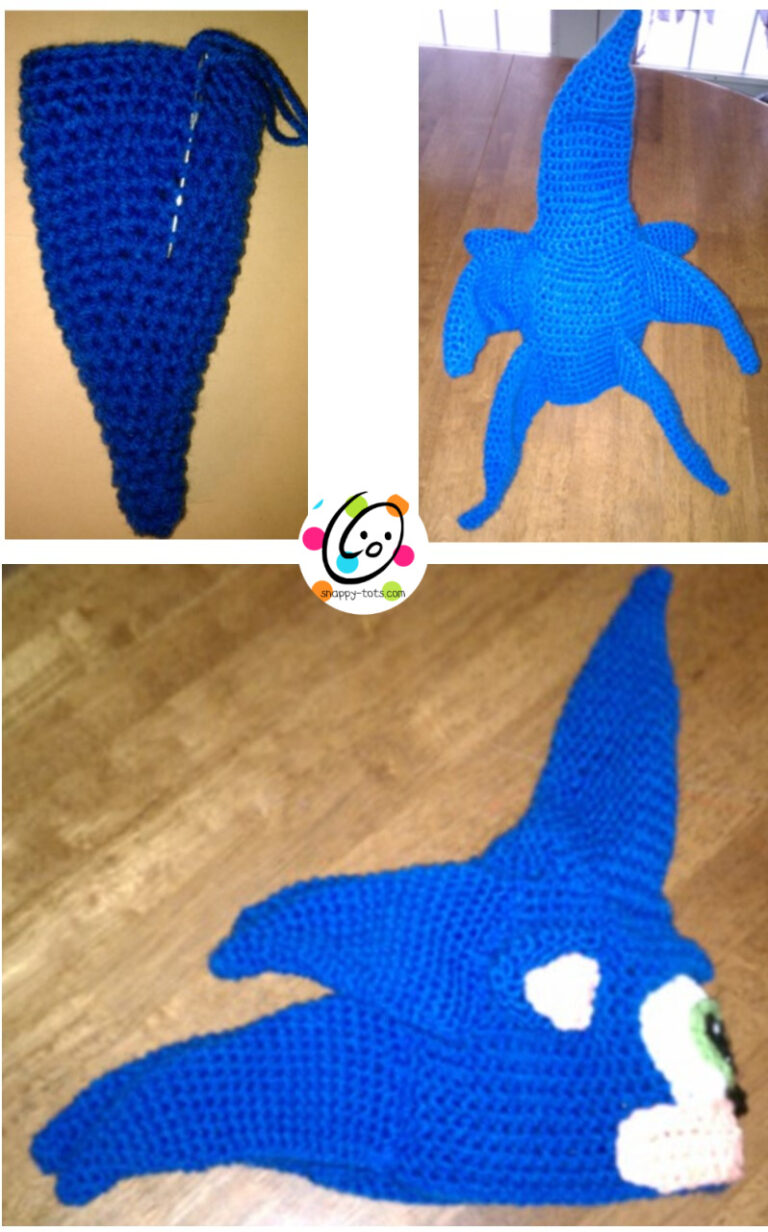
Shaping The Spikes
To create a slight arch to each spike: With a yarn needle, use the yarn tail at the beginning tip to thread the yarn through the stitches along one edge of the spike. See photos at the end of the pattern.
When the yarn has been woven through the stitches and is at the large opening, pull gently to gather stitches as much as desired. Use your fingers to smooth the stitches and even out the gathered area.
Attaching The Spikes To The Hat
Two longest spikes: Fold the hat in half to decide placement of the spikes. The two longest spikes are attached closest to the bottom of the hat, approximately 3” apart. Flatten the spikes. With a yarn needle, use the yarn tail to sew each spike to the hat.
Two middle spikes: The next two spikes are sewn slightly above the first two and a little further apart.
Top spike: The top spike is attached in a different way from the others. All other spikes are flattened and then sewn into place. The top spike is opened into a circle and sewn to the crown of the hat.
Note: the easiest way to get even placement is to place the hat onto a rounded surface, similar to a mannequin head. Use several pins to keep the spike in place. The rounds of the hat can be used as guides for even placement. Take your time.
Weave in all yarn ends.
Face
Make all face pieces before attaching any of them to the hat.
Eyes (make 2)
1. With an I hook and white yarn, start with a magic circle of 6 sc sts (or preferred method of starting a circle of 6 sc sts), pull closed and place a marker for working in the round. (6sts)
2. 2hdc in each st to end of round. (12sts)
3. 2dc in each st to end of round. (24sts)
4. Hdc in the next st, sc in the next st, sl st in the next st. Ch 2, do not turn, sc in the NEXT st (not the current st), sc in the next 5 stitches. Finish off, leaving a long tail for sewing the eyes to the hat.
Notice the shape of the eyes in the photo. They are not perfect. Fix the shape as you sew them to the hat with a yarn needle and the yarn tails.
Iris of eyes (make 2)
1. With an I hook and green yarn, ch 6, 2sc in the 2nd ch from the hook, sc 3, 3sc in the last ch. (8sts)
2. Rotate the piece to work in the back loops of the ch. Sc 4, sl st to join. Finish off, leaving a long tail for attaching to the hat.
Pupils (make 2)
With an H hook and black yarn, ch 6, sc in the 2nd ch from the hook and in each ch across. (5sts) Finish off, leaving a long tail for attaching to the hat.
Muzzle
1. With an I hook and peach yarn, ch 22, 2hdc in the 3rd ch from hook, hdc 18, (2hdc, 3dc) in the last st. Rotate the piece to work in the back loops of the ch. Hdc in each stitch with 3dc in the last st, sl st to join.
2. Ch 2, do NOT turn, hdc in the next st, hdc in each st, ch 2, sl st to join.
Nose
1. With an I hook and black yarn, start with a magic circle of 5 sc sts (or preferred method of starting a circle of 5 sc sts), pull closed and place a marker for working in the round. (5sts)
2-4. Sc in each st to end of round.
Sl st in the next st. Finish off, leaving a long tail for attaching to the hat.
Assembly
Position facial features on the hat, centered on the front. Place the muzzle along the bottom edge, with the eyes slightly underneath the top edge of the muzzle. Use yarn tails to sew all pieces in place.
With white yarn and yarn needle take a few stitches in each pupil to create a highlight.
3-D brow
Ok…now for some creativity! Once the face in sewn into place its time to create the brow that sticks out. Play with this for a few minutes before you start sewing to see how you want it to look.
Use a long blue yarn and yarn needle to take some stitches through the brow to keep it in place.
Ears (make 2)
1. With an I hook and blue yarn, start with a magic circle of 6 sc sts (or preferred method of starting a circle of 6 sc sts), pull closed and place a marker for working in the round. (6sts)
2. *2sc in the next st, sc*, repeat to end of round. (9sts)
3. *2sc in the next st, sc 2*, repeat to end of round. (12sts)
4. Sc in each st to end of round.
5. *2sc in the next st, sc 3*, repeat to end of round. (15sts)
6-7. Sc in each st to end of round.
8. *2sc in the next st, sc 4*, repeat to end of round. (18sts)
9. Sc in each st to end of round. Finish off, leaving a long tail for attaching to the hat.
Peach Insert (make 2)
1. With an I hook and peach yarn, ch 7, hdc in the 3rd ch from hook and in the next 4 chs. (5sts)
2. Ch 1, turn, hdc2tog, hdc 3. (4sts)
3. Ch 1, turn, hdc2tog, hdc 2. (3sts)
4. Ch 1, turn, hdc2tog, hdc. Finish off, leaving a long tail for attaching to the ears.
With a yarn needle, use the peach yarn tail to sew the insert to each ear, making sure the yarn doesn’t go through the second layer (back) of ear. Use the blue yarn tails to sew the ears in place on the hat. See photo for placement.

Good luck!
Pin To Save For Later
Similar Snappiness You Might Like
Before You Go…
Sign up for my mailing list and get a free crochet pattern of your choice on your birthday.


