

Crochet Reindeer Pouch
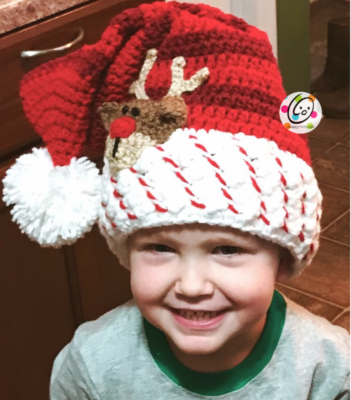
Since my youngest son was little I have made special Christmas hats for him each year. Now that I have two grand kids they need special hats too so last year I made “Santa’s Stocking Cap” for my grandson Leland. Isn’t he cute in his hat?
The reindeer applique turned out so cute that I have wanted to use it on another project. I designed this cute little pouch and it is just the right size to use for many things:
- Small treats/presents.
- Hang on the tree as a special ornament to hold a treat or momento.
- Make several to create a countdown to Christmas. Fill each little pouch with treats, small prizes, thoughtful notes, a festive event to do that day (read a Christmas story, go see Christmas lights, make sugar cookies, etc).
If you make one, please share a picture or let us know in the comments below how you used your new reindeer pouch.

Reindeer Pouch Pattern
Materials and Details
- Yarn: worsted weight in choice of colors
- Sample Yarns: Red Heart Super Saver Cherry Red, White, Soft White, Cafe, Tan
- Crochet Hook: G (4.25mm), H (5mm)
- Miscellaneous: yarn needle, 2 small black buttons, sewing needle and matching thread, small amount of stuffing, ¾” button for closure, small amount of black embroidery floss or light weight black yarn (for the mouth line), pins for holding pieces during assembly
- Gauge: not important for this project
Tips
- First stitch of each row is worked into the same stitch as the turning chain unless noted.
- Numbers at the beginning of each line may refer to steps and not indicate number of rows.
Directions: Bag
- With an H hook and red yarn, ch 15, sc in the 2nd ch from hook and in each ch across. (14sts)
- Buttonhole: Ch 1, turn, sc in the same st, sc 5, ch 2, sk 2, sc 6. Note: If you do not want a buttonhole, work an sc in each st across this row instead.
- Ch 2, turn, hdc in the same st and in each st across.
- Repeat previous step for an additional 24 rows.
- Ch 1, turn, sc in the same st and in each st across. Finish off and weave in ends. Set piece aside.
Directions: Reindeer
Head
- With a G hook and darker brown yarn, ch 9, sc in 2nd ch from hook and in each ch across. (8sts)
- Ch 1, turn, 2sc in same st, sc 6, 2sc in last st. (10sts)
- Ch 1, turn, 2sc in same st, sc 8, 2sc in last st. (12sts) 4-5. Ch 1, turn, sc in same st and in each st to end of row.
- Ch 1, turn, sc2tog, sc 8, sc2tog. (10sts)
- Change to light brown. Ch 1, turn, sc in same st and in each st to end of row.
- Ch 1, turn, sc2tog, sc 6, sc2tog. (8sts)
- Ch 1, turn, sc2tog, sc 4, sc2tog. (6sts)
- Ch 1, turn, sc in same st and in each st to end of row.
- Ch 1, turn, sc2tog, sc 2, sc2tog. (4sts)
- Ch 1, turn, sc2tog, sc2tog. (2sts) Finish off, leaving a yarn tail for sewing in place.
Nose
- With a G hook and red yarn, ch 4, sc in 2nd ch from hook, sc 2. (3sts)
- Ch 1, turn, sc in each st to end of row. Finish off, leaving a yarn tail for sewing nose to head. With a yarn needle, use the yarn tail to sew the nose to the center of the head piece, overlapping the color change.
With a sewing needle and thread, sew two buttons above the nose. With a yarn needle and black yarn or embroidery floss, stitch a line straight down from the nose.
Ears (make 2)
- With a G hook and yarn, start with a magic circle of 5 sc sts (or preferred method for starting a circle of 5 sc sts), pull closed and place marker for working in the round. (5sts)
- (hdc, dc) in next st, dc. Ch 1, turn, sl st 2, sc, 2sc in next st, 2sc in next st, 2sc in next st, sl st, sl st 2 in the side of the dc post. Finish off, leaving a tail for sewing in place. Set aside.
Antlers (make 2): With a G hook, ch 13, sl st 6, ch 6, sl st 11. Finish off, leaving a tail for sewing in place.
Fold the bag piece in half, matching the short ends, to find the middle. Mark the center fold and open the bag piece. Lay the head and antler pieces on the bag to find placement. The buttonhole should be at the top of the head.
With a yarn needle and using the yarn tail from each piece, sew the antlers in place. Sew the head in place, overlapping the bottom ⅓ of the antlers. Lightly stuff the head before finished. Tip: when stitching the outer edge of the head, switch to the darker brown yarn when sewing the top part of the head in place, then switch back to the lighter brown.
With a yarn needle, use the yarn tail to sew the rounded edge of each ear to the side of the head.
Bag Assembly
The button is sewn at the center of the opposite edge of the buttonhole, on the wrong side of the bag piece (the reindeer head is on the right side). Use a sewing needle and matching thread to sew the button in place.
Fold the bag piece in half, wrong sides together. Pin the edges together.
With an H hook, attach matching yarn to the bottom corner (as shown in photo).

Ch 1. Working through both layers, sc evenly up the side of the bag.
At the top edge, ch 25 (or desired length for the handle), sl st in the corner of the top edge (of both layers) at the opposite edge.
Working through both layers, sc evenly down the side of the bag.
Ch 1, turn, sl st in each st up the side, across the handle, and down the other side. Finish off and weave in ends.
Project complete.
Pin To Save For Later


