

Free Pattern: Quick Ridges Beanie
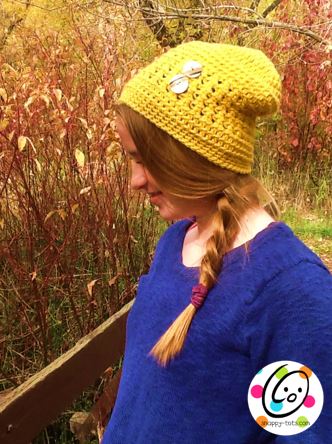
Beanies are so popular and I love when they can be made in any size, to fit a variety of styles. This pattern can be made slouchy, with or without a textured section, to fit everyone on your gift list.
I originally designed this pattern for a friend of mine, Tricia of Everlaughter. She is an awesome lady and her samples are always in bright, rainbows of color. She has been a great inspiration to me as a designer and person.


Quick Ridges Beanie Crochet Pattern
An ad-free, downloadable PDF of this pattern with all of the photos is available to purchase for a small fee from my shop.
Project Description
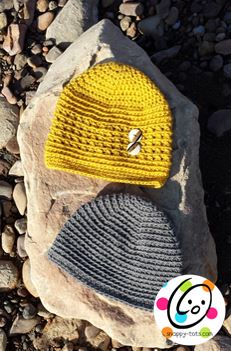
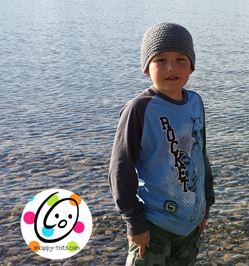
- About the project: Includes instructions for 2 styles of beanie, both worked in back loop stitches. This is a great style for the entire family and includes all sizes.
- Skill Level: Easy. Basic crochet skills are needed and must be able to read a crochet pattern.
- Completion Time (how long it takes the designer to make one): 1.5 hours. Of course this time will vary, but hopefully gives an idea. I always like to know approximately how long to plan for a project.
- Skill level: Beginner. Email help is always available.
Materials and Details
- Yarn: worsted weight in choice of colors
- Crochet Hooks: I
- Miscellaneous: yarn needle, buttons (optional)
- Gauge: 4″ = 14hdc and 13 rounds
- Sizes: newborn to adult
- Notes: All sizes start the same. Continue working increase rounds until desired size isnoted, then skip to “body”.
Tips
This hat is designed to be worked 2 different ways. Either work all sts in the back loop or start working in back loop only after increase rounds.
Choose option A or option B below.
Option A
For a slouchy version of this hat, start with a J hook and add 1-3” to the length, depending on hat size.
All stitches are worked in the back loops only (BLO). Change colors as desired.
1. With I hook and yarn color of choice, start with a magic circle of 8 sts (or preferred method of starting a circle of 8 sc sts), place marker for working in the round. (8sts)
2. 2hdc in each stitch to end of round. (16sts)
3. *hdc, 2hdc in next st*, repeat to end of round. (24sts)
4. Please note this round starts increasing by 6sts instead of 8sts. The repeat is “hdc 3”, not “hdc 2”. *hdc 3, 2 hdc in next st*, repeat to end of round. (30sts)
5. *hdc 4, 2 hdc in next st*, repeat to end of round. (36sts) newborn
6. *hdc 5, 2 hdc in next st*, repeat to end of round. (42sts) 3-6 mths
7. *hdc 6, 2 hdc in next st*, repeat to end of round. (48sts) 6-12 mths
8. *hdc 7, 2 hdc in next st*, repeat to end of round. (54sts) 12-24 mths
9. *hdc 8, 2 hdc in next st*, repeat to end of round. (60sts) Child/preteen
10. *hdc 9, 2 hdc in next st*, repeat to end of round. (66sts) Teen/Adult
Body: Working in BLO, Hdc in each stitch, changing colors as desired until hat measures 1” shorter than desired length, from top of hat to current row, according to chart at end of pattern.
When length has been reached, sc in each stitch around for desired width of band.
Newborn-24mths: 4 rounds; Child/preteen: 5 rounds; Teen-Lg adult: 6-7 rounds
Finish off and weave in ends.
~~~~~~~~~~~~~~~~~~~~~~~~~~~~~~~~~~~~~~~~~~~~~~~~~~~~~~
Option B
For a slouchy version of this hat, start with a J hook and add 1-3” to the length, depending on hat size.
The beginning of this style hat is worked through both loops as usual. Change colors as desired.
1. With I hook and yarn color of choice, start with a magic circle of 8 sts (or preferred method of starting a circle of 8 sc sts), place marker for working in the round. (8sts)
2. 2hdc in each stitch to end of round. (16sts)
3. *hdc, 2hdc in next st*, repeat to end of round. (24sts)
4. Please note this round starts increasing by 6sts instead of 8sts. The repeat is “hdc 3”, not
“hdc 2”. *hdc 3, 2 hdc in next st*, repeat to end of round. (30sts)
5. *hdc 4, 2 hdc in next st*, repeat to end of round. (36sts) newborn
6. *hdc 5, 2 hdc in next st*, repeat to end of round. (42sts) 3-6 mths
7. *hdc 6, 2 hdc in next st*, repeat to end of round. (48sts) 6-12 mths
8. *hdc 7, 2 hdc in next st*, repeat to end of round. (54sts) 12-24 mths
9. *hdc 8, 2 hdc in next st*, repeat to end of round. (60sts) Child/preteen
10. *hdc 9, 2 hdc in next st*, repeat to end of round. (66sts) Teen/Adult
Body (all sizes): Working in BLO, Hdc in each stitch to end of round for 3 rounds.
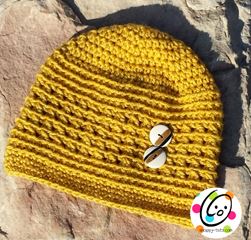
Cross stitch section:
1. Sc in next st, sl st in next st. From this point on each round is joined at the end.
Ch 2, dc in same st, *sk 1, dc, dc in skipped st*, repeat until 2 sts remain, dc 2, sl st in first st to join.
2-3. Ch 2, dc in same st, *sk 1, dc, dc in skipped st*, repeat until 2 sts remain, dc 2, sl st in first st to join. End here for sizes newborn to 24 months. Skip to “finishing all sizes”.
4. Ch 2, dc in same st, *sk 1, dc, dc in skipped st*, repeat until 2 sts remain, dc 2, sl st in first st to join. End here for sizes child/preteen. Skip to “finishing all sizes”.
5. Ch 2, dc in same st, *sk 1, dc, dc in skipped st*, repeat until 2 sts remain, dc 2, sl st in first st to join. Continue with “finishing all sizes”.
Finishing all sizes:
Ch 2. Working in BLO, Hdc in each stitch to end of round, sl st to join. Repeat until hat measures 1” shorter than desired length. Measure from top of hat to current row. Refer to chart at end of pattern for sizes. Continue with band.
Band: Ch 1, sc in each st to end of round, sl st to join. Repeat three times or more for additional length.
Finish off and weave in ends.
Embellishments: With sewing needle and thread, sew buttons to hat or add a crocheted flower or bow.
Please click the share buttons to spread the word about this free pattern.

This pattern is copyrighted to snappytots and may not be copied for resale in part or whole. It is illegal to post this pattern online or share with others without written consent from Heidi Yates. Items created from this pattern MAY be sold. Please include a link to snappy-tots.com if selling online.
Visit Snappy Tots on facebook for giveaways, new release announcements, events and fun. If you enjoyed this pattern, please check out the complete line of Snappy patterns.


