

Free Pattern: Icicle Ike Penguin
I am so ready for chilly air and snow! Maybe this guy will help Mother Nature know it is time for winter. He is cute hanging on your door, wall, or made into a pillow.
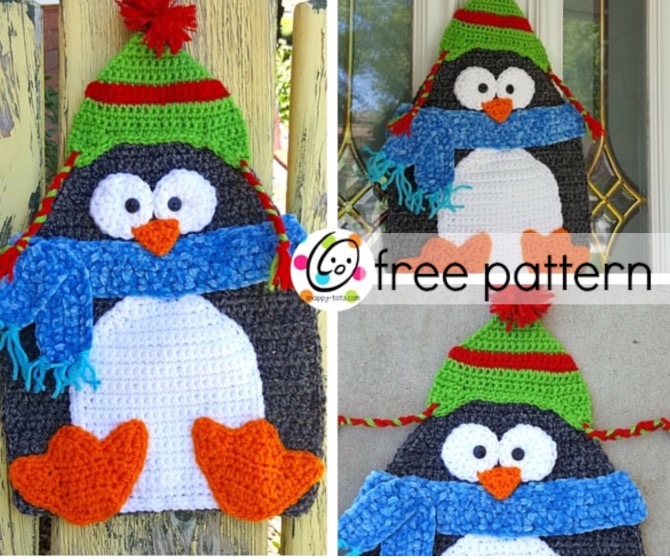
Meet Icicle Ike
This colorful guy can be a door decoration or made into a pillow to snuggle with. I LOVE how the Super Tweed yarn turned out, making the perfect penguin body.
Update: unfortunately the “super tweed yarn” has been discontinued. I have added some substitution suggestions to the materials list.
Crazy side note: I swear yarn companies think “hey, I wonder if Snappy Tots has created something fabulous with this yarn” and then if I have that is what they choose to discontinue.
Icicle Ike Penguin Crochet Pattern
This crochet pattern is available for free below. A downloadable file of this pattern is available to purchase from my shops for a small fee: Ravelry | Etsy
- Materials Yarn: Worsted yarn in colors of choice. Sample: Red Heart Yarns – Super Tweed in Smokey (substitution suggestions: Red Heart Charcoal, Black Fleck); Super Saver in Pumpkin, Cherry, Turqua, Spring Green, White, Black; Velvety in Lake; Scrubby red (optional for pompom)
- Crochet Hooks: H, I, J hook
- Miscellaneous: yarn needle, two small black buttons for eyes, sewing needle and black thread
- Gauge: not necessary for this project
- Finished size: 10” at widest point x 15” tall
Directions
Penguin Body (make 1 for door hanging, make 2 for pillow)
1. With I hook and black (smokey) yarn, ch 31, sc in 2nd ch from hook and in each ch across. (30sts) 2-18. Ch 2, turn, hdc in each st to end of row.
19. Ch 1, turn, sc2tog, sc in each st until 2 sts remain, sc2tog. (28sts)
20. Ch 2, turn, sc in each st to end of row. 21-28. Repeat steps 19-20. (20 sts after row 28)
29. Ch 1, turn, sc2tog, sc16, sc2tog. (18sts)
30. Ch 1, turn, sc2tog, sc 14, sc2tog. (16sts)
31. Ch 1, turn, sc2tog, hdc 12, sc2tog. (14sts)
32. Ch 1, turn, sc2tog, sc, hdc 2, dc 4, hdc 2, sc, sc2tog. (12sts)
33. Ch 1, do not turn. Sc evenly around piece, working (sc, ch 1, sc) in each corner. Finish off and weave in ends. Set aside.
Tummy (make 1)
1. With I hook and white yarn, ch 21, sc in 2nd ch from hook and in each ch across. (20sts) 2-18. Ch 1, turn, sc in each st to end of row.
19. Ch 1, turn, sc2tog, sc in each st until 2 sts remain, sc2tog. (18sts) 20-25. Ch 1, turn, sc2tog, sc in each st until 2 sts remain, sc2tog. (6 sts after row 25)
26. Ch 1, do not turn. Sc evenly around piece, working (sc, ch 1, sc) in each corner. Finish off, leaving a long yarn tail for sewing to body.
With yarn needle and yarn tail, sew tummy to penguin, lining up bottom edges.
Feet (make 2):
1. With I hook and orange yarn, ch 6, sc in each ch to end of row. (5sts)
2. Ch 2, turn, 2hdc in same st, hdc 3, 2hdc in last st. (7sts)
3. Ch 2, turn, 2hdc in same st, hdc 5, 2hdc in last st. (9sts)
4. Ch 2, turn, 2hdc in same st, hdc 7, 2hdc in last st. (11sts)
5. Ch 1, turn, sc 3. Sts will be left unworked. This creates his first “toe”. (3sts)
6. Ch 1, turn, sc2tog, sc. (2sts)
7. Ch 1, turn, sc2tog. Finish off.
8. Attach yarn to opposite edge of row 5. Ch 1, sc 3. This creates his second “toe”. (3sts)
9. Ch 1, turn, sc2tog, sc. (2sts)
10. Ch 1, turn, sc2tog. Finish off.
11. Attach yarn to first unused st between “toes”. Ch 1, sc 5. (5sts)
12. Ch 1, turn, sc2tog, sc, sc2tog. (3sts)
13. Ch 1, turn, sc2tog, sc. (2sts)
14. Ch 1, turn, sc2tog.
15. Ch 1, sc evenly around outer edge, working (sc, ch 1, sc) in each peak, sl st to join. Finish off, leaving a yarn tail for sewing foot to penguin.
With yarn needle and yarn tail, sew each foot to penguin. See photo for placement.
Scarf (make 1)
1. With J hook and velvety yarn, ch 33, sc in 2nd ch from hook and in each ch across. (32sts) 2-3. Ch 2, turn, hdc in each st to end of row.
4. Ch 1, turn, sc in each st to end of row. Finish off, leaving a long yarn tail for sewing to penguin.
Wrap short ends around edge of penguin, making it look like the scarf goes around his neck. With yarn needle and yarn tail, sew scarf to penguin.
Scarf tail (make 1)
1. Ch 19, sc in 2nd ch from hook and in each ch across. (18sts) 2-3. Ch 2, turn, hdc in each st to end of row.
4. Ch 1, turn, sc in each st to end of row. Finish off and weave in ends.
Tie a knot in the middle of the scarf tail. With yarn needle and matching yarn, sew knot to scarf.
Cut 12 strands of turqua yarn, 10″ long. Divide in half. Fold 2 strands in half and pull center through a stitch at the end of one scarf tail. Pull yarn tails through the folded loops and tight against scarf. Repeat across both scarf tails, 3 pairs per tail.
Eyes (make 2):
1. With H hook and white yarn, start with a magic circle of 6 sts (or preferred method for starting a circle of 6 sc sts), pull closed and sl st to join.
2. Ch 1, 2sc in each st to end of round, sl st to join. (12sts)
3. Ch 1, *hdc, 2hdc in next st,* repeat to end of round, sl st to join. (18sts) Finish off, leaving a tail for sewing in place. With yarn needle and yarn tail, sew each eye to penguin. With sewing needle and black thread, sew a button on top of each eye piece for pupils.
Beak (make 1)
1. Leave a yarn tail in the beginning for sewing beak in place. With H hook and orange or yellow yarn, ch 7, sc in 2nd ch from hook and in each ch across. (6sts)
2. Ch 1, turn, sc2tog, sc 2, sc2tog. (4sts)
3. Ch 1, turn, sc2tog, sc2tog.
4. Ch 1, turn, sc2tog. Finish off and weave in end. With yarn needle and yarn tail, sew beak in place, slightly overlapping bottom edge of eyes and top of scarf.
Hat (make 1 for door hanging, 2 for pillow) 1 With H hook and green yarn, ch 4, 2sc in 2nd ch from hook, sc, 2sc in last ch. (5sts)
2. Ch 1, turn, sc in each st to end of row.
3. Ch 1, turn, 2sc in same st, sc 3, 2sc in last st. (7sts)
4. Repeat step 3 until 17sts
5. Change to red yarn. Ch 1, turn, 2sc in same st, sc 15, 2sc in last st. (19sts)
6. Ch 1, turn, sc in each st to end of row.
7. Change to green yarn. Ch 1, turn, 2sc in same st, sc 17, 2sc in last st. (21sts)
8. Ch 1, turn, sc in each st to end of row.
9. Ch 1, turn, 2sc in same st, sc 19, 2sc in last st. (23sts)
10. Ch 1, turn, sc in each st to end of row.
11. Ch 1, turn, sc 5. There will be stitches left unworked. This starts the first earflap. (5sts)
12. Ch 1, turn, sc2tog, sc 3. (4sts)
13. Ch 1, turn, sc 2, sc2tog. (3sts)
14. Ch 1, turn, sc2tog, sc. (2sts)
15. Ch 1, turn, sc2tog. Finish off and weave in end.
16. Attach yarn to opposite end of row 11. Ch 1, turn, sc 5. There will be stitches left unworked. This starts the second earflap. (5sts)
17. Ch 1, turn, sc2tog, sc 3. (4sts)
18. Ch 1, turn, sc 2, sc2tog. (3sts)
19. Ch 1, turn, sc2tog, sc. (2sts)
20. Ch 1, turn, sc2tog.
21. Ch 1, turn, sc evenly across bottom edge of hat. Finish off, leaving a yarn tail for sewing bottom edge of hat to penguin.
With yarn needle and yarn tail, sew bottom edge of hat to top of penguin head.
Braids (make 2) Cut 1 strand of green and 2 strands of red 10″ long per braid. Pull the ends of 3 strands through the tip of one earflap. Braid the strands and tie a knot in the end. Trim the ends and pull the strands apart for a frizzy look.
PomPom (top of hat)
Hold one strand of red yarn plus one strand of red scrubby yarn (optional) and wrap 12 times around the palm of your hand. Carefully slide the yarn off your hand and wrap an 8” length of yarn around the center, pulling tight and knotting to hold in place. Do NOT cut this piece of yarn. Cut loops of pompom. Firmly tie the pompom to the top of the hat. Trim pompom as desired.
Wall Hanger
If you would like to hang this on a wall, it is helpful to add a hook to the top/back.
With an H hook and yarn that matches the pompom, attach the yarn to the top of the hat. Ch 15, sl st in same st as start of chain. Finish off, tie a knot with both yarn tails. Trim yarn to blend into pompom.
Pillow Assembly
Follow directions, making 2 full penguins or one complete penguin and one plain body and one hat without tassels.
With wrong sides together, place body pieces so edges line up. Pin pieces together. With matching yarn and yarn needle, sew outer edge of layers together, leaving enough room open to stuff the pillow.
Stuff pillow until desired firmness. With matching yarn and yarn needle, sew closed.
Pin To Save For Later

I love this so much! You made my day.thank you!