Free Pattern: Toothy Grin
A Mr. Chesh mask for dress up or when a face covering is needed.
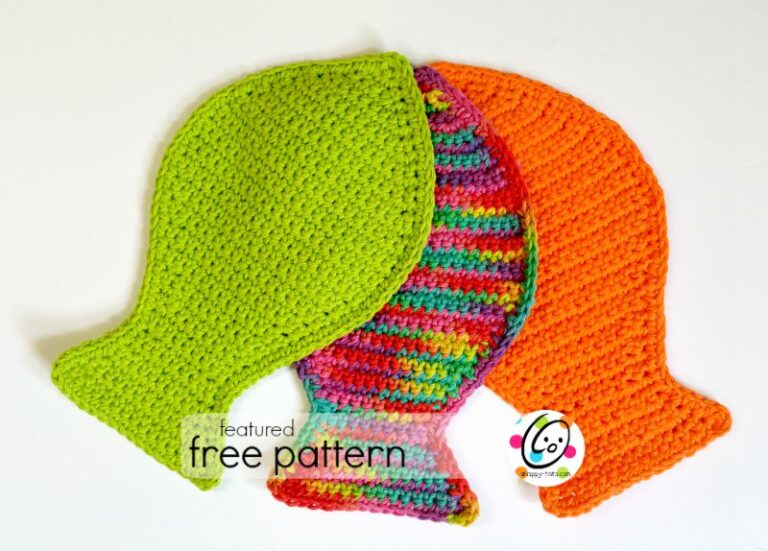
In June, my youngest son Hayden (13) and I are flying to Texas to help my daughter and granddaughter, Lucy, move back to Utah so they can get settled before she starts a new job. My son in law is finishing up some things with the army and will join them in July. Hayden and I have masks to wear on the flight, but I wanted something fun to change into before I see Lucy. I knew I wanted to make a big toothy grinned Mr. Chesh grinned mask based on my Chesh patterns.

It is important to note that this mask, as shown in my son’s photo, is quite warm. Because I don’t leave the house much and am not around others when I do, I am not used to wearing a mask so I do not know how this compares to other crocheted masks. Since this is double thickness it will be warmer than others… which will make it great for keeping my face warm when I shovel snow this winter!
I was excited to see Yarnspirations release a crocheted mask pattern. I know there has been a TON of conversation over the safety of different masks, but Yarnspirations made sure their mask does “align with current CDC guidelines for homemade masks”.
I whipped up the mask (without the added liner or grin) in about thirty minutes.

The mask instructions are very easy to follow and I am really pleased with the fit. They also include a template and instructions for adding a liner for more protection.

Base Mask Pattern
Disclaimer from Yarnspirations’ website: These masks have not been tested but were created by the Yarnspirations design team to align with current CDC guidelines for homemade masks. Please always follow the latest mask recommendations put out by your country.
- Free Crochet pattern: Crochet pattern instructions
- Video: How to Crochet the mask
Materials
- Yarn: I used Red Heart With Love in Violet. Less than 100 yards.
- Crochet Hook: H (5mm)
The mask pattern includes instructions for 4 ties or elastic. I wanted to crochet ear loops.
Ear Loops: Attach matching yarn to one corner of the mask. Ch 26, sl st in the opposite corner on the same edge. Sl st in each st across one edge of the mask, being careful to not pull these sts too snug. At the corner, ch 26, sl st in the opposite corner on the same edge. Sl st in each st across this edge. Secure yarn at the corner and weave in ends.
Toothy Grin Pattern

This would work with any type of mask and could also be sewn any place a smile is needed.
Materials For Grin
- Yarn: Small amounts of RHSS yarn in Light Plum, White, Shocking Pink, Black.
- Crochet Hook: H (5mm)
- Miscellaneous: yarn needle, pins (optional)
Smile
- With an H hook and white yarn, ch 20, sc in the 2nd ch from the hook and in the next 3 chs, (hdc, dc) in the next ch, dc 3, trc 3, dc 3, (dc, hdc) in the next ch, sc 4. (21sts)
- Ch 1, turn, sc in the same st and in the next 3 sts, hdc, 2hdc in next st, hdc, dc 2, 2dc in next st, dc, 2dc in next st, dc 2, hdc, 2hdc in next st, hdc, sc 4. (25sts)
- Change to lavender yarn. Work in BLO for this step. Ch 2, turn.
Dc in the same st and in the next 7 sts, 2dc in the next st, dc 3, 2dc in the next st, dc 3, 2dc in the next st, dc 7, 3dc in the st. Note: next 3 sts should be worked in the side of the smile. 2dc in next st, hdc.
Working across the top of the smile, 2hdc in next st, dc 6, dc2tog, dc, dc2tog, dc 6, 2hdc in next st. Note: next 3 sts should be worked in the side of the smile (similar to the first side), hdc, 2dc in next st, sl st in first st to join. (55sts)
Finish off, leaving a long tail for sewing to item. - I pulled my ww black yarn apart and used 2 of the 4 strands to outline the teeth. You could use lightweight black yarn if you’d prefer. With black yarn and a yarn needle, stitch around the smile and outline the “teeth”.
Nose
- With an H hook and dark pink yarn, start with a magic circle of 8 sc sts (or preferred method for starting a circle of 8sts), pull closed, and sl st to join. (8sts)
- Ch 1, 2hdc in each st to end of the round, sl st to join. (16sts)
- Ch 1, sc2tog, sc 4, 2hdc in next st, sc 4, sc2tog, sl st 3 (this is the top edge of the nose). Finish off, leaving a long tail for sewing in place. Set aside.
Assembly
Place the smile on the mask to find placement. I first attached mine lower than I wanted so I moved it higher. I suggest attaching it so the top edges of the grin piece are next to the top edge of the mask. Then place the nose as desired.
Use a yarn needle and the yarn tail from the smile to sew the outer edge to the mask.
Use a yarn needle and the yarn tail from the nose to sew the nose in place, allowing the center to bulge. Lightly stuff the nose if desired, but not necessary.
Pin To Save For Later