Free Pattern: Snowflake Banner
Long, round pillows (aka Bolsters) have always been one of my favorites and something I have wanted to design. For one of my events, I thought it would be fun to make one with interchangeable pieces for each end. Hence, the birth of my “All Seasons Bolster” (available from Etsy and Ravelry).
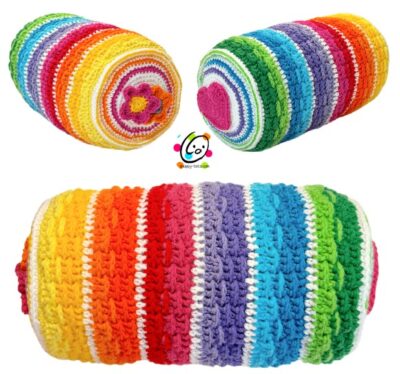
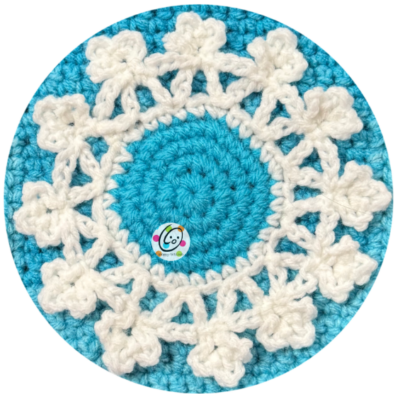
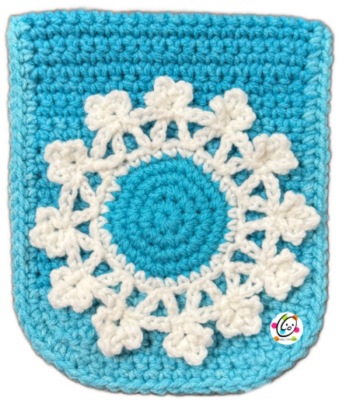
For the winter “scene”, I made a large snowflake. It turned out so pretty!
Since each of these little add-ons were great decorations on their own I made a little banner in case someone wanted to use it that way instead.
This is designed to attach to my “All Seasons Bolster” (available from Etsy and Ravelry) or one of your favorite items and switch out for the seasons.
Add a Little Chill Crochet Pattern
The pattern for the snowflake and banner are free to follow along below. This pattern is available for free below.
Materials & Details
- Yarn: small amounts of worsted weight yarn.
- Crochet Hook: H (5mm)
- Notions: Yarn needle for weaving in ends, 1 large sew on snap, sewing needle, black thread
- Gauge: refer to measurements throughout pattern to match size
- Measurements: 5.75” across, from tip to tip
Tips
- Numbers at the beginning of each line may refer to steps and not indicate the number of rows.
- The beginning ch does not count as a st.
- The stitch count remains the same unless noted otherwise.
- If you have any questions about this pattern please contact [email protected].
Snowflake
1. With an H hook and worsted weight yarn (Sample: Turqua), create a magic circle of 8 sc sts (or preferred method of starting a circle of 8 sc sts), pull closed and sl st to join. (8sts)
2. Ch 1, 2sc in each st to end of round, sl st to join. (16sts)
3. Ch 1, *sc, 2sc in the next st*, repeat to end of round, sl st to join. (24sts)
4. Ch 1, *sc 3, 2sc in the next st*, repeat to end of round, sl st to join. (30sts)
5. Finish off the current yarn and change to white yarn. Ch 1, *sc 4, 2sc in the next st*, repeat to end of round, sl st to join. (36sts)
6. *ch 7, sl st in the 5th ch from hook, ch 2, sk 1 on circle, sl st 2*, repeat to end of round
7. Look at the peaks created in the previous round. Each has a space at the bottom and a small one at the top. *Sl st in the first space, sl st in the top space. *ch 4, sl st in the same space*, repeat 2 more times. Sl st in the bottom space (from the opposite side), ch 4*, repeat to end of round, sl st in the first space to join.
| Choose one of the following options for finishing your project: Snap On Version: With a yarn needle, use the yarn tail to sew one part of the snap to the middle of the wrong side of the center circle. Make sure this is the opposite side of the snap from the one on the item you want to snap to. A snap could be added to the banner so you could switch items each month/season. Banner: Follow instructions below for making the banner. |
Banner (optional)
This starts at the top edge.
1. With an H hook and worsted weight yarn (Sample: Ombre Scuba), ch 21, sc in the 2nd ch from hook and in each ch across. (20sts)
2. Ch 1, turn, sc in the same st and in each st to end of row.
3. Repeat the previous for an additional 6 rows.
4. This step creates a casing at the top edge of the banner. Ch 1, turn. Fold the piece in half, matching the beginning and current edges. Working through both layers, sc in the same st and in each st to end of row. (20sts)
5. Ch 1, turn, sc in the same st and in each st to end of row.
6. Repeat the previous row for an additional 19 rows.
7. Ch 1, turn, sc2tog, sc in each st until 2 sts remain, sc2tog. (18sts)
8. Ch 1, turn, sc2tog, sc in each st until 2 sts remain, sc2tog. (16sts)
9. Ch 1, turn, sc2tog, sc in each st until 2 sts remain, sc2tog. (14sts)
10. Ch 1, turn, sc2tog, sc, hdc 8, sc, sc2tog. (12sts) Finish off and weave in ends.
11. This step creates a border around the outer edge. Insert the hook in the top left edge of the casing. See photo.
Ch 1, evenly sc across the front layer of the casing and down the side of the banner. 2sc in the first st on the bottom edge, sc in each st until 1 st remains, 2sc in the last st, sc evenly up the sidee of the banner and across the front layer of the casing. This is the right side/front of the banner.
12. Ch 1, turn, loosely sl st in each st from the previous step. Finish off and weave in ends.
Attach the snowflake either by snap or use a yarn needle and matching yarn to sew the first round of white and the tips of the snowflake to the banner.