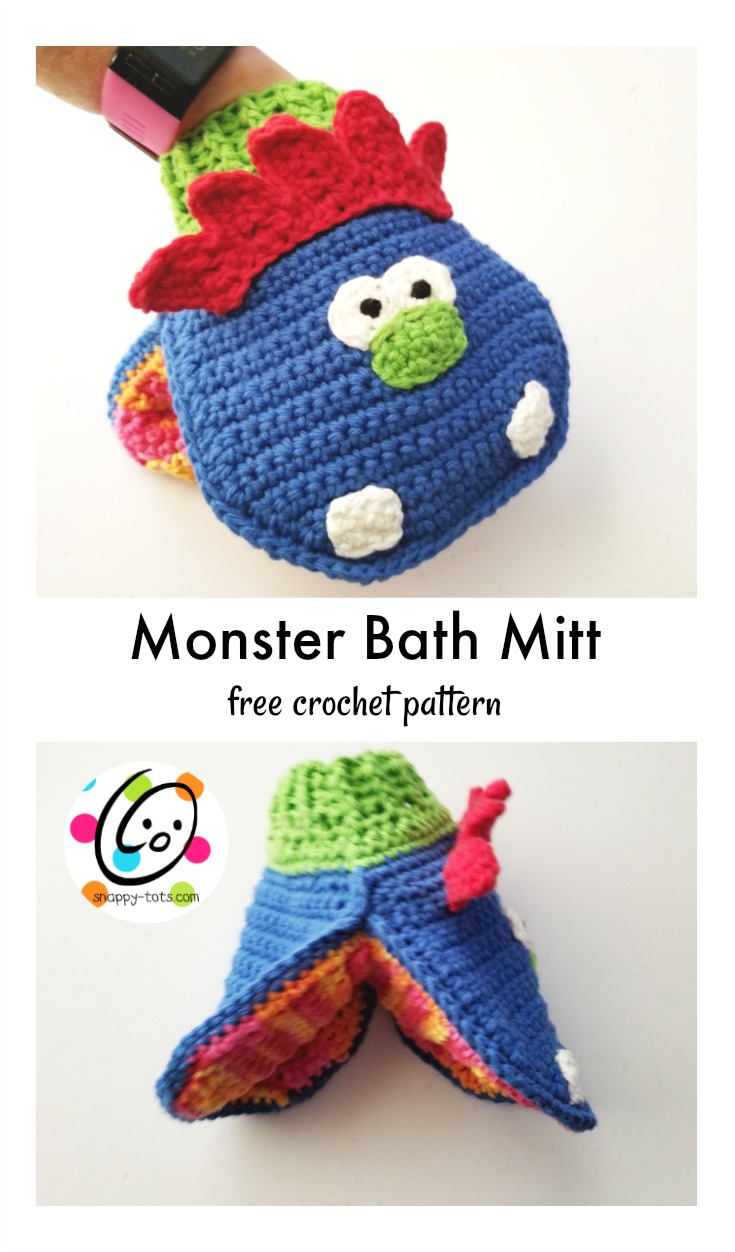
Free Pattern: Monster Bath Mitt
My kids have always liked bath mitts so I have wanted to try a crocheted version.
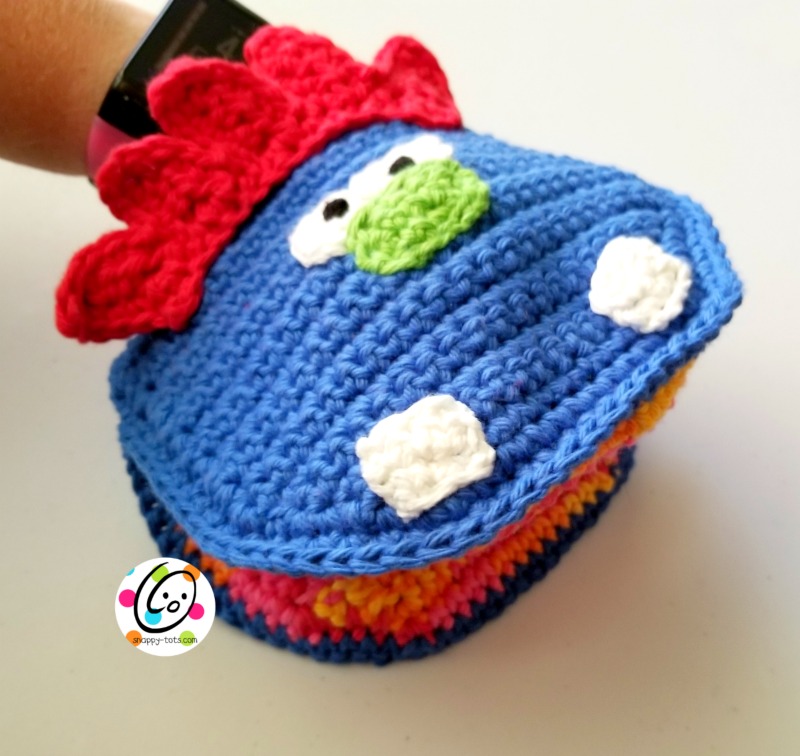
Monster Bath Mitt
Click HERE to add this to your Ravelry favorites or to purchase a downloadable, ad-free version.
Materials
Yarn: Red Heart Scrubby Smoothie Worsted Weight Cotton Yarn (I LOVE this yarn!)
Sample Yarns: Red Heart Scrubby Smoothie in Royal, Zesty, White, Lime, Cherry and a tiny bit of black.
Crochet Hook: H
Miscellaneous: Yarn needle, pins (optional)
Directions
Inside Mouth Piece – Zesty (variegated) yarn in sample
- With an H hook and yarn, ch 15, sc in 2nd ch from hook and in each ch across. (14sts)
- Ch 1, turn, 2sc in same st, sc 12, 2sc in last st. (16sts)
-
Ch 1, turn, 2sc in same st, sc 14, 2sc in last st. (18sts)
-
Ch 1, turn, 2sc in same st, sc 16, 2sc in last st. (20sts)
-
Ch 1, turn, 2sc in same st, sc 18, 2sc in last st. (22sts)
-
Ch 1, turn, sc in each st to end of row.
-
Repeat previous row 23 more times (a total of 24 sc rows after step #5).
-
Ch 1, turn, sc2tog, sc 18, sc2tog. (20sts)
-
Ch 1, turn, sc2tog, sc 16, sc2tog. (18sts)
-
Ch 1, turn, sc2tog, sc 14, sc2tog. (16sts)
-
Ch 1, turn, sc2tog, sc 12, sc2tog. (14sts)
-
Ch 1, turn, sc in each st to end of row.
-
This step is worked around the outer edge of this piece. Ch 1, do not turn. Sc in same st. Sc evenly around piece (working one st at the end of each row), with 2sc at each bend to help the piece curve. At the end of the round, sl st in first st to join.
Finish off and weave in ends. Set this piece aside.
Outer Piece – Blue in sample (make 2-3 pieces)
Two pieces are needed. A third piece could be created as a liner to cover the back of the stitches from attaching the facial features.
- With an H hook and yarn, ch 15, sc in 2nd ch from hook and in each ch across. (14sts)
-
Ch 1, turn, 2sc in same st, sc 12, 2sc in last st. (16sts)
-
Ch 1, turn, 2sc in same st, sc 14, 2sc in last st. (18sts)
-
Ch 1, turn, 2sc in same st, sc 16, 2sc in last st. (20sts)
-
Ch 1, turn, 2sc in same st, sc 18, 2sc in last st. (22sts)
-
Ch 1, turn, sc in each st to end of row.
-
Repeat previous row 11 more times (a total of 12 sc rows after step #5).
-
This step is worked around the outer edge of this piece. Ch 1, do not turn. Sc in same st. Sc evenly around piece (working one st at the end of each row), with 2sc at each bend to help the piece curve. At the end of the round, sl st in first st to join. Finish off and weave in ends.
Finish off and weave in ends. Set pieces aside.
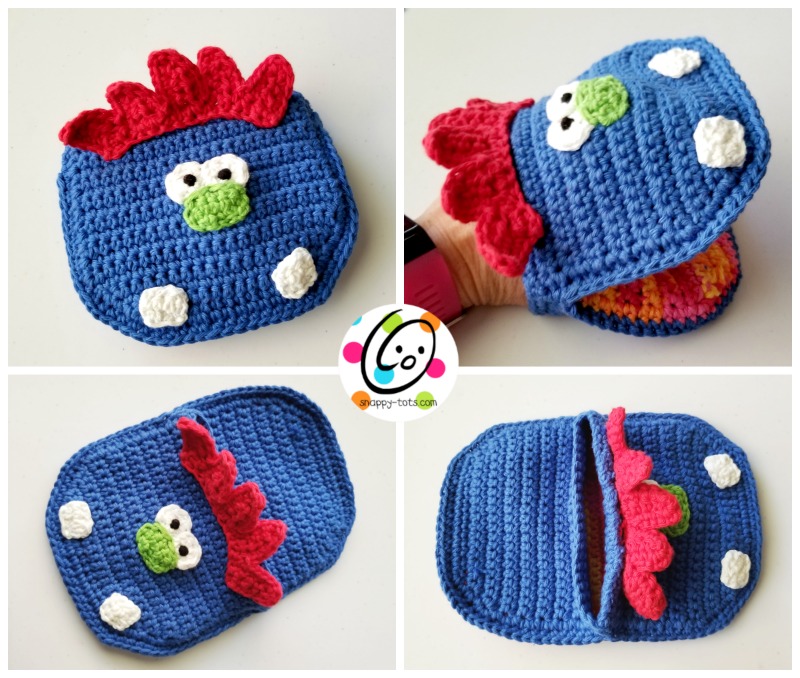
Face
Eyes (make 2)
With an H hook and white yarn, create a magic loop of 6 hdc sts (or preferred method for creating a circle of 6 hdc sts), pull closed and sl st to join. (6sts) Finish off, leaving a tail for sewing in place.
With a yarn needle and yarn tail, stitch the eyes to the center of one “outer piece”.
Pupil: Cut a piece of black yarn approximately 18″ long. Fold the piece in half. Tie a knot in the middle and then another knot over the first one. Pull the yarn tails through the middle of the eye. Secure the tails behind the “outer piece”. Repeat for second eye.
Nose
- With an H hook and green yarn, ch 5, 2sc in 2nd ch from hook, sc 2, 2sc in last ch. (6sts)
-
Ch 1, turn, sc in each st to end of row.
-
Ch 1, turn, sc2tog, sc 2, sc2tog. (4sts) Finish off, leaving a tail for sewing in place.
With a yarn needle and yarn tail, stitch the nose to the face, overlapping the bottom edge of the eyes slightly.
Teeth (make 2)
- With an H hook and white yarn, ch 4, sc in 2nd ch from hook, sc 2. (3sts)
-
Ch 1, turn, sc in each st.
-
Ch 1, turn, sl st in next 2 sts. Finish off, leaving a tail for sewing in place.
With a yarn needle and yarn tail, sew the outer edge of each tooth to the bottom edge of the face piece, just in from the outer round.
Hair (make 2 pieces)
- With an H hook and red yarn, ch 5, sl st in 2nd ch from hook, sc, hdc 2. (4sts) First “spike” complete.
-
Ch 6, sl st in 2nd ch from hook, sc, hdc 2. Leave remaining chain unworked. This chain is to create a “gap” between the first two spikes. Second “spike” complete.
-
Ch 7, sl st in 2nd ch from hook, sc, hdc 3. Leave remaining chain unworked. Third “spike” complete.
-
Ch 6, sl st in 2nd ch from hook, sc, hdc 2. Fourth “spike” complete.
-
Ch 6, sl st in 2nd ch from hook, sc, hdc 2. Fifth “spike” complete. Finish off.
-
Repeat steps 1-5 for a second hair piece, but do not finish off.
-
Ch 1 and turn piece to work up side of last spike created. Place the first hair piece under the current piece and line up the spikes. Pin together if needed. Working through both layers, sc in each st up side of the first spike to tip, (sc, hdc, ch 1, sc) in tip, sc in each st down side of spike, sl st in ch of both layers between spikes.
*Sc in each st up side of the next spike to the tip, (sc, hdc, ch 1, sc) in tip, sc in each st down side of spike, sl st in ch of both layers between spikes*, repeat for each spike. After last spike there will not be a chain to work the sl st into.
Ch 1, turn. This step is worked across the bottom (flat) edge of the hair piece. Sc evenly across. Finish off, leaving a tail for sewing the bottom edge of the hair to the face piece.
With a yarn needle and yarn tail, sew the bottom edge of the hair piece just above the face, approximately 1-2″.
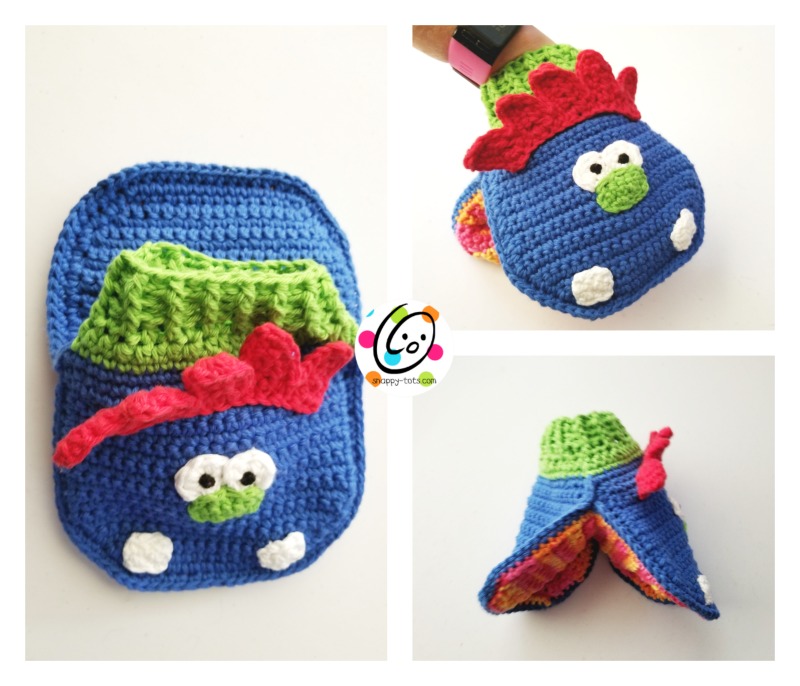
Assembly
The blue/outer pieces are slightly longer when placed together than the inside mouth piece. The extra length is to help make it easier to insert your hand into the opening.
With wrong sides together, line up the rounded (mouth opening) edge of the BLANK (non face) blue/outer piece with the long inside mouth piece.
Insert the hook into the 3rd st down from the top edge of one outer piece and a st at the center of the inside mouth piece.
With an H hook and matching yarn, sc through both layers in each st around the mouth opening to the middle stitch at the opposite edge. Finish off yarn.
Place the face piece on top of the other half of the inside mouth piece, wrong sides together. Insert hook into the 3rd st down from the top edge of the outer piece and into the next st on the inside mouth piece. Sc through both layers (or all three if you chose to make a liner piece) in each st around the mouth opening to the last remaining st at the opposite edge. Do not finish off.
At this point, we’ll join the remaining sides of the blue pieces. Sc in each st of the blue/outer pieces, (sc, ch 1, sc) in the corner st.
This part is worked across the top of the face piece only. Sc in each st across the top edge. This step is worked into both blue layers. (sc, ch 1, sc) through both layers at the tip. Sc the layers together, working down the edge.
The project can be complete here or an additional cuff can be added.
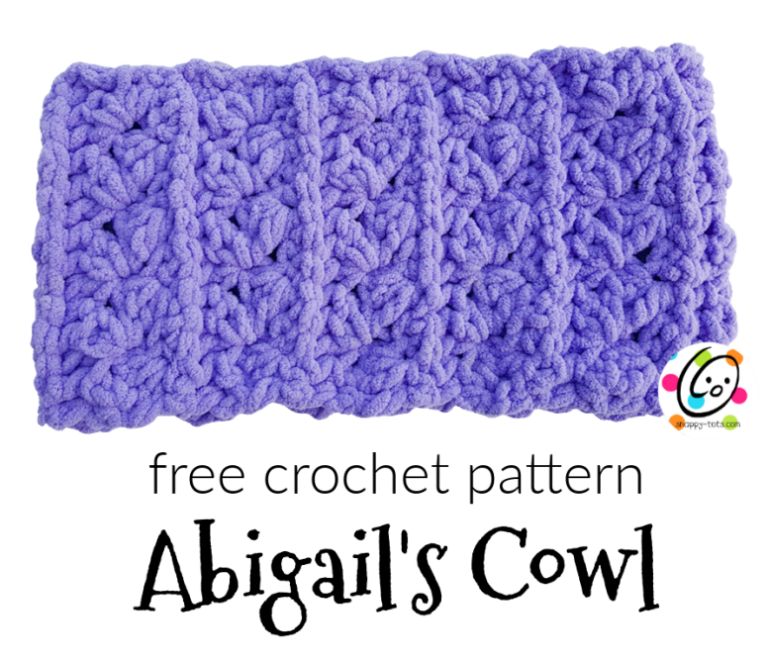
Cuff (optional)
- With an H hook, attach green (or any contrasting yarn) to a stitch in the middle of the top edge of the hand opening. Ch 1, sc in each st to the first corner, sc2tog, sc in each st to the next corner, sc2tog, sc in each st to end of round, sl st to join. (approximately 46sts)
-
Ch 1, hdc in same st, hdc2tog, hdc 2, hdc2tog, hdc in each st to the corner, hdc2tog at the corner, hdc 3 sts, hdc2tog, hdc in each st to the middle of this piece, hdc2tog, hdc 2, hdc2tog, hdc in each st to the corner, hdc2tog at the corner, hdc 3 sts, hdc in each st to end of round, sl st to join. (38sts)
-
Ch 1, *hdc2tog, hdc 3,* repeat until there are 3 sts, hdc2tog, hdc, sl st to join. (30sts)
4-6. Ch 2, FPHDC around the next post, BPHDC around the next post, repeat to end of round, sl st to join.
Finish off and weave in ends. Project complete.
Pin To Save For Later