Free Pattern: Goose Holiday Suits
I made outfits for our geese for Thanksgiving but ran out of time to post the patterns SO I made Christmas versions and both versions are in these new patterns: “Goose Holiday Suits” and “Goose Tutus“.

Scroll down to see some of the awesome creations by my testers!
Watch for more fancy outfits to come each month. You can find the latest “Ducke and Goose” patterns at THIS LINK and find more goose outfits and accessories at THIS LINK.
Where To Get The Goose
This is designed for a 23” goose statue like the one sold by Miles Kimball: https://www.mileskimball.com/buy-large-white-goose-23-h-310493
It is also available from Amazon: https://amzn.to/3AdRWSP
Stylin Geese
Thank you to my awesome testers for sharing pictures of their creations. More to come!
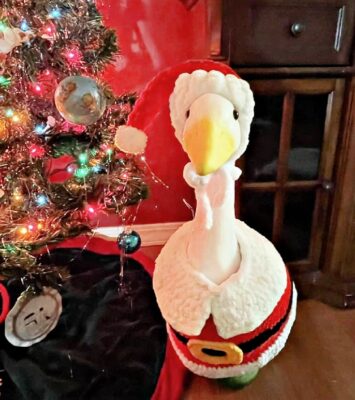
Susan Fischer made this cute Santa suit for her goose, “Henry”. I love how she used Bernat Blanket yarn for the collar and trim.
Goose Holiday Suits Crochet Pattern
The patterns for the suits and hats are available to view here on the blog. An ad-free, downloadable pdf
is available to purchase from my shops: Etsy | Ravelry
The pattern for the santa hat is available with a chunky santa sweater at this link.
Materials
- Yarn: worsted weight in the following colors – 150 yards dark brown/red, 40 yards black, 50 yards off white/white, 10 yards gold
- Crochet Hook: H (5mm), I (5.5mm)
- Supplies: Yarn needle for weaving in ends
- Optional: Measuring tape, scissors
Measurements
- Finished Measurements:
Suit – 9” from top to bottom, 14” across bottom edge - Gauge – 4” with an I hook = 14 hdc sts and 9.5 hdc rounds
Tips
- The first stitch of each row is worked into the same stitch as the turning chain unless noted.
- Numbers at the beginning of each line may refer to steps and not indicate number of rows.
- Stitch count remains the same unless noted at end of row/round.
- If you have any questions about this pattern please contact [email protected].
The Suits

- This starts at the neck edge and is worked in rounds to the bottom edge. The collar is added after suit is complete.
- Instructions are written for color changes as shown in the sample. Substitute colors as desired.
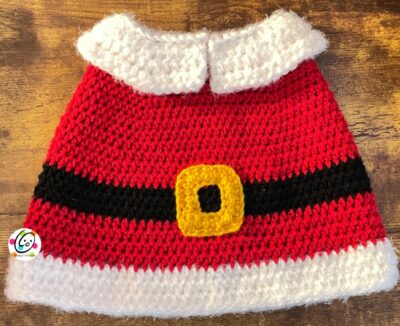
- Both the Santa and Pilgrim suits are made from the same pattern with changes noted as needed.
1. With an I hook and dark brown or red yarn, ch 44, sl st in the last ch from hook to form a circle. Make sure the chain is not twisted. (44sts)
2. Ch 1, *hdc 10, 2hdc in the next st*, repeat to end of round, sl st to join. (48sts)
3. Ch 1, *hdc 11, 2hdc in the next st*, repeat to end of round, sl st to join. (52sts)
4. Ch 1, *hdc 12, 2hdc in the next st*, repeat to end of round, sl st to join. (56sts)
5. Ch 1, *hdc 13, 2hdc in the next st*, repeat to end of round, sl st to join. (60sts)
6. Ch 1, *hdc 14, 2hdc in the next st*, repeat to end of round, sl st to join. (64sts)
7. Ch 1, *hdc 15, 2hdc in the next st*, repeat to end of round, sl st to join. (68sts)
8. Ch 1, *hdc 16, 2hdc in the next st*, repeat to end of round, sl st to join. (72sts)
9. Ch 1, *hdc 17, 2hdc in the next st*, repeat to end of round, sl st to join. (76sts)
10-11. Ch 1, hdc in the same st and in each st to end of round, sl st to join.
12. Ch 1, *hdc 18, 2hdc in the next st*, repeat to end of round, sl st to join. (80sts)
13. Ch 1, *hdc 39, 2hdc in the next st*, repeat once, sl st to join. (82sts)
14. Ch 1, hdc in the same st and in each st to end of round, sl st to join.
15. Finish off the current yarn and change to black yarn for the belt. Ch 1, hdc in the same st and in each st to end of round, sl st to join.
16. Ch 1, *hdc 40, 2hdc in the next st*, repeat once, sl st to join. (84sts)
17. Ch 1, hdc in the same st and in each st to end of round, sl st to join.
18. Finish off the current yarn and change to brown yarn. Ch 1, hdc in the same st and in each st to end of round, sl st to join.
19. Ch 1, *hdc 41, 2hdc in the next st*, repeat once, sl st to join. (86sts)
20-21. Ch 1, hdc in the same st and in each st to end of round, sl st to join.
For the Santa version, stop here and continue below.
22. *ch 1, sl st in next st*, repeat to end of round. Finish off and weave in ends.
Santa Version
1. Change to bulky weight white yarn (or one strand white worsted yarn + white novelty/fur yarn) and an I hook.
2-4 Ch 1, hdc in the same st and in each st to end of round, sl st in the first st to join.
5. Sl st in each st to end of round. Finish off and weave in ends.
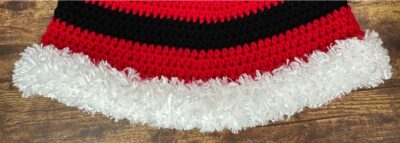
I really wanted to add “fur” at the bottom and for the collar. I like using novelty “fur” yarns and hold one strand of ww yarn with the fur to make it easier to see the stitches.
Unfortunately, I didn’t have enough fur yarn on hand so I used Red Heart Hygge yarn instead. I did want to show you how cute the fur looks too in case you have some. This is “boa” yarn which unfortunately is discontinued.
Pilgrim Collar
1. With the right side of the suit towards you, use an H hook and off white yarn to sl st in the FLO of any st on the top edge. Ch 1, sc in the same st and in each st to end of round. Do not join. (44sts)
2. Ch 1, turn. Work this step/row in FLO (the edge closest to you. Hdc in the same st, hdc 9, 2hdc in the next st, hdc 22, 2hdc in the next st, hdc 10. (46sts)
3. From this point on, the sts are worked between the posts of the previous row. This will prevent the ridges created when working back and forth in rows. To work “between” the sts, insert your hook between the next two posts from the previous row. This is right below the st you would normally place your hook. When the patterns states “in the stitch” the placement should still be as described above. It is written this way to make it easier to read the instructions.
Ch 1, hdc 5, 2hdc in the next st, hdc 5, 2hdc in the next st, hdc 22, 2hdc in the next st, hdc 5, 2hdc in the next st, hdc 5. (50sts)
4. Ch 1, hdc 5, 2hdc in the next st, hdc 5, 2hdc in the next st, hdc 26, 2hdc in the next st, hdc 5, 2hdc in the next st, hdc 5. (54sts)
5. Ch 1, hdc 5, 2hdc in the next st, hdc 5, 2hdc in the next st, hdc 30, 2hdc in the next st, hdc 5, 2hdc in the next st, hdc 5. (58sts)
6. Ch 1, turn, hdc between each of the posts to end of row.
7. Ch 1, turn, hdc 5, 2hdc in the next st, hdc 46, 2hdc in the next st, hdc 5. (60sts)
Santa Collar
1. With the right side of the suit towards you, use an I hook and the same yarn used for the bottom edge of the suit to sl st in the FLO of any st on the top edge. Ch 1, sc in the same st and in each st to end of round. Do not join. (44sts)
2. Ch 1, turn. Work this step/row in FLO (the edge closest to you. Hdc in the same st, hdc 9, 2hdc in the next st, hdc 22, 2hdc in the next st, hdc 10. (46sts)
3. From this point on, the sts are worked between the posts of the previous row. This will prevent the ridges created when working back and forth in rows. To work “between” the sts, insert your hook between the next two posts from the previous row. This is right below the st you would normally place your hook. When the pattern states “in the stitch” the placement should still be as described above. It is written this way to make it easier to read the instructions.
Ch 1, turn, hdc 5, 2hdc in the next st, hdc 5, 2hdc in the next st, hdc 22, 2hdc in the next st, hdc 5, 2hdc in the next st, hdc 5. (50sts)
4. Ch 1, turn, hdc 5, 2hdc in the next st, hdc 5, 2hdc in the next st, hdc 26, 2hdc in the next st, hdc 5, 2hdc in the next st, hdc 5. (54sts)
5. Ch 1, turn, sc 5, 2sc in the next st, sc 5, 2sc in the next st, sc 30, 2sc in the next st, sc 5, 2sc in the next st, sc 5. (58sts)
6. *ch 1, sl st in next st*, repeat to end of round. Finish off and weave in ends.
Buckle
1. With an H hook and golden yellow yarn, ch 29, sc in 2nd ch from hook and in each ch across. (28sts)
2. Ch 1, turn, *sc 3, sc2tog, sc2tog*, repeat to end of row. (20sts) Finish off, leaving a long yarn tail for sewing in place.
Finger shape the buckle piece into a square, overlapping the short ends and centered over the belt section.
With a yarn needle, use the yarn tail to sew the buckle in place.

Top Hat
1. With an H hook and worsted weight black yarn, start with a magic circle of 8 sc sts (or preferred method for creating a circle of 8 sc sts), pull closed and sl st in the first st to join. (8sts)
2. Ch 1, 2sc in each st to end of round, sl st in the first st to join. (16sts)
3. Ch 1, *sc, 2sc in the next st*, repeat to end of round, sl st in the first st to join. (24sts)
4. Ch 1, *sc, 2sc in the next st*, repeat to end of round, sl st in the first st to join. (36sts)
5. Work this round in BLO and a little more snug than the previous rounds. Ch 1, sc in each st to end of round, sl st in the first st to join.
8. Ch 1, sc in the same st and in each st to end of round, sl st in the first st to join.
9. Repeat the previous step for an additional 5 rounds.
10. Finish off the current yarn and change to brown yarn. Ch 1, sc in the same st and in each st to end of round, sl st in the first st to join.
11. Repeat the previous step for an additional 3 rounds.
12. Finish off the current yarn and change back to black. Work this round in FLO. Ch 1, sc in the same st and in each st to end of round, sl st in the first st to join.
13. Ch 1, *sc 5, 2sc in the next st*, repeat to end of round, sl st to join. (42sts)
14. Ch 1, *sc 6, 2sc in the next st*, repeat to end of round, sl st to join. (48sts)
15. Ch 1, *sc 7, 2sc in the next st*, repeat to end of round, sl st to join. (54sts)
16. Ch 1, sc 4, *2sc in the next st, sc 8*, repeat until 5 sts remain, 2sc in the next st, sc 4, sl st to join. (60sts)
Finish off and weave in ends.
Ties: Fold the hat in half with the buckle in the middle to find the placement for the ties. With an H hook and ww yarn (white to match the duck), attach the yarn to an inside loop (so it doesn’t show on the outside of the hat). Ch 30. Finish off and tie a knot in the end of the chain. Repeat for the opposite side.
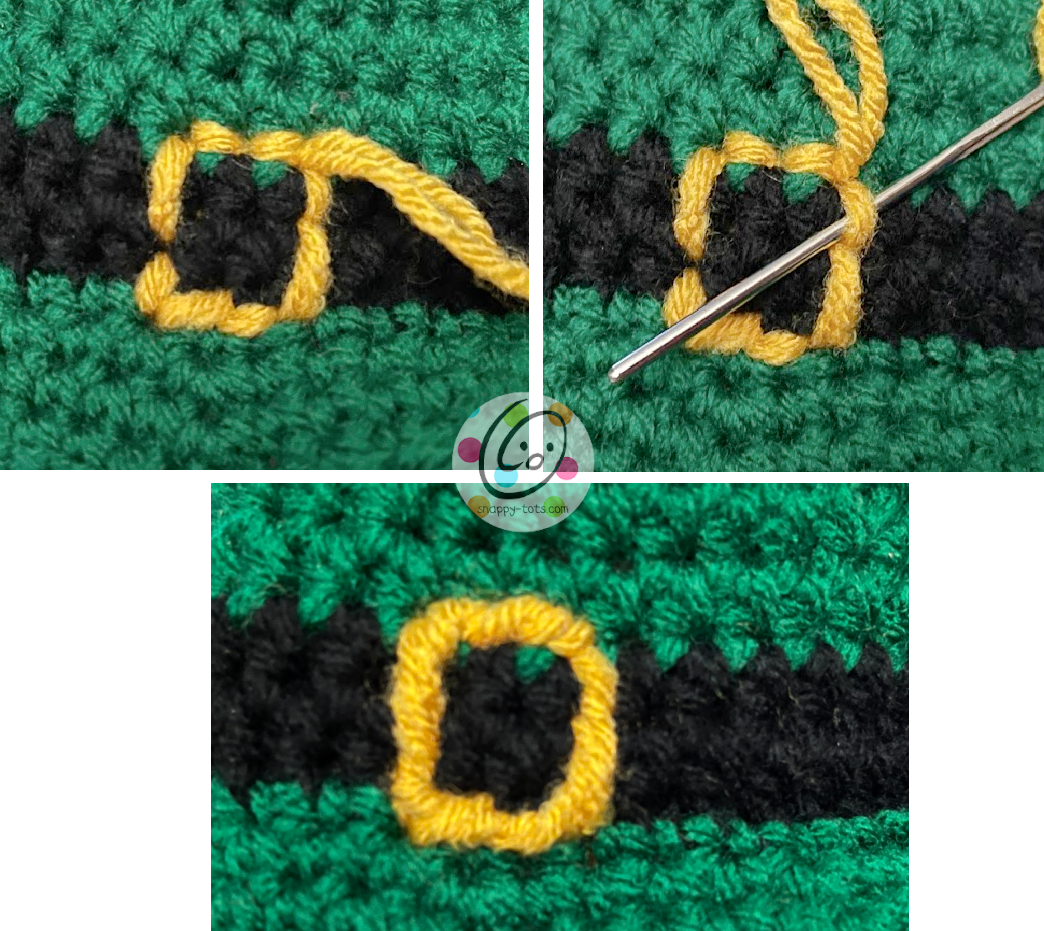
Buckle: Pull a long piece of golden yellow yarn through a yarn needle until the ends match up. Tie a knot.
- Stitch a square around the hatband to create the buckle with this double strand of yarn. Photo below, top left.
- After the square is complete, work on TOP of the hat (not up and down to the inside of the hat), slide the yarn needle under the next st. Photo below, top right.
- Pull the needle through until the yarn is snug. Repeat for each st working around the square. Photo below, bottom.
Pin To Save For Later