Free Pattern: BIG Bunny Bins
My little “Bunny Bins” have been a lot of fun. Seeing the little guys popping up on social media has made me smile so I made a bigger version. I hope you will love this one too.

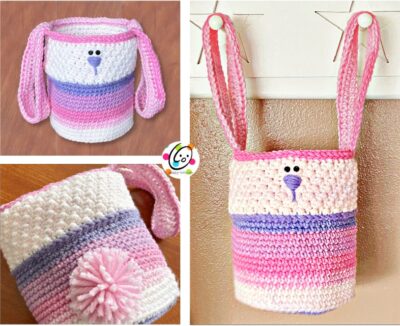
Big Bunny Bins Crochet Pattern
The crochet pattern is available for free below. A downloadable, ad-free pattern is available to purchase from my Ravelry Shop.
Materials & Details
- Yarn: 225-250 yards super bulky weight yarn; Sample yarn: Caron Chunky Cake in Ballet Sorbet
- Miscellaneous: Yarn needle, measuring tape, 2 small black buttons for eyes (6-9mm), sewing needle, black thread
- Crochet Hook: K (6.5mm)
- Measurement: 8.5” tall x 7” across the base
- Gauge: not necessary for this project
Tips
- First stitch of each row is worked into the same stitch as the turning chain unless noted.
- Numbers at the beginning of each line may refer to steps and not indicate number of rows.
Directions
This project starts at the bottom of the bag.
For the sample, I used parts of a Caron Chunky Cakes, cutting it to control color placement. I started the base and then made sure I was using the desired body color (light pink in sample) by step 10. The pattern includes color changes but substitute colors as desired. The color changes in the skein were really long so I cut them to allow more colors to show in the bunny’s sweater section.
1. With a K hook and super bulky weight yarn, start with a magic loop of 8 sc sts (or preferred method for starting a circle of 8 sc sts. Pull closed and sl st to join. (8sts)
2. Ch 1, 2sc in each st to end of round, sl st to join. (16sts)
3. Ch 1, *sc, 2sc in next st*, repeat to end of round, sl st to join. (24sts)
4. Ch 1, *sc 3, 2sc in next st*, repeat to end of round, sl st to join. (30sts)
5. Ch 1, *sc 4, 2sc in next st*, repeat to end of round, sl st to join. (36sts)
6. Ch 1, *sc 5, 2sc in next st*, repeat to end of round, sl st to join. (42sts)
7. Ch 1, *sc 6, 2sc in next st*, repeat to end of round, sl st to join. (48sts)
8. Ch 1, *sc 7, 2sc in next st*, repeat to end of round, sl st to join. (54sts)
9. Ch 1, *sc 8, 2sc in next st*, repeat to end of round, sl st to join. (60sts)
10. Ch 1, sc in each st to end of round, sl st to join.
11. Work in BLO for this round. Ch 1, sc in each st to end of round, sl st to join.
12-13. Ch 1, sc in each st to end of round, sl st to join.
14. Suggestion: Change yarn color starting this round for the “sweater” section. Ch 1, sc in each st to end of round, sl st to join.
15. Repeat the previous round for an additional 11 rounds (12 “sweater” rounds)
16. Loosely sl st in each st to end of round. Finish off and weave in ends.
17. This step starts the top/bunny section and is worked from the inside/wrong side of the piece. This is so the bumpier texture will be on the outside/right side of the piece.

This round is worked into the sts from the last sc round, NOT the sl sts.
With a K hook and super bulky yarn (light pink in sample), pull up a loop in any st. See photo above. Ch 1, sc in the same st, hdc in the next st, *sc in the next st, hdc in the next st*, repeat to end of round. Do not join. Place a marker for working in the round. (60sts)
18. Sc2tog (pull this a little snug to close any gap since we are not joining at the end of the round. *hdc in the next st, sc in the next st*, keep repeating until there are 7 rounds in the gray section.
Notes: There should be 59 sts at the end of each round. Because there is an odd number of sts the hdc and sc sts will not line up on each round.
19. After 8 rounds of the “body” section have been completed, sl st in the next st. Ch 1, turn to work from the outside/right side of the piece. Sc in the same st and in each st until 1 st remains, 2sc in the last st, sl st to join. (60sts)
20. This step creates the handles/ears. **Ch 50, sl st in the next 2 sts on the top round of the bin.
*Ch 1, turn, working across the chain, sc 8, hdc 10, dc 14, hdc 10, sc 8, sl st in the same st on the top round of the bin, sl st in the next st*, repeat once. Sl st 28 (in the sts on the top round of the bin).**
Repeat the section from ** to **.
21. This step is worked in each st around the top edge of the bin and ears. *Sc2tog at the beginning of the ear, sl st in each st across the handle/ear until 2 sts remain, sc2tog, sl st in each st of the top edge of the bin to the next ear*, repeat once. Finish off and weave in ends.
Nose: With a yarn needle and long piece of yarn (brown in sample) create a triangle shape by taking several sts in the middle of the face section (centered between the handles/ears). Stitch a line down from the nose.
Eyes: With a sewing needle and black thread, stitch 2 buttons centered above the nose.
Pompom: Create a large pompom out of the same yarn and sew it to the back, center of the bin, near the bottom. Pull the yarn pieces apart to fill in the pom.