

Free Pattern: All The Things Hat
This is an easy to follow hat pattern with a choose-your-own adventure approach. Whether you need a plain hat or one with a touch of attitude I hope you will find this one a keeper, especially when you don’t have time to fiddle and frog. I have included a nice sunhat brim that stands out on its own.
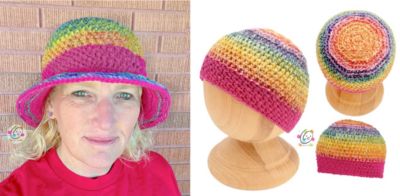
All The Things Sun Hat Crochet Pattern
The pattern is free below on this page. An ad-free, downloadable pdf is also available this week for free as part of my freebie files and special “Pattern Party Week” event.
If you already receive my email you should have the link and password for the freebie files. If not, you can sign up below.
All The Things Hat
Materials and Details
- Yarn: 150-200 yards worsted weight yarn in color(s) of choice
- Sample: Red Heart Bitty Stripes Rainbow; Bernat Super Value Raspberry
- Crochet Hook: I (5.5mm), J (6mm)
- Miscellaneous: yarn needle
- Size: one size to fit Preteen to Adult
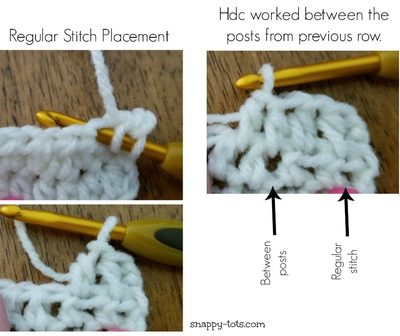
- Gauge: I hook and 4” = 12 hdc and 11.5 rounds Note: The body of this hat is worked “between the posts” and creates a tighter gauge than usual. See graphic at end of pattern for help with this technique. If you are a tight crocheter I suggest going up one size hook. I have provided measurements along the way so you can check your project against mine.
Tips – please take a second to read this section
- The first stitch of each row is worked into the same stitch as the turning chain unless noted.
- Numbers at the beginning of each line may refer to steps and not indicate number of rows.
- Stitch count remains the same unless noted at end of row/round.
- If you have any questions about this pattern please contact [email protected].
- Finger shape the pieces for a smooth edge (see tips on last page)
- Reminder: sc 3 = sc one st in each of the next 3 sts; 3sc in next st = work 3sc sts in the next (one) st
Directions- Preteen-Adult
- This is designed for an average size head/hair. For a larger hat please use a J hook.
- This hat is worked in the round. Do not join at the end of each round until stated in pattern. Place a marker to keep track of the beginning of the round.
- When checking measurements in pattern please be aware the piece will vary slightly depending on where you are measuring (i.e. increase sts vs regular st sections).
- Tip: Do you like your beanies a little roomier? Try going up to a size J hook for the body of the hat and change back to an I hook for the “band” section.
1. With an I hook and worsted weight yarn (Sample: RH Bitty Stripes), start with a magic circle of 8 sc sts (or preferred method for starting a circle of 8 sc sts). Pull closed and place a marker to keep track of the beginning of the round. (8sts)
2. 2sc in each stitch to end of round. (16sts)
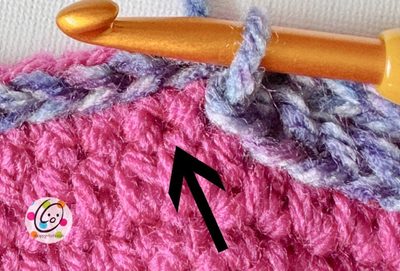
Note: At this point, decide if you want a plain, smooth top or one with a spiraling ridge (as shown in sample).
Choose one: Plain option – work pattern as written; Spiraling ridge option – work all sts in BLO until stated in pattern. See tip at end of pattern for working in BLO + 3rd loop.
3. *hdc, 2hdc in next st*, repeat to end of round. (24sts) 2.25” across
4. *hdc 2, 2hdc in next st*, repeat to end of round. (32sts) 3” across
5. *hdc 3, 2hdc in next st*, repeat to end of round. (40sts) 3.75” across
6. *hdc 4, 2hdc in next st*, repeat to end of round. (48sts) 4.5” across
7. *hdc 5, 2hdc in next st*, repeat to end of round. (56sts) 5.25” across
8. *hdc 13, 2hdc in next st*, repeat to end of round. (60sts) 6” across
9. Sc in next st, sl st in next st. This is the new start of the round and each round will be joined at the end from now on. Ch 1, hdc in the same st and in each st to end of round, sl st to join. This step is still worked in BLO for that option.
Note: From this point on, work sts between posts from the previous round to create a more solid fabric. This is done by inserting the hook slightly below the st. See graphic at end of pattern if needed.
10. Ch 1, hdc in the same st and in each st to end of round, sl st in the first st to join.
11. Repeat previous round 7 more times.
12. Place the hat on a flat surface and measure from the top to current bottom edge of the beanie. It should measure approximately 6” long. Add more rounds if needed.
- Beanie Option: Repeat step 10 until hat measures approximately 1.5” shorter than the desired length. Refer to chart at end of pattern. Continue to step 13.
- Sunhat Option: If hat measurement is 6-6.5” long continue to step 13. Add more rounds if needed.
13. This step creates a textured band at the bottom of the beanie. In the sample, the yarn is changed to a plain color (Sample: Raspberry).
Ch 1, sc in the same st, dc in the next st, *sc in the next st, dc in the next st*, repeat to end of round, sl st in the first st to join. Stitch count remains the same.
14. Ch 1, dc in the same st, sc in the next st, *dc in the next st, sc in the next st*, repeat to end of round, sl st in the first st to join.
15. Repeat steps 13-14.
16. Ch 1, hdc in the same st and in each st to end of round, sl st in the first st to join.
- Beanie Option: Finish off and weave in ends. Project complete.
- Sunhat Option: Continue to step 17.
17. Ch 1, *FPHDC around each of the next 5 posts, 2FPHDC around the next post*, repeat to end of round, sl st in the first st to join. (70sts)
18. Notice the stitch change on this round to Front Post Single Crochet. Ch 1, *FPSC around each of the next 6 posts, 2FPSC around the next post*, repeat to end of round, sl st in the first st to join. (80sts)
Tips:
- The following sts are worked in the st as usual, NOT between the posts.
- The sts change between hdc and sc each round.
19. Ch 1, *hdc 9, 2hdc in the next st*, repeat to end of round, sl st in the first st to join. (88sts)
20. Ch 1, sc 5, *2sc in the next st, sc 10*, repeat until 6 sts remain, 2sc in the next st, sc 5, sl st in the first st to join. (96sts)
21. Ch 1, *hdc 11, 2hdc in the next st*, repeat to end of round, sl st in the first st to join. (104sts)
22. Ch 1, sc 6, *2sc in the next st, sc 12*, repeat until 7 sts remain, 2sc in the next st, sc 6, sl st in the first st to join. (112sts)
24. Ch 1, *hdc 13, 2hdc in the next st*, repeat to end of round, sl st in the first st to join. (120sts)
25. Ch 1, sc 7, *2sc in the next st, sc 14*, repeat until 8 sts remain, 2sc in the next st, sc 7, sl st in the first st to join. (128sts)
26. Change colors if desired (Sample: same yarn as top of hat). Sl st in each st to end of round, making sure to not work these sts too snug. At this point, you can either finish off the yarn and weave in ends or continue and add rounds of surface crochet as shown in the main sample.
27. Insert hook in the space one round below. See arrow in photo below. Pull up a loop and through the loops on your hook as if you were working a sl st. Insert hook in the next space and repeat. Continue around the hat.
28. For an additional round, repeat step 7, working between the posts of the hdc sts. Finish off and weave in ends.
Stitch Placement Tips
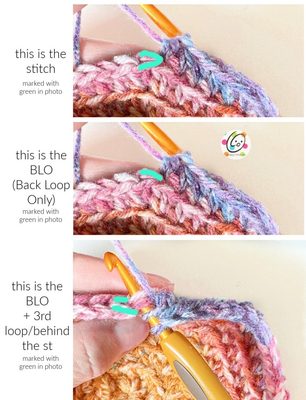
Working in BLO + 3rd loop
When working in BLO, I like to also work into the loop behind the st, the “3rd loop”. This helps secure the st and prevents it from pulling the single loop out of place. Please see the graphic for st placement.
I would LOVE to see your creations and help with your crochet endeavors while making my patterns. Please send me an email anytime or stop by my online spots and say hi. All of the contact info is at the end of this pattern. I wish you and yours the very best and many happy moments.


