

Woven With Happy Crochet Along
I am doing a few projects in hopes of spreading some happiness. You can find links and information about the various projects on the main page: Happy Project
All of the information in this post is available to download in the following files:
Note: all of these parts will be combined into one file by 4/30/20.
About This Crochet Along
This is part one of my “Woven With Happy” project. I am sure you have questions and are wondering “what on earth is this crazy lady up to now?” I see lots of people looking for projects that fit the following: things that can be made with what they have, easy enough for beginners, something kids can help with and more. I hope the projects I have come up with fit those.
Choosing Colors
I love color and it brings me happiness. Different colors mean different things to each person. I am letting my 13 year old son choose the colors for the blanket we will be making for this project. He is choosing his favorites.
Here are some suggestions for choosing colors: I love creating things with meanings and this blanket is all about “weaving in the happiness”. Maybe you will weave in strands of color that represent different people in your family. If others will be involved they could each choose the color on their day. You could assign a color to each day of the week and use that color on the day you weave. However you choose to do this, it will be GREAT! Don’t worry. Just do.
Choosing Yarns
Take a look at your stash and see what you have before you begin. My son wanted his blanket to be mostly red. Can you believe I do not have a full skein of red ww yarn?? I do have odds and ends of red heart chunky weight so that is what I will be using for our mesh base. He likes thicker blankets and I thought it would be easier for him to weave through thicker yarn so this works great. You could use 2 strands ww held together if doing the blanket.
It is EASY to add yarns throughout, even during the mesh base, so don’t worry about using lots of odds and ends.
We will be using some ww yarns to weave through the holes so a variety of sizes of yarns will work too.
The Projects
If you follow me you know I like to get the most out of a design and try to give lots of uses for a pattern. This includes a bunch of projects you can make PLUS I have included the recipe for you to create your own custom project.
Now Where To Start
First, no matter which project you choose to create, we will start with a “mesh base” made with the “filet crochet” technique… which just means we are going to crochet a rectangle shape with lots of holes we can weave through later.
- For the smaller projects, I suggest completing the mesh base first. These whip up super quick!
- For blankets, I suggest creating at least a foot length of the mesh base and then start on the weaving. Add more length to the mesh base and then more weaving, working back and forth.

Materials
The yarn amounts will vary depending on whether you choose to make one of the smaller or bigger projects. I have listed approximate yardage and hook size for each project. PLEASE use up what you have. These all will look GREAT in random yarns and can even incorporate different sizes in one.
REMEMBER: This is just PART ONE of the project. We are just getting started and the MAIN POINT to focus on is to ENJOY the process and make happy moments.
Tips
- Customize: These projects can be made any size by starting with an even number of chains. The st count after step 1 needs to be an odd number of sc sts. If you need any help with this please let me know.
- Numbers at the beginning of each line may refer to steps and not indicate number of rows.
If you have any questions about this pattern, customizing, color choice, et. please as in our facebook group or contact [email protected].

Small Projects
This size is great for a washcloth/dish cloth, hand towel, placemat, bag, pillow.
Yarn Suggestions and Sizes
- Washcloth/dish cloth, hand towel – 100% cotton yarn so the piece is absorbent. 75 yards for the mesh base and up to 50 yards for the weaving. Length: repeat mesh until 10” for a square cloth or longer for the hand towel.
- Placemat – any ww yarn. 100-130 yards for the mesh base and 50-75 yards for the weaving. Length: repeat mesh until 18” or desired length.
- Bag (make 2 mesh bases) – any ww yarn. 75-100 yards for the mesh base and 50-75 yards for the weaving. Length: repeat mesh until 10” for a small, square bag or longer for a rectangle. Assembly instructions will be for a vertical bag that is 10” across x length.
- Pillow (make 2 mesh bases) – made from ww yarn the pillow will be approximately 10”. any ww yarn. 100 yards for the mesh base and 100-125 yards for the weaving. Length: repeat mesh until 10” for a square pillow of longer for a rectangle pillow. For a larger pillow, consider using 2 strands ww held together or a thicker yarn. For my sample I used Bernat Softee Chunky for the mesh base. I didn’t have enough of it for the weaving so I did that with ww yarn (more on that in part 2).
- Custom sizes will require an adjustment to the yardage.
Materials and Details
- Yarn: worsted weight in a variety of colors. Yardage for mesh base – see sizes above.
- Crochet Hook: I (5.5mm) or size for yarn
- Notions: Yarn needle for weaving
- Measurements: 10” wide by desired length
Directions for Mesh Base
Size: 10” x desired length
1. With an I hook and ww yarn, ch 38, sc in the 2nd ch from hook and in each ch across. (37sts)
2. TURN, ch 3 (counts as the first dc + ch 1), sk next st, dc in next st (which is actually the third st of the row), *ch 1, sk 1, dc in next st*, repeat to end of row.
Note: After trying different things, I found starting with a ch 3 worked best for a more even edge in the end.
3. TURN, ch 3, sk next st, dc in next st, *ch 1, sk 1, dc in next st*, repeat to end of row, working last dc in the 2nd ch of the ch 3 from the previous row.
4. Repeat step 3 until piece is desired length (see “yarn suggestions and sizes” above). For my sample, I have 18 open hole rows and it ends up a rectangle.
5. Ch 1, turn, sc in the same st and in each st to end of row. (37sts)
Note: The piece will be shaped a little wonky due to the construction. Give it a few tugs to create a square/rectangle, depending on the length you have chosen.
Weaving
Skip to WEAVING INSTRUCTIONS.
Blanket – Multiple Sizes
Materials and Details – See individual sizes below for this information.
Mesh Base – all sizes
This part is created basically the same way, no matter the size. Please choose which size you would like to make and follow that information for the first step. Continue with step 2 for all sizes.
Step 1: Choose blanket size
- Lapghan – 48” wide x 60” (or desired length) Yarn: Size 5-6 weight yarn or 2-3 strands ww yarn held together. 800- 1000 yards for the mesh base (2-3 times that amount if using ww yarn). Weaving yarn yardage is unknown at this time. Crochet Hook: J (6mm) or hook size needed for measurement. Note: If you have a hard time matching the 48” width, follow the instructions below for “custom” blankets. Ch 150, sc in the 2nd ch from the hook and in each ch across. (149sts). Skip to “step 2” below.
- Custom Sizes/Yarns Yarn: Choice of yarn weight. Yardage will depend on the weight of yarn and blanket size. Crochet Hook: size needed for yarn weight. Create a chain the desired width of your blanket, making sure there are an even number of chains. When measuring your chain, remember not to pull the chain. Sc in the 2nd ch from the hook and in each ch across. Make sure the total number of sts at this point is an ODD number. Continue to “step 2” below.
Step 2: Continue here for all blanket sizes.
1. TURN, ch 3 (counts as the first dc + ch 1), sk next st, dc in next st (which is actually the third st of the row), *ch 1, sk 1, dc in next st*, repeat to end of row.
Note: After trying different things, I found starting with a ch 3 worked best for a more even edge in the end.
2. TURN, ch 3, sk next st, dc in next st, *ch 1, sk 1, dc in next st*, repeat to end of row, working last dc in the 2nd ch of the ch 3 from the previous row.
3. Repeat step 2 until piece is 12-24” long at this point. After that we will start weaving strands of color and then add more to the base mesh when needed (more information in part 2, available 4/2/20.
Note: The piece will be shaped a little wonky due to the construction. Don’t worry. The weaving helps that.
Weaving
Continue below.
Part 2 – Weaving
Weaving With a Crocheted Chain
The next step is to weave yarn in and out of our beginning mesh base. You can use one yarn color for all of the weaving, alternate every two rows or any random colors
I found it was easiest to work with a chain no longer than twice the width of the project. Do NOT finish off the yarn at the end of the chain. Just slip the loop off of your hook and pull the loop a little long to prevent it from coming out. After you have done the first weaving you can decide which length works best for you.
1. With the same size hook and yarn as used for the mesh base (ww and an I hook in sample), create a chain at least twice the width of the mesh base. Slip the loop off of the hook.
2. Thread the beginning yarn tail through a yarn needle. Starting at the side of the piece and working parallel to the beginning edge, use the yarn needle to weave the chain over and under the bars across the first row of holes.
MAKE SURE to pull the sides of your base mesh back to the original size after the first row is complete. If not, the chain will cinch in the project.

3. Once you have woven across the first row, continue pulling the chain through this row until you have enough to weave through the second row.
If you finished the first row over a bar, you will start the next row under the bar and vice versa. Weave over and under the next row.
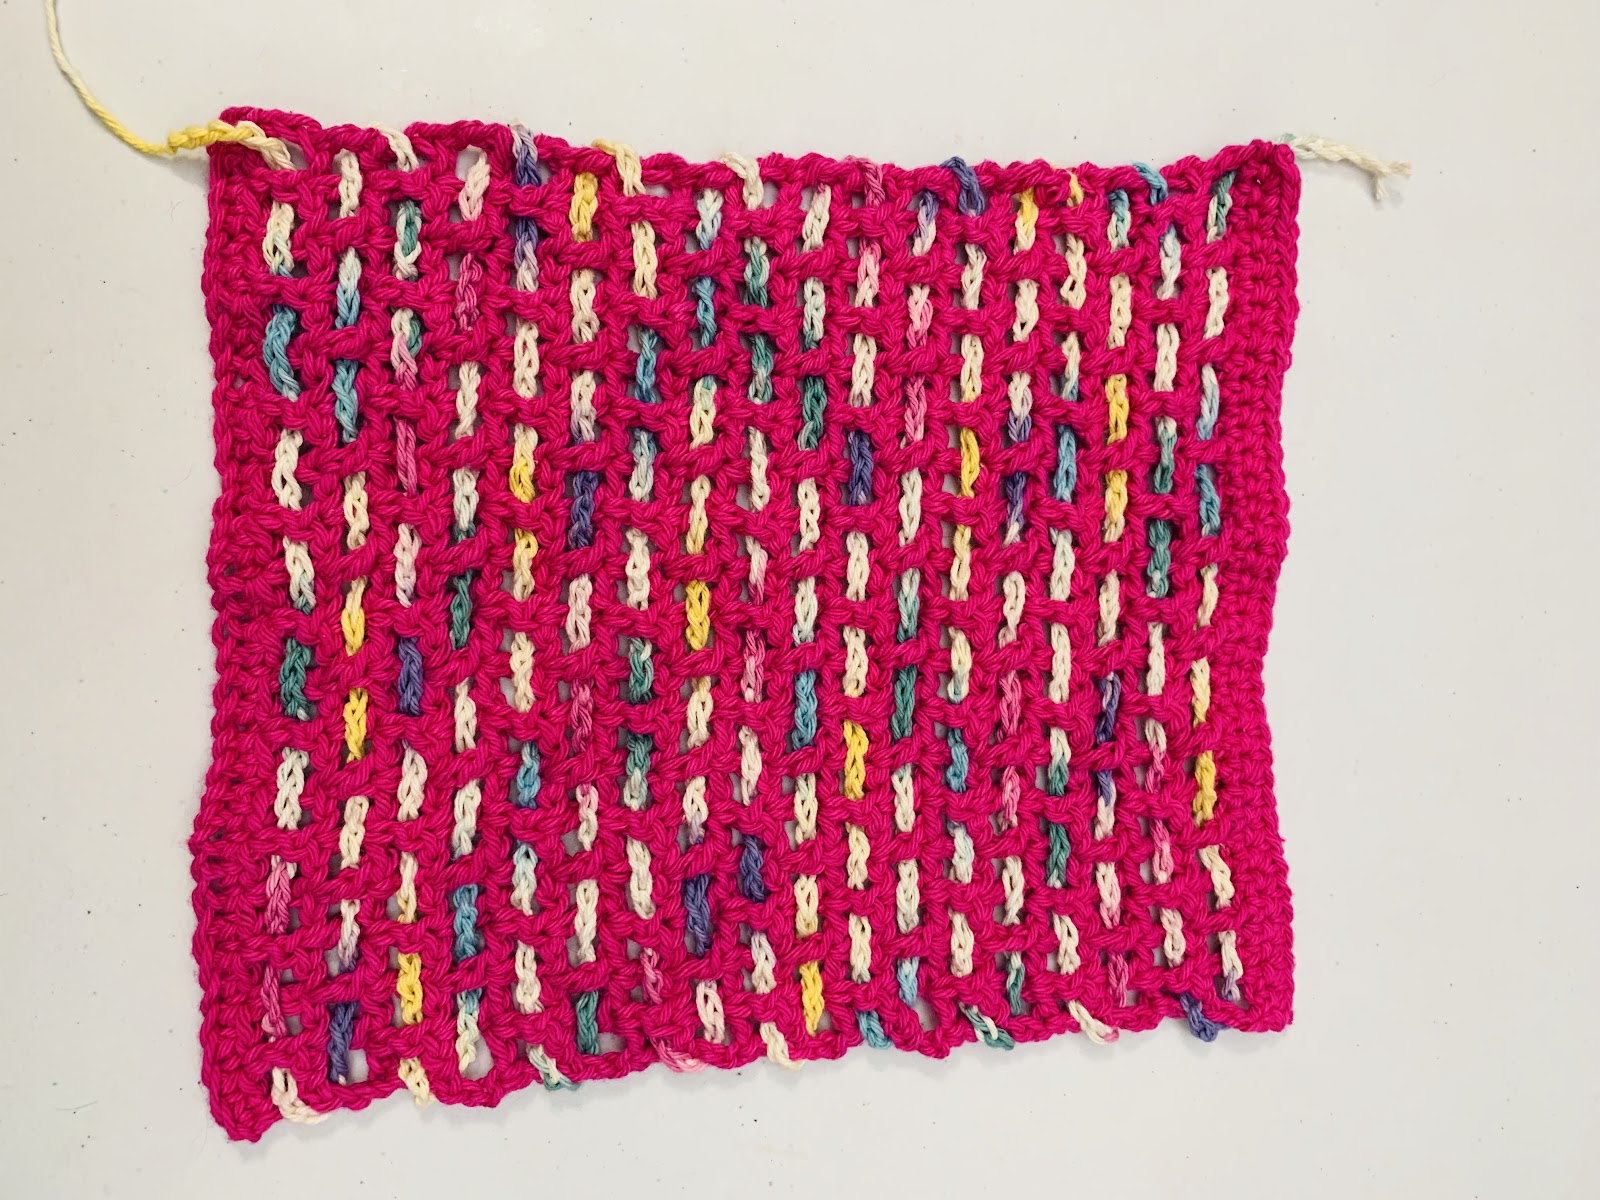
Make sure the edge does not get cinched in. See photo below.
4. At this point, I suggest cutting the chain, leaving at least 3”. We will weave in the yarn tails at the end. I found it was a lot easier working just 2 rows at a time instead of pulling the length through all the rows.
If you want, you could slip the loop of yarn back on your hook and chain another piece the same length, then cut the yarn and use that yarn tail to weave in and out of the next two rows if you would like.
Keep repeating the weaving process until all hole rows are full.
Finishing off the ends: Thread one of the yarn tails through a yarn needle. Bend the yarn tail over the final bar and weave the tail in and out of the chain to secure. Repeat for each yarn tail.
Weaving With Strands of Yarn
The next step is to weave yarn in and out of our beginning mesh base. You can use one yarn color for all of the weaving, alternate every two rows or any random colors
This option is for those who have family members around to help with your project that do not crochet or if you prefer to weave with yarn instead of crocheting the chain.
Number of strands to use per mesh base type: one strand ww mesh base, use 2 strands ww yarn to weave (or equivalent); one strand bulky weight mesh base, use 3 strands ww yarn to weave (or equivalent).
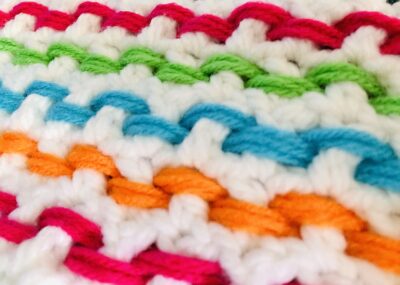
If you are using thick yarn for the mesh base you might want to work back across the same row, opposite of how you did the first one, before going on to the next row as shown in the first photo of this post.
1. Thread the beginning yarn tails through a yarn needle. Starting at the side of the piece and working parallel to the beginning edge, use the yarn needle to weave the yarn strands over and under the bars across the first row of holes.
MAKE SURE to pull the sides of your base mesh back to the original size after the first row is complete. If not, the yarn weaving will cinch in the project.
2. Once you have woven across the first row, continue pulling the yarn tails through this row until you have enough to weave through the second row.
If you finished the first row over a bar, you will start the next row under the bar and vice versa. Weave over and under the next row.
Make sure the edge does not get cinched in.
3. At this point, I suggest cutting the chain, leaving at least 3”. We will weave in the yarn tails at the end. I found it was a lot easier working just 2 rows at a time instead of pulling the length through all the rows.
Keep repeating the weaving process until all hole rows have been filled. If you are working a blanket, add to the mesh base as needed.
Part 3 – Edging
This step is worked around the entire outer edge of the piece. Choose one of the following options:
Option A: Edging for weaving done with a crocheted chain
With the same size hook and yarn, attach the yarn to the first st of the last row (right corner). Ch 1, sc in the same st and in each st across until 1 st remains, (sc, ch 1, sc) in the last st.
Working across the edge of the piece, sc in the first hole before the first woven chain and sc after the same chain. You will be working 2 sc in each hole (one on either side of the woven chain) to the end of the row. (2 sts per row hole/mesh row of piece).
(sc, ch 1, sc) in the first st of the beginning row of the piece. Sc in each st across until 1 st remains, (sc, ch 1, sc) in the last st.
Working across the second edge of the piece, sc in the first hole before the woven chain and sc in the first hole after the same chain. Repeat this for each hole to the end of the edge. Ch 1, sl st in first st of the round to join. Finish off and weave in ends or continue for one more round. If you would like to add tassels like the other option, you could skip to step #2 of Option B.

Ch 1, sc in each st around, working (sc, ch 1, sc) in each corner. Sl st in first st of round to join. Finish off and weave in ends.
Option B: Edging for weaving done with yarn strands
1. After all of the weaving is complete, tie a knot at the edge for each of the yarn tail sections. Make sure you do not pull the yarn tails too much or it will cinch in the edges of your piece.
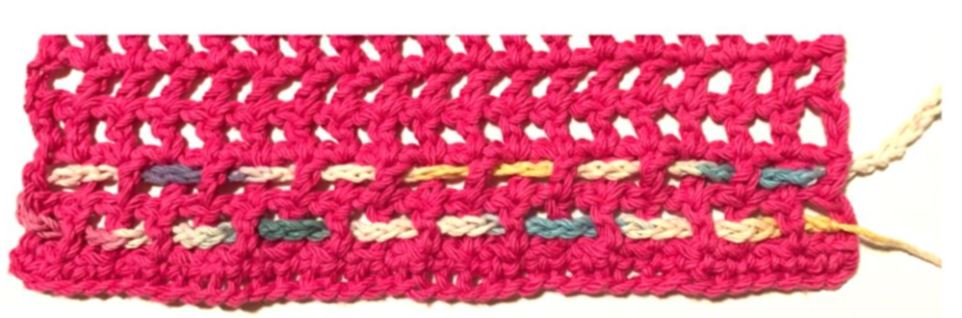
2. We want to make sure there is a tassel at the end of each weaving row. Notice in the first picture below there are some stripes of color that do not have yarn tails at the end. We will need to add the same amount of yarn strands at the empty ends. For example, I used 3 strands for weaving and I want to have at least 3” tails so I will cut 3 strands that each measure 6.25” long.
Pull one set of yarn tail ends through the end of a weaving row. See photo below. I also made sure there was a tassel at each corner.
Tie a knot at the edge.

3. After a tassel or yarn tails have been tied at the end of each weaving row, we will work one round of sc around the outer edge IN A SPECIAL WAY. Please follow the instructions below carefully.
With the same size hook and yarn used the for the mesh base, attach the yarn to the first st of the last row (right corner). Ch 1, sc in the same st and in each st across until 1 st remains. Each time you come to a tassel, split the tassel in half, pulling half of the strands forward and pushing half of the strands back. Just keep them out of the way for now. (sc, ch 1, sc) in the last st (corner).
Working across the edge of the piece, sc in the first hole before the first weaving strands. Make sure the tassel is split so half is in front and half is in back. Sc in the space after the weaving strands. Note: You will be working 2 sc in each hole (one on either side of the yarn strands) to the end of the row. (2 sts per row hole/mesh row of piece).
(sc, ch 1, sc) in the first st of the beginning row of the piece. Sc in each st across until 1 st remains, (sc, ch 1, sc) in the last st.
Working across the second edge of the piece, sc in the first hole before the woven chain and sc in the first hole after the same chain. Repeat this for each hole to the end of the edge. Ch 1, sl st in first st of the round to join. Finish off and weave in ends.
Tying the tassels: grab all of the yarn tails for one tassel. Wrap the yarn tails around your finger, pull the ends through the loops and snug against the edge of the piece. Flatten out the tassels and give them a trim so they are even.


Projects
If you would like to make a pillow or bag, Follow the directions for making any of the projects above. Make two pieces and finish the edging, even if you want to add the tassels. Place the pieces wrong sides together and pin the sides together if needed. With matching yarn, sew 3-4 sides together (3 for a bag, 4 for a pillow), just inside the edging round. Stuff the pillow or insert a pillow form before sewing the final side. For the bag, add your favorite handle (or follow the instructions before) to the top edge.
Handle (optional – make 1)
As written, the handle is 32” long when complete. Adjust beginning chain for length if desired.
1. With an I hook and 2 strands of yarn, ch 111, sc in the 2nd ch from hook and in each ch across. (110sts)
2-4. Ch 1, turn, sc in same st to end of row.
Finish off and weave in ends. With matching yarn, use a yarn needle to sew each end of the handle to the inside edges of the gusset, overlapping approximately 2”.
I Want To See Your Creations
I am going to have a contest in May based on these projects to encourage everyone to share their creations. Watch for details coming in May.


