

Free Pattern: Unique Hatband and Headband
My two oldest kids have always burned easily. No matter how much sunscreen we applied, they would always end up with a burn. My daughter, now 22, recently spent the day at an airshow and even tho she put on sunscreen throughout the day she still ended up imitating a lobster. She needed a wide brimmed sun hat right away to shade her burnt face and shoulders. I picked up an inexpensive hat at Walmart, but after getting it home the hat kept telling me it needed some handmade love.
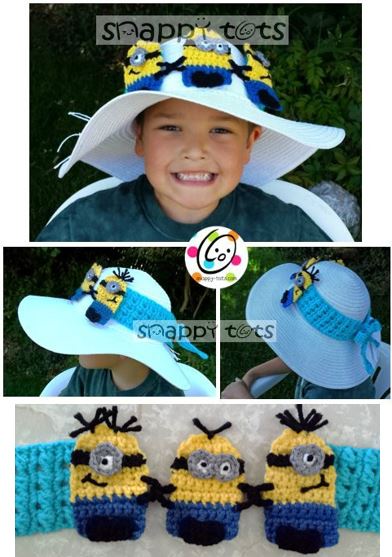
We love the minions at our house and especially my daughter. I started with 3 little guys interlocking arms. When I started adding the sides of the band, I decided I wanted it interchangeable so she could wear it a variety of ways. The minions button on to cute sides which wrap around and tie. I think we will love making new pieces to button in place. Watch for more to come.
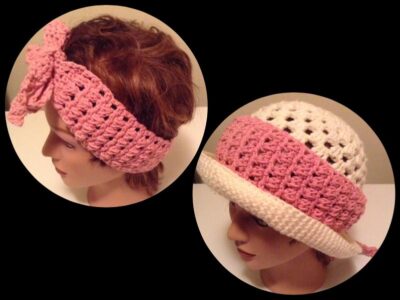
The side bands were fun and easy to make. I just knew we needed a full band to wear not only on hats, but as a headband too. Pattern for full band is below the whimsical minion version.
Click HERE to add this pattern to your Ravelry library. Thank you!

Whimsical Hat Band
3 interlocking minions which button on two side bands and tied in back. Hat pattern not included.
Yarn: worsted weight in yellow, blue, black, white, grey and desired color for band sections (turquoise in sample)
Crochet Hook: G, H
Miscellaneous: yarn needle, two 3/4″ buttons for attaching to band sections, sewing needle and yellow thread, tiny black buttons and black thread (optional for eyes, not shown in photo).
Full Band:45″ x 3″, Tall Minions: 4″ x 2.5″; Small Minions: 3.5″ x 2.5″
This is designed to fit adult size hats and heads. For smaller sizes, see note in pattern and try using a G hook for minions.
Directions
Minions
Tall (make 2):
1. With H hook and yellow yarn, ch 5, sc in 2nd ch from hook and in each ch across. (4sts)
2. Ch 1, turn, 2sc in same st, sc 2, 2sc in last st. (6sts)
3. Ch 1, turn, 2sc in same st, sc 4, 2sc in last st. (8sts)
4. Change to black yarn. Work in BLO for this row. Ch 1, sc in each st to end of row.
5. Change to yellow yarn. Work in BLO for this row. Ch 1, turn, sc in each st to end of row.
6-8. Ch 1, turn, sc in each st to end of row.
9. Change to blue yarn. Ch 1, turn, sc in each st to end of row.
10-13. Ch 1, turn, sc in each st to end of row.
Finish off and weave in ends.
Short (make 1):
1. With H hook and yellow yarn, ch 5, sc in 2nd ch from hook and in each ch across. (4sts)
2. Ch 1, turn, 2sc in same st, sc 2, 2sc in last st. (6sts)
3. Ch 1, turn, 2sc in same st, sc 4, 2sc in last st. (8sts)
4. Change to black yarn. Work in BLO for this row. Ch 1, sc in each st to end of row.
5. Change to yellow yarn. Work in BLO for this row. Ch 1, turn, sc in each st to end of row.
6-7. Ch 1, turn, sc in each st to end of row.
8. Change to blue yarn. Ch 1, turn, sc in each st to end of row.
9-11. Ch 1, turn, sc in each st to end of row.
Finish off and weave in ends.
Shoes (make 3):
1. With H hook and black yarn, ch 5, 2sc in 2nd ch from hook, sc 2, 2sc in last ch. (6sts)
2. Ch 1, turn, sc2tog, sl st 2, sc2tog. (4sts) Finish off, leaving a tail for sewing in place.
With yarn needle and yarn tails, sew shoes to blue section of each minion, lining up bottom edge of shoes to bottom edge of minion.
Eyes (make 1 or 2 PER minion):
With G hook and white yarn, start with a magic circle of 5 sts (or preferred method for starting a circle of 5 sc sts), join and pull closed. Change to grey yarn. 2sc in each st to end of round. Finish off, leaving a tail for sewing in place.
With yarn needle and yarn tail, sew each eye to minion, overlapping the black line. With yarn needle and black yarn, stitch a black dot in center of each eye.
Arms (make 4): Leave a 5″ tail in the beginning. This will be used to sew the arm in place. With H hook and black yarn, ch 8. Finish off, leaving 5″ at each end.
Assembly: Lay minions on a flat surface with the short one in the middle. The arms need to loop through the middle minion’s arms so please do not attach all arms. Follow these steps. *Attach both ends of one arm piece to the right side of the short minion. I tied one end to the yellow section. Then I used a yarn needle to take the yarn tail through the stitch and end of arm again a few times, then wove the remaining end in back of minion. Attach the other end of the arm to the minion where the yellow and blue meet.* repeat for left side of middle/short minion.
Slip another arm piece through the short minion’s right arm. Attach both ends of arm piece to tall minion on right, same way as first arms.
Slip last arm piece through the short minion’s left arm. Attach both ends of arm piece to tall minion on left, same way as first arms.
With yellow thread and sewing needle, sew a button to the center back of the two tall minions. These will slip through the side band pieces.
Side Band Piece (make 2):
Note: Band starts at the wide end, next to minions, and works in short rows towards ties.
With H hook and turquoise blue yarn (or desired color), ch 11, sc in 2nd ch from hook and in each ch across. (10sts)
1. Ch 2, turn, yo, pick up a loop in same st, [yo, pick up a loop in next st] 2 times, yo draw through 7 loops on hook (triangle made), *ch 2, yo, pick up a loop in same st as last st of previous triangle, [yo, pick up a loop in next st] twice, yo over draw through 7 loops on hook, repeat from * across, hdc in last st (do not ch 2 after last triangle). (4 clusters)
- Ch 1, turn, sc in first st, 2 sc in each ch-2 space across, sc in space after last triangle, sc in top of turning ch. (10sts)
3-18. Repeat steps 1-2 eight times (creating 9 sets of cluster and sc rows). Note: repeat fewer times for smaller bands.
- Ch 2, turn, hdc2tog, hdc 2, hdc2tog, hdc 2, hdc2tog. (7sts)
- Ch 2, turn, hdc2tog, hdc 2, hdc2tog. (5sts)
21-22. Ch 2, turn, hdc in each st to end of row.
- Ch 2, turn, hdc2tog, hdc, hdc2tog. (3sts)
24-39. Ch 2, turn, hdc in each st to end of row.
- Ch 2, turn, hdc2tog, hdc. (2sts)
41-48. Ch 1, turn, sc 2.
Finish off and weave in ends.
Add minions: Slip button from back of each minion through clusters in middle of wide end of side pieces, approximately 1.5″ from end.
Full Band
Textured band to be worn on a hat or around the head and tied in back. Hat pattern not included.
Materials
Yarn: worsted weight in choice of color
Crochet Hook: H
Miscellaneous: yarn needle
Size: 47″ x 3″
This is designed to fit adult size hats and heads. For smaller sizes, see note in pattern.
Directions
Note: Band starts at one end (with skinny tie section) and works in short rows towards other end.
1. With H hook and turquoise blue yarn (or desired color), ch 3, sc in 2nd ch from hook and in next ch. (2sts)
2-9. Ch 1, turn, sc 2.
10. Ch 2, turn, 2hdc in same st, hdc. (3sts)
11-26. Ch 2, turn, hdc 3.
27. Ch 2, turn, 2hdc in same st, hdc, 2hdc in last st. (5sts)
28-29. Ch 2, turn, hdc in each st to end of row.
30. Ch 2, turn, 2hdc in same st, hdc 3, 2hdc in last st. (7sts)
31. Ch 2, turn, 2hdc in same st, hdc 2, 2hdc in next st, hdc 2, 2hdc in last st. (10sts)
32. ch 2, turn, yo, pick up a loop in same st, [yo, pick up a loop in next st] 2 times, yo draw through 7 loops on hook (triangle made), *ch 2, yo, pick up a loop in same st as last st of previous triangle, [yo, pick up a loop in next st] twice, yo over draw through 7 loops on hook, repeat from * across, hdc in last st (do not ch 2 after last triangle). (4 clusters)
- Ch 1, turn, sc in first st, 2 sc in each ch-2 space across, sc in space after last triangle, sc in top of turning ch. (10sts)
34-83. Repeat steps 32-33 twenty five times (creating 26 sets of cluster and sc rows). Note: repeat fewer times for smaller bands.
- Ch 2, turn, hdc2tog, hdc 2, hdc2tog, hdc 2, hdc2tog. (7sts)
- Ch 2, turn, hdc2tog, hdc 3, hdc2tog. (5sts)
86-87. Ch 2, turn, hdc in each st to end of row.
- Ch 2, turn, hdc2tog, hdc, hdc2tog. (3sts)
89-104. Ch 2, turn, hdc in each st to end of row.
- Ch 2, turn, hdc2tog, hdc. (2sts)
106-113. Ch 1, turn, sc 2.
Finish off and weave in ends.
Common Crochet Abbreviations Ch – chain Sl st – slip stitch St – stitch Hdc – half double crochet Sp – space; sps – spaces Dc – double crochet Sc – single crochet Trc –treble/triple crochet ** – repeat instructions between, as many times as indicated
This pattern is copyrighted to snappytots and may not be copied for resale in part or whole. It is illegal to post this pattern online or share with others without written consent from Heidi Yates. Items created from this pattern MAY be sold. Please include a link to snappy-tots.com if selling online.
Visit Snappy Tots on facebook for giveaways, new release announcements, events and fun. If you enjoyed this pattern, please check out the complete line of Snappy patterns.


