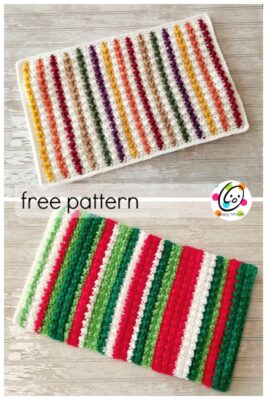
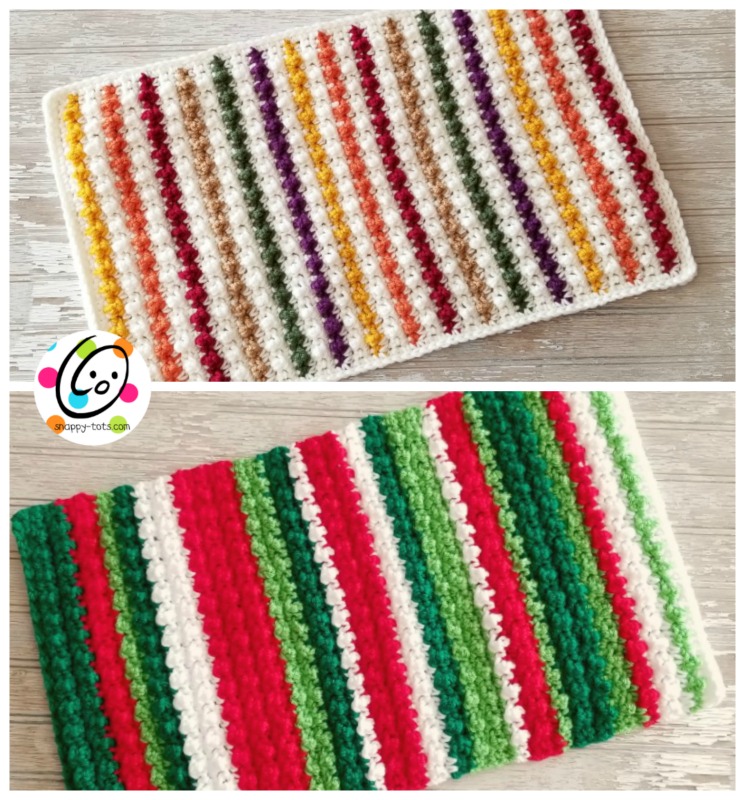
Free Pattern: Jellybean Place Mat
I have been cleaning out my craft room lately and I have a TON of yarn scrap balls! Each year there is a “Stashdown Crochet Along” and I love the thought of being able to use up all of our odds and ends. I decided to make some place mats that I could use under an apple basket on my kitchen table.
I have always liked using colorful place mats under a basket or lamp for a cozy touch. Here are some other ways you could use these placemats:
- Add to your holiday feast by making one for each place setting.
- Make some in favorite colors and let each person take their’s home from a special event.
- Use favorite team colors for a party table.
- Give a wedding gift they will love by making these in their wedding colors.
- Help kids learn their colors by using primary colors and having them practice during snack time.
Jellybean Place mat
Project Info
- Project Description: Designed as a place mat, this could also be made any length for a table runner.
- Skill Level: Basic crochet skills are needed and must be able to read a crochet pattern.
- Completion Time (how long it takes the designer to make one): 2 hours
Materials
- Yarn: worsted weight in choice of colors.
Sample 1 (Fall Colors): Red Heart Super Saver Soft White, Burgundy, Carrot, Medium Thyme, Warm Brown; Red Heart With Love Aubergine
Sample 2 (Christmas Colors): Red Heart Super Saver White, Cherry, Spring Green, Paddy Green - Hook: I
- Miscellaneous: yarn needle for weaving in ends.
Details
- Measurements:
Without border – 10” wide x 18” long
With border – 11” wide x 19” long - Gauge: Not important for this project
Tips
- First stitch of each row is worked into the same stitch as the turning chain unless noted.
- Numbers at the beginning of each line may refer to steps and not indicate number of rows.
- Pattern is written with color changes for the sample. Finish off each yarn when changing colors.
- Substitute colors as desired. Try to use similar weight yarns, preferably all the same brand.
- The repeat calls for “tr in next st, sc in next st” and creates a small puff. These rows are worked from the wrong side of the piece so the puff ends up on the right side.
Directions – Cream Stripes Sample
- With an I hook and soft white yarn, ch 34, sc in 2nd ch from hook and in each ch across. (33sts)
- Change to gold yarn. Ch 1, turn, sc in same st, sc, *tr in next st, sc in next st*, repeat until 1 st remains, sc in last st.
- Change to soft white yarn. Ch 1, turn, sc in each st to end of row.
- Ch 1, turn, sc in same st, sc, *tr in next st, sc in next st*, repeat until 1 st remains, sc in last st.
- Ch 1, turn, sc in each st to end of row.
- Change to orange yarn. Ch 1, turn, sc in same st, sc, *tr in next st, sc in next st*, repeat until 1 st remains, sc in last st.
- Change to soft white yarn. Ch 1, turn, sc in each st to end of row.
- Ch 1, turn, sc in same st, sc, *tr in next st, sc in next st*, repeat until 1 st remains, sc in last st.
- Ch 1, turn, sc in each st to end of row.
- Change to burgundy yarn. Ch 1, turn, sc in same st, sc, *tr in next st, sc in next st*, repeat until 1 st remains, sc in last st.
- Change to soft white yarn. Ch 1, turn, sc in each st to end of row.
- Ch 1, turn, sc in same st, sc, *tr in next st, sc in next st*, repeat until 1 st remains, sc in last st.
- Ch 1, turn, sc in each st to end of row.
- Change to tan yarn. Ch 1, turn, sc in same st, sc, *tr in next st, sc in next st*, repeat until 1 st remains, sc in last st.
- Change to soft white yarn. Ch 1, turn, sc in each st to end of row.
- Ch 1, turn, sc in same st, sc, *tr in next st, sc in next st*, repeat until 1 st remains, sc in last st.
- Ch 1, turn, sc in each st to end of row.
- Change to Green yarn. Ch 1, turn, sc in same st, sc, *tr in next st, sc in next st*, repeat until 1 st remains, sc in last st.
- Change to soft white yarn. Ch 1, turn, sc in each st to end of row.
- Ch 1, turn, sc in same st, sc, *tr in next st, sc in next st*, repeat until 1 st remains, sc in last st.
- Ch 1, turn, sc in each st to end of row.
- Change to purple yarn 1, turn, sc in same st, sc, *tr in next st, sc in next st*, repeat until 1 st remains, sc in last st.
- Change to soft white yarn. Ch 1, turn, sc in each st to end of row.
- Ch 1, turn, sc in same st, sc, *tr in next st, sc in next st*, repeat until 1 st remains, sc in last st.
- Ch 1, turn, sc in each st to end of row.
26-49. Repeat steps 2-25.
- Change to gold yarn. Ch 1, turn, sc in same st, sc, *tr in next st, sc in next st*, repeat until 1 st remains, sc in last st.
- Change to soft white yarn. Ch 1, turn, sc in each st to end of row.
- Ch 1, turn, sc in same st, sc, *tr in next st, sc in next st*, repeat until 1 st remains, sc in last st.
- Ch 1, turn, sc in each st to end of row.
- Change to orange yarn. Ch 1, turn, sc in same st, sc, *tr in next st, sc in next st*, repeat until 1 st remains, sc in last st.
- Change to soft white yarn. Ch 1, turn, sc in each st to end of row.
- Ch 1, turn, sc in same st, sc, *tr in next st, sc in next st*, repeat until 1 st remains, sc in last st.
- Ch 1, turn, sc in each st to end of row.
- Change to burgundy yarn. Ch 1, turn, sc in same st, sc, *tr in next st, sc in next st*, repeat until 1 st remains, sc in last st.
- Change to soft white yarn. Ch 1, turn, sc in each st to end of row.
For a table runner, continue repeating pattern until desired length.
Finishing
Option 1 – without border
I like the look of the mat without a border too. To help the ends lay flat, I added a row of sl st.
With the right side of the mat facing, attach matching yarn to the first st of one short end. Sl st in each st across, making sure the sts are not worked too tight. Finish off and weave in ends. Repeat for opposite end of mat with right side facing.
Option 2 – with border
Continue where step #59 ended. Sc in same st as last st of row.
Ch 1, pivot to left to work across long edge of mat. Work 2sc in same st as previous st. Sc evenly across edge. Write down this number. (2sc, ch 1, 2sc) in corner.
Pivot to work across short end. Sc in each st until 1 st remains, (2sc, ch 1, 2sc) in corner.
Pivot to work across long edge. Sc evenly across edge, working same amount of sts as opposite edge. (2sc, ch 1, 2sc) in corner.
Pivot to work across short end. Sc in each st, sl st to join.
Sl st in each st around outer edge of mat, working 2 sl st in each corner ch 1 space. Make sure these sts are not worked too tight or the edges will not lay flat. Finish off and weave in ends.
Variation – Christmas Stripes
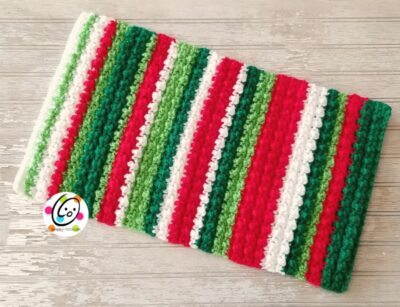
Follow instructions from main pattern, using the colors listed below:
A line description (sc, bobble) has been included to help keep you on track.
- White -Start
- Lime Green – Bobble
- White – Sc
- White – Bobble
- White – Sc
- Red – Bobble
- Lime Green – Sc
- Lime Green – Bobble
- Lime Green – Sc
- Green – Bobble
- Green – Sc
- Green – Bobble
- Green – Sc
- Lime Green – Bobble
- Red – Sc
- Red – Bobble
- Red – Sc
- White – Bobble
- Lime Green – Sc
- Lime Green – Bobble
- Lime Green – Sc
- Lime Green – Bobble
- Green – Sc
- Green – Bobble
- White – Sc
- White – Bobble
- White – Sc
- Red – Bobble
- Red – Sc
- Red – Bobble
- Red – Sc
- White – Bobble
- Green – Sc
- Green – Bobble
- Green – Sc
- Lime Green – Bobble
- Lime Green – Sc
- Lime Green – Bobble
- Red – Sc
- Red – Bobble
- Red – Sc
- Red – Bobble
- Red – Sc
- Red – Bobble
- White – Sc
- White – Bobble
- White – Sc
- White – Bobble
- Green – Sc
- Green – Bobble
- Lime Green – Sc
- Lime Green – Bobble
- Red – Sc
- Red – Bobble
- Red – Sc
- Green – Bobble
- Green – Sc
- Green – Bobble
- Green – Sc
Finish off using one of the options from main pattern.
Snappy Spotlight
I would LOVE to see pix of your creations! Please post a picture in the comments below and make sure you add it as a project on Ravelry. Thanks!