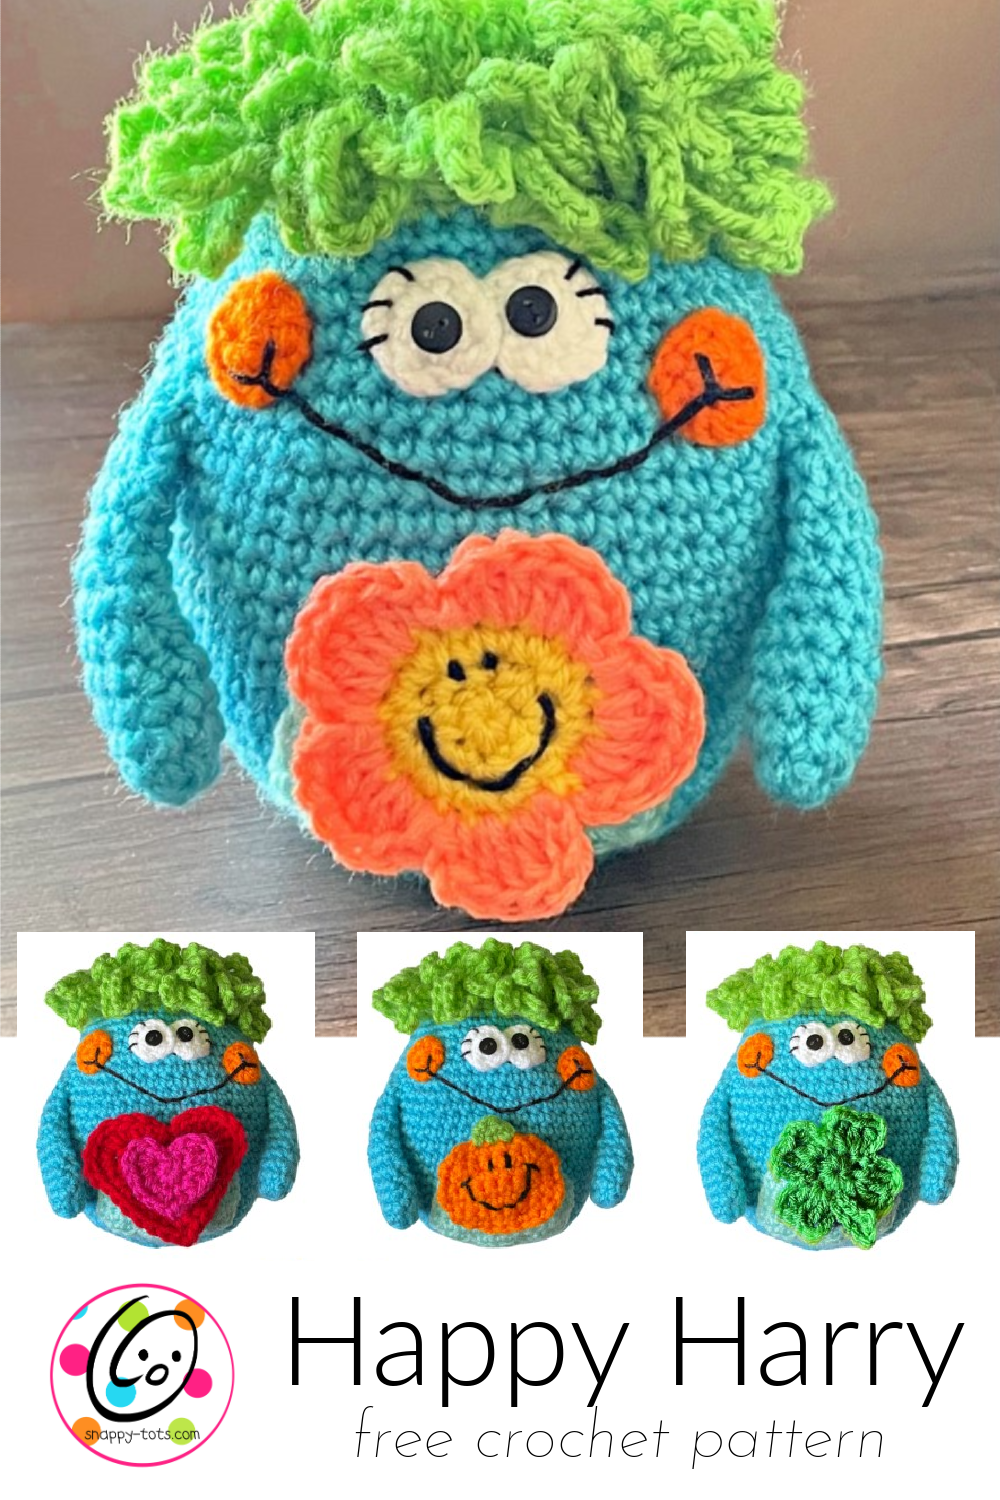
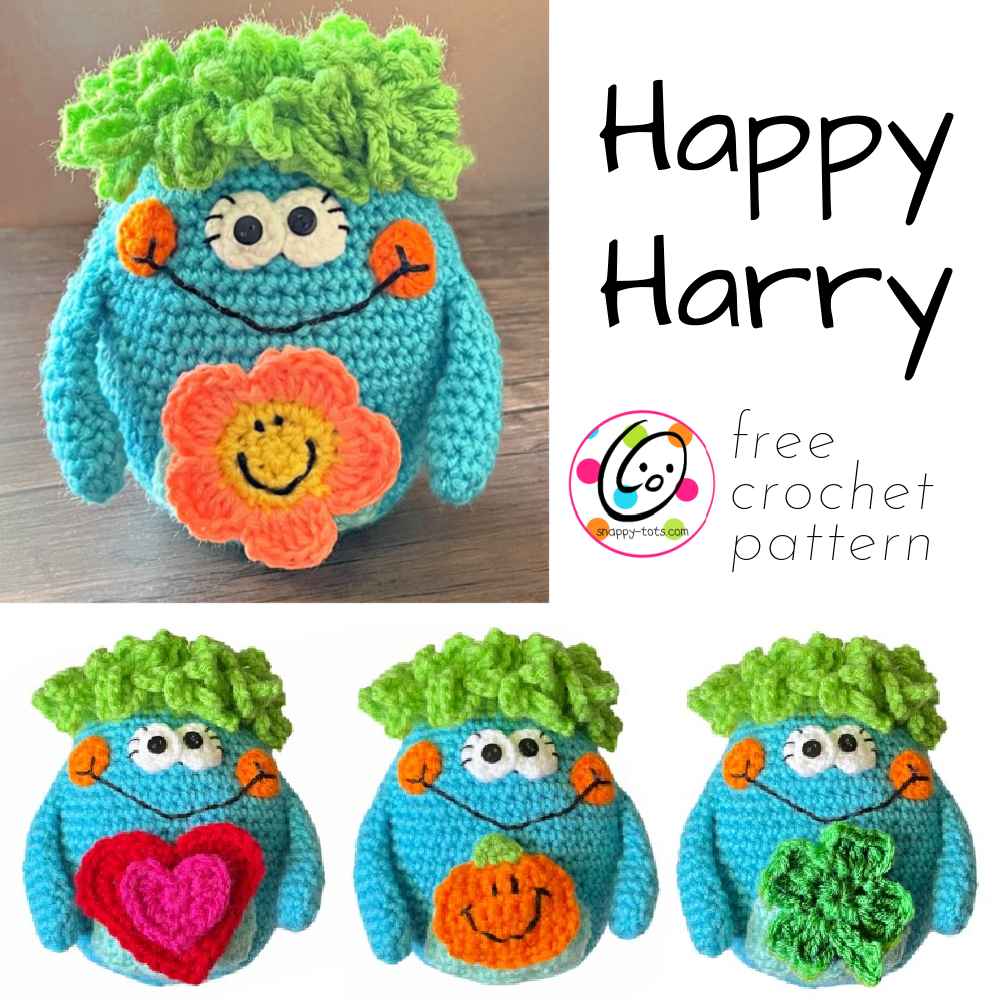
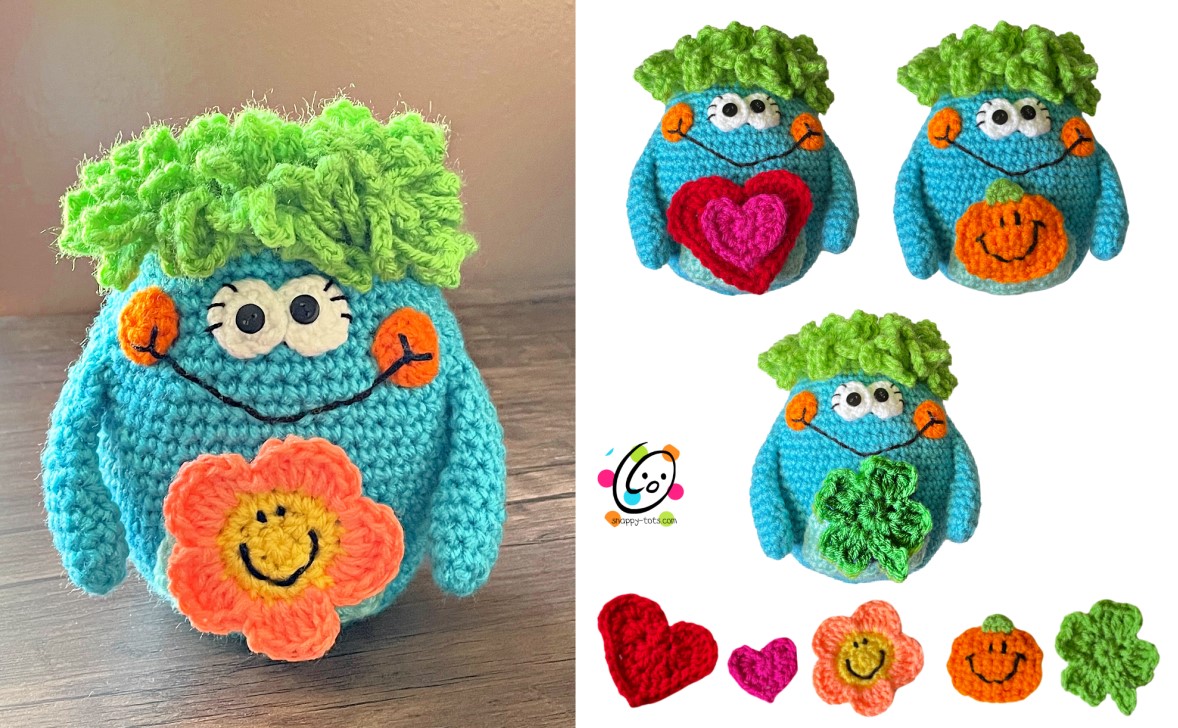
Free Pattern: Happy Harry
I love things that I can change for the seasons. Along those lines, I wanted a small item I could make for gifts that could be used for different reasons. “Happy Harry” was born. This little guy is designed to spread sunshine with little interchangeable pieces. The pieces snap on, but could be sewn directly to the stuffie instead.
Happy Harry Crochet Pattern
This pattern is available to follow along here on my blog for free below.
An ad-free, downloadable version is also available now for free as part of my “Look forward and FLY” restart event from 8/17-8/31/25. Please click the link to download your copy and use password: freeforpeeps25 (no spaces)
Please click the button above or if it doesn’t work from your device please visit: https://snappy-tots.com/document/happy-harry/
Watch for more freebies each day until 8/31/25.
Materials
- Red Heart Super Saver Worsted Weight Yarn: Body- 150 yards Turqua; Hair – 50 yards Spring Green; Small amounts of Aruba Sea (tummy), White, Cherry, Pumpkin, Shocking Pink, Paddy Green, Black, Peach.
- Crochet Hook: H (5mm)
- Notions: Yarn needle for weaving in ends, 2 small black buttons for eyes, black thread, sewing needle, stuffing, 1 large sew on snap, black embroidery floss.
- Optional: Measuring tape, scissors, 1 cup popcorn or stones for a weighted stuffie + nylon sock
Measurements and Details
- Finished Measurements: 6” tall x 5.5” across x 3.5” deep
- Gauge: not needed for this project.
Tips
- First stitch of each row is worked into the same stitch as the turning chain.
- Numbers at the beginning of each line may refer to steps and not indicate number of rows.
- Stitch count remains the same unless noted at end of row/round.
- If you have any questions about this pattern please contact [email protected].
Directions: Body
1. Start with a magic circle of 8 sc sts (or preferred method for creating a circle of 8 sc sts), pull closed and place a marker for working in the round. (8sts)
2. 2sc in each st to end of round. (16sts)
3. *sc, 2sc in next st*, repeat to end of round. (24sts)
4. *sc 3, 2sc in next st*, repeat to end of round. (30sts)
5. *sc 4, 2sc in next st*, repeat to end of round. (36sts)
6. *sc 5, 2sc in next st*, repeat to end of round. (42sts)
7. Sl st in the next st. Ch 1, sc in the BLO of each st to end of round, sl st to join.
8. Ch 1, *sc 13, 2sc in the next st*, repeat to end of round. Do not join. (45sts)
9. From this point on, we will work in the round (not joining at the end of each round). Place a marker to keep track of the beginning of the round. *sc 14, 2sc in the next st*, repeat to end of round. (48sts)
10. Sc in each st to end of round.
11. Repeat the previous round for an additional 9 rounds.
12. *sc2tog, sc 2, sc2tog, sc 18*, repeat once. (44sts)
13. Sc in each st to end of round.
14. *sc2tog, sc 2, sc2tog, sc 16*, repeat once. (40sts)
15. Sc in each st to end of round.
16. *sc2tog, sc, sc2tog, sc 15*, repeat once. (36sts)
17. Sc in each st to end of round.
18. Finish off the current yarn and change to yarn for the hair (Spring green in sample). *sc2tog, sc, sc2tog, sc 13*, repeat once. (33sts)
19. *ch 14, FPSL ST around the next post*, repeat to end of round.
Note: There is not much of a post, but it is possible to work a Front Post Slip Stitch around each sc from the previous round.
20. *sc 9, sc2tog*, repeat to end of round. (30sts)
21. *ch 12, FPSL ST*, repeat to end of round.
22. Stop and make the features (directions on page 3). Add the face, arms, tummy, and snap (optional) at this point before stuffing.
Optional: At this point, you could finish off the yarn and leave it as is for a little container instead of making it a stuffy.
24. Insert weight (optional) and stuff to this point (see instructions on page 3). Note: The increases are placed at the sides, across from each other, to create a flatter, more oval piece. This can be enhanced when stuffed.
25. *sc2tog*, repeat to end of round. (15sts)
26. Flatten the last round as shown in the photos below. *ch 10, sl st through the next st on both edges*, repeat across the row to seam the final edges together. Finish off and weave in ends.

Weighted Body (optional)
I added weight to the body before stuffing to help it stand and be roly poly. Before stuffing, place 1 cup of unpopped popcorn in a nylon sock or 1 cup stones in the bottom of the stuffie.
NOTE ABOUT ASSEMBLY: Make the body first. In the body directions, when instructed to, skip to this point and make the features. Add the features BEFORE stuffing the body.
Tummy
1. With an H hook and worsted weight yarn to contrast the body or one shade lighter (Aruba Sea in sample), ch 11, 2sc in the 2nd ch from hook, sc 8, 2sc in the last ch. (12sts)
2-3. Ch 1, turn, sc in the same st and in each st to end of row.
4. Ch 1, turn, sc2tog, sc 10. (11sts)
5. Ch 1, turn, sc2tog, sc 9. (10sts)
6. Ch 1, turn, sc2tog, sc 6, sc2tog. (8sts)
7. Ch 1, turn, sc2tog, sc 4, sc2tog. (6sts) Finish off, leave a long tail for sewing in place.
Use a yarn needle and the yarn tail to sew the tummy to the front of the body. Notice the round of sts at the bottom of the stuffy leftover from working the BLO round. The flat edge of the tummy is placed against those sts.
Arms (make 2)
This starts at the “hand” and worked in continuous rounds to the top.
1. Start with a magic circle of 8 sc sts (or preferred method for creating a circle of 8 sc sts), pull closed and place a marker for working in the round. (8sts)
2. *sc 3, 2sc in the next st*, repeat once. (10sts)
3-4. Sc in each st to end of round.
5. *sc 3, sc2tog*, repeat once. (8sts)
6-7. Sc in each st to end of round.
8. Sc2tog, sc 6. (7sts)
9-10. Sc in each st to end of round.
11. Sc2tog, sc 5. (6sts)
12. Sc in each st to end of round. Sl st in the next st. Finish off, leaving a yarn tail for sewing to body. The arms are NOT stuffed.
With a yarn needle, use the yarn tails to sew the top edge of each arm to the body at the sides and at a slight inward angle. See main photos for placement.
Face
Eyes (make 2)
With an H hook and white yarn, create a magic circle of 8 sc sts (or preferred method for creating a circle of 8 sc sts), pull closed and sl st to join. (8sts) Finish off, leaving a long tail for sewing in place.
Flatten the body, with the decreases at each edge. With a yarn needle, use the yarn tails to sew each of the eyes to the front of the body, just below the hairline.
With a sewing needle and black thread, sew 2 buttons on top of the white eye pieces.
Eyelashes: With a yarn needle and black embroidery floss, stitch eyelashes a the outer top edge of each eye.
Cheeks (make 2)
With an H hook and orange yarn, create a magic circle of 8 sc sts (or preferred method for creating a circle of 8 sc sts), pull closed and sl st to join. (8sts) Finish off, leaving a long tail for sewing in place.
With a yarn needle, use the yarn tails to sew each of the cheeks to the front of the body. See main photo for placement.
Smile: With a yarn needle and black embroidery floss, stitch a smile in place, overlapping each cheek at the ends.
Snap On Pieces
If these will be interchangeable, sew one end of the snap to the tummy of the stuffie. Sew the other end of the snap to the back of each piece.
Smiley Flower – 2.5” across
1. With an H hook and yarn for the center of the flower (Bright Yellow in sample), start with a magic circle of 5 sts (or preferred method for starting a circle of 5 sc sts), pull closed and sl st to join. (5sts)
2. Ch 1, 2sc in each st to end of round, sl st to join. (10sts)
3. Ch 1, 2sc in each st to end of round, sl st to join. (20sts)
4. Finish off the current yarn and change to yarn for the petals (peach in sample). *Ch 1, hdc in the same st, 2dc in the next st, 2dc in the next st, (hdc, ch 1, sl st) in the next st, sl st in the next st,* repeat to end of round. Finish off and weave in ends.
5. With a yarn needle and black embroidery floss, st the smile and eyes to the flower center.
Clover – 2.5” across
1. With an H hook and dark green yarn, start with a magic circle of 8 sts (or preferred method for starting a circle of 8 sc sts), join and pull closed. (8sts)
2. *Ch 4, (trc, hdc, trc) in the same stitch, ch 4, sl st in next st*, repeat to end of round, sl st to join.
3. (stem) Ch 5, sc in first ch from hook, ch 1, sl st in next st, and in each ch, sl st into base of shamrock. Finish off and weave in ends.
Pumpkin – 2” across
1. With an H hook and orange yarn, ch 6, 2sc in the 2nd ch from hook, sc 3, 2sc in the last st. (7sts)
2. Ch 1, turn, 2sc in the same st, sc 5. 2sc in the last st. (9sts)
3-5. Ch 1, turn, sc in the same st and in each st to end of row.
6. Ch 1, turn, sc2tog, sc 5, sc2tog. (7sts)
7. Ch 1, turn, sc2tog, sc 3, sc2tog. (5sts)
8. Finish off the orange yarn. Change to green yarn. Attach green yarn to the 2nd st from the right (on the last row). Ch 1, sc in the same st, sc 2. (3sts)
9. Ch 1, turn, sc2tog, sl st in the last st. Finish off and weave in ends.
With a yarn needle and black embroidery floss, st the face in place.
Small Heart – 1.5” across
1. With an H hook and ww yarn, start with a magic circle of 8 sts (or preferred method for starting a circle of 8 sc
sts), sl st to join. (8sts)
2. Sl st in next st, (sc, hdc, dc 2, hdc) in next st, hdc 2, (hdc, ch 2, sl st in 2nd ch from hook, hdc) in next st, hdc 2, (hdc, dc 2, hdc, sc) in next st, sl st in next sp (between posts) to join. Finish off and weave in ends.
Large Heart – 2.5” across
1. With an H hook and red yarn, start with a magic circle of 8 hdc sts (or preferred method for starting a circle of 8 hdc sts), sl st to join. (8sts)
2. Sl st in next st, (sc, hdc, dc 2, hdc) in next st, hdc 2, 3hdc in next st, hdc 2, (hdc, dc 2, hdc, sc) in next st, sl st in next sp (between posts) to join.
3. Ch 1, sk first st, (sc, hdc) in next st, (hdc, 2dc) in next st, (2dc, hdc) in next st, sc 5, (hdc, ch 2, sl st in 2nd ch from hook, hdc) in next st, sc 4, (hdc, 2dc) in next st, (2dc, hdc) in next st, (hdc, sc) in next st, sl st to join.
Finish off and weave in ends.
The hearts can be used individually or stacked.
Pin To Save For Later