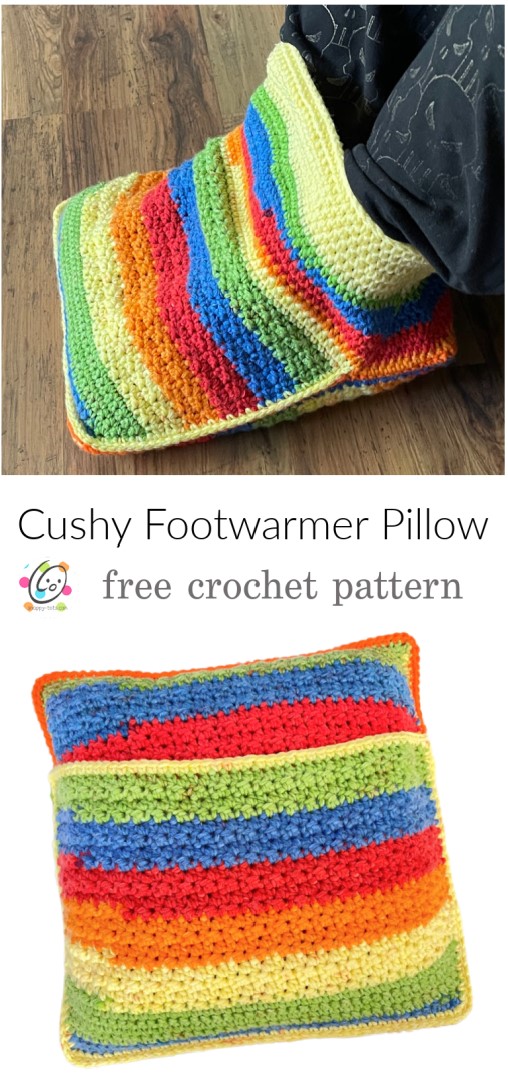
Free Pattern: Cushy Footwarmer Pillow
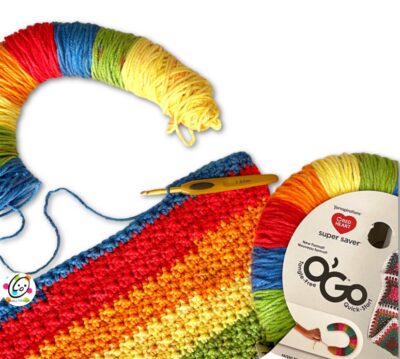
This summer Yarnspirations announced a new tangle free “o’go yarn“. I was super excited when they sent me a couple of skeins to try. .. and they chose the perfect one to send! (I always secretly worry yarn companies will send me pastel yarns to try).
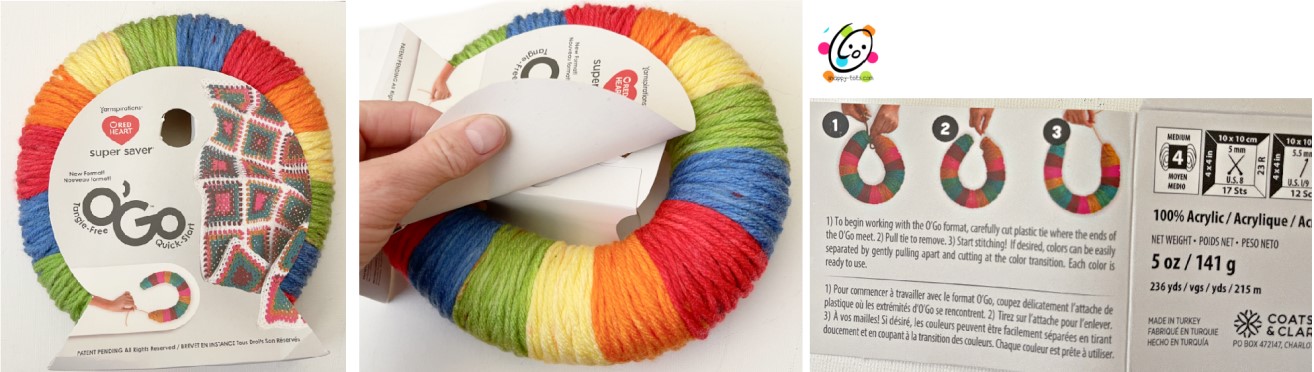
I have to admit, I was a little skeptical about this and thought it was just a gimmicky thing. But I kept an open mind and gave it a try. I am glad they provide instructions for opening this donut. There are even pictures!
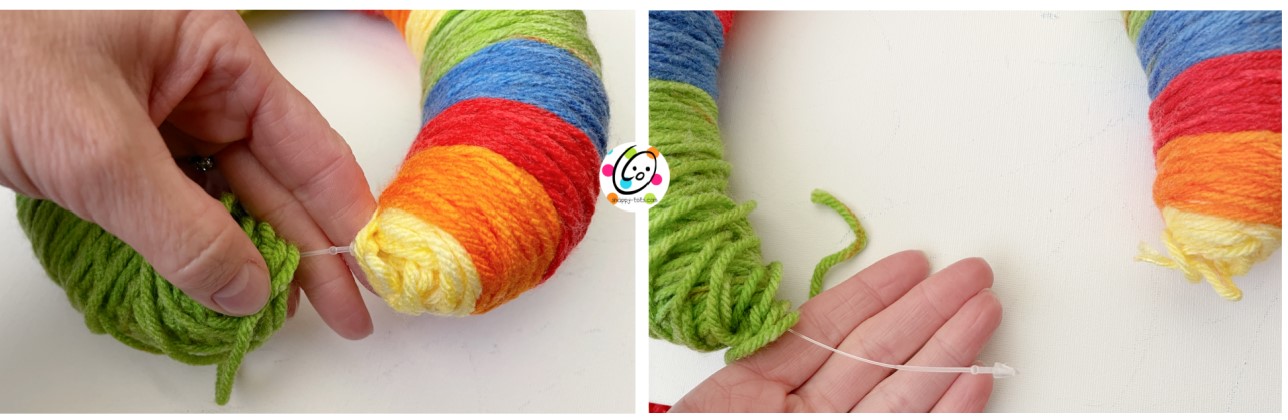
Find the plastic piece between the two ends and carefully cut it. Slowly pull that plastic piece out and throw it away.
What is the yarn like?
- I love the colors and there is just the right amount of yarn between color changes. I really like that.
- It reminds me of the cake yarns. It seems slightly thicker and softer than regular super saver yarn.
- It has a cute little fleck (for lack of a better word) throughout that is really love.
I originally thought “I could just buy all of those colors and make my own”. This is so dang convenient tho PLUS all of the yarns are exactly the same weight. You don’t have to worry about one being a little lighter and throwing off your gauge. LOVE that!
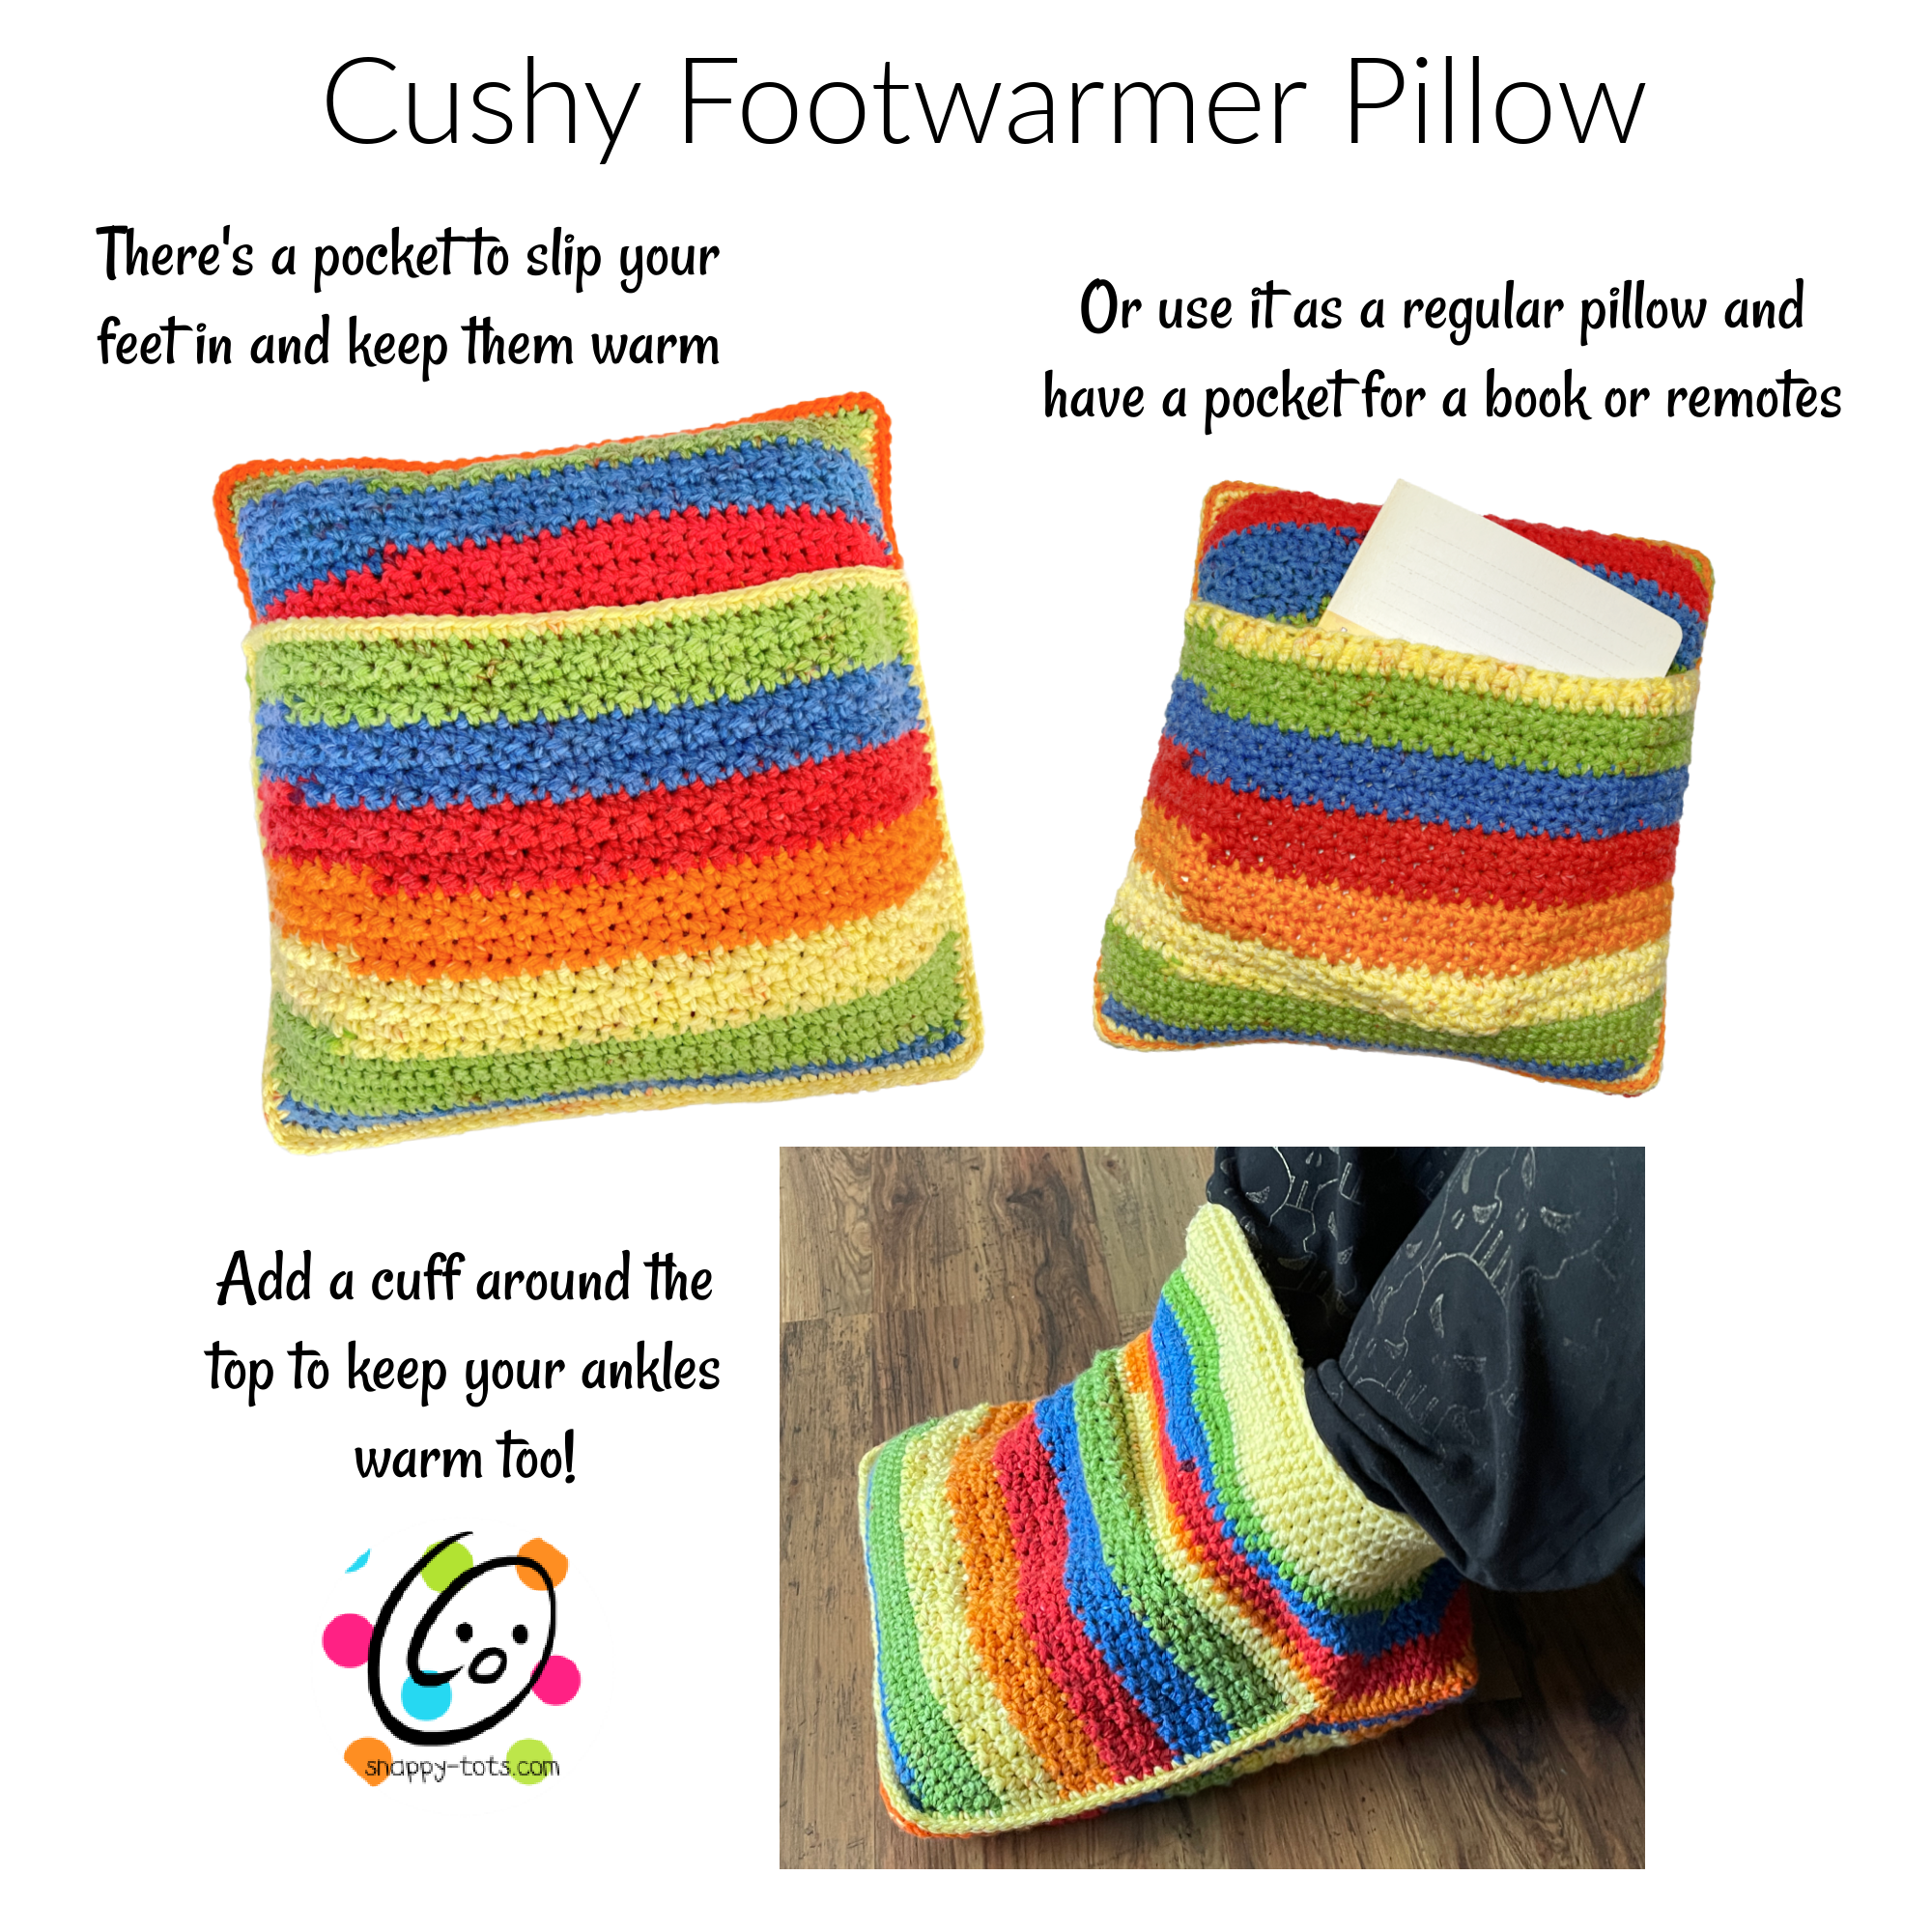
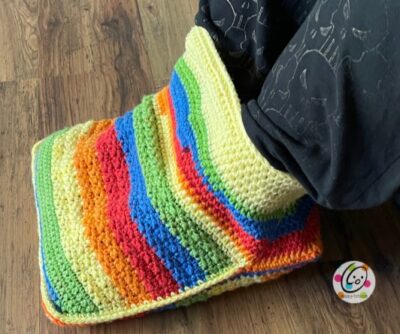
This “Cushy Footwarmer Pillow” was designed because my feet were always really cold under my desk and my chair was just a little too high off the ground. I placed a pillow there and decided if it had a pocket on the pillow I could slip my feet inside and they would stay warm. I thought of my mom who is much shorter than I am and knew this would be great for her too. The cuff was added because I know she would want her ankles warm too. A hand warmer pack could be slipped in the pocket to keep your feet extra toasty.
Cushy Footwarmer Pillow Crochet Pattern
This pattern is available for free below. A downloadable, ad-free pattern that includes the instructions and all pictures is also available to purchase from my Ravelry Shop.
Materials
- Yarn: pillow with pocket – 236 yds ww yarn; pillow with cuff – 260 yds ww yarn Yarn used in the sample: Pillow with pocket – 236 yds Red Heart Super Saver O’Go in Rainbow; Cuff – 25 yds Caron One Pound Sunflower
- Crochet Hook: I (5.5mm)
- Notions: Yarn needle for weaving in ends, stuffing
- Optional: Measuring tape, scissors
Measurements
- Finished Measurements: 13” square
- Gauge: 4” = 6.5 clusters, 11 rows
Tips
- The first stitch of each row is worked into the same stitch as the turning chain unless noted.
- Numbers at the beginning of each line may refer to steps and not indicate the number of rows.
- Stitch count remains the same unless noted at end of row/round.
- If you have any questions about this pattern please contact [email protected].
Description
Both the pocket and cuff versions use the same pillow squares. Choose to add either the “plain pocket” or “cuff pocket”. Those will be sewn together and the pillow stuffed.
At that point, the extra cuff can be added around the top of the pillow if desired.
Pillow Square
(make 2)
1. With an I hook and ww yarn, ch 41, sc in the 2nd ch from hook and in each ch across. (40sts)
2. Ch 1, turn, sc in the same st, hdc in the next st, *sc in the next st, hdc in the next st*, repeat to end of row.
3. Repeat the previous row for an additional 34 rows.
4. This step is worked around the outer edge of the square.
Ch 1, turn, 3sc in the same st, sc 38, 3sc in the last st, sc 38 sts evenly spaced across the edge of the square. 3sc in the first st of the beginning row, sc 38, 3sc in the last st, sc 38 sts evenly spaced across the next edge of the square, sl st in the first st to join. (164sts)
Finish off and weave in ends.
Choose one of the pocket options.
Plain Pocket (no cuff version)(make 1)
1. With an I hook and ww yarn, ch 41, sc in the 2nd ch from hook and in each ch across. (40sts)
2. Ch 1, turn, sc in the same st and in each st to end of row.
3. Ch 1, turn, 2sc in the same st, sc 38, 2sc in the last st. (42sts)
4. Ch 1, turn, sc in the same st and in each st to end of row.
5. Ch 1, turn, 2sc in the same st, sc 40, 2sc in the last st. (44sts)
6. Ch 1, turn, sc in the same st and in each st to end of row.
7. Ch 1, turn, 2sc in the same st, sc 42, 2sc in the last st. (46sts)
8. Ch 1, turn, sc in the same st, hdc in the next st, *sc in the next st, hdc in the next st*, repeat to end of row.
9. Repeat the previous row for an additional 20 rows.
10. Ch 1, turn, hdc in the same st and in each st to end of row.
11. This step is worked around the outer edge of the pocket piece.
Ch 1, turn, 3sc in the same st, *FPHDC around the next post, BPHDC around the next post*, repeat until 1 st remains, 3sc in the last st.
Sc 28 sts evenly spaced across the edge of the square. 3sc in the first st of the beginning row, sc 38, 3sc in the last st, sc 28 sts evenly spaced across the next edge of the square, sl st in the first st to join. (152sts)
Finish off and weave in ends. Skip to “assembly”.
Cuff Pocket (make 1)
1. With an I hook and ww yarn, ch 41, sc in the 2nd ch from hook and in each ch across. (40sts)
2. Ch 1, turn, sc in the same st and in each st to end of row.
3. Ch 1, turn, 2sc in the same st, sc 38, 2sc in the last st. (42sts)
4. Ch 1, turn, sc in the same st and in each st to end of row.
5. Ch 1, turn, 2sc in the same st, sc 40, 2sc in the last st. (44sts)
6. Ch 1, turn, sc in the same st and in each st to end of row.
7. Ch 1, turn, 2sc in the same st, sc 42, 2sc in the last st. (46sts)
8. Ch 1, turn, sc in the same st, hdc in the next st, *sc in the next st, hdc in the next st*, repeat to end of row.
9. Repeat the previous row for an additional 19 rows.
10. This step is worked around the outer edge of the pocket piece.
Ch 1, turn, 3sc in the same st, sc 44, 3sc in the last st.
Sc 26 sts evenly spaced across the edge of the square. 3sc in the first st of the beginning row, sc 38, 3sc in the last st, sc 26 sts evenly spaced across the next edge of the square, sl st in the first st to join. (148sts)
Finish off and weave in ends. Continue to “assembly”. The cuff will be added after the pillow is sewn together.
Assembly
Stack the pieces together as follows:
2 pillow squares with wrong sides together, 1 pocket piece on top with right side up and even with 3 edges.
Pin the pieces together.
Attach matching yarn to a corner with an I hook. Working through the sts of all layers, sl st around the outside of the pillow square/pocket pieces. Stuff the pillow as you go.
Cuff (optional)
Note: For this step, the st count will be approximate and could vary a few sts due to the pillow seaming process.
1. With an H hook, attach matching yarn to the right corner of the pocket (see photo below).

Working across the front/pocket edge, ch 1, hdc2tog, hdc in each st across, working hdc2tog at the corner (picking up one st from the pocket piece and one st from the pillow seam). Hdc in each st around the top edge of the pillow, sl st in the first st to join. (approximately 110sts). The cuff is added to the section marked with the oval in the graphic below.

2. Ch 1, hdc in the same st and in each st around, working hdc2tog at approximately each of the 4 corners (at the beginning and ends of the pocket piece and each top corner of the pillow), sl st in the first st to join. (approximately 106sts)
Optional: If you would prefer actual st counts instead of working as written above, I have included st counts, but please be aware you may have a few more or less sts: Ch 1, *hdc2tog, hdc 25*, repeat to end of round, working an hdc in any additional sts.
3. Ch 1, hdc in the same st and in each st around, working hdc2tog at approximately each of the 4, in the middle of the front pocket edge and in the middle of the top pillow edge (6 decreases total), sl st in the first st to join. (approximately 100 sts)
Optional: If you would prefer actual st counts instead of working as written above, I have included st counts, but please be aware you may have a few more or less sts: Ch 1, *hdc2tog, hdc 15*, repeat to end of round, working an hdc in any additional sts.
4. Keep repeating step #3 until approximately 80 sts remain.
5. Ch 1, hdc in the same st and in each st to end of round, sl st in the first st to join. (approximately 80sts)
6. Repeat step #5 for an additional 6 rounds.
Finish off and weave in ends.
Pin To Save For Later