

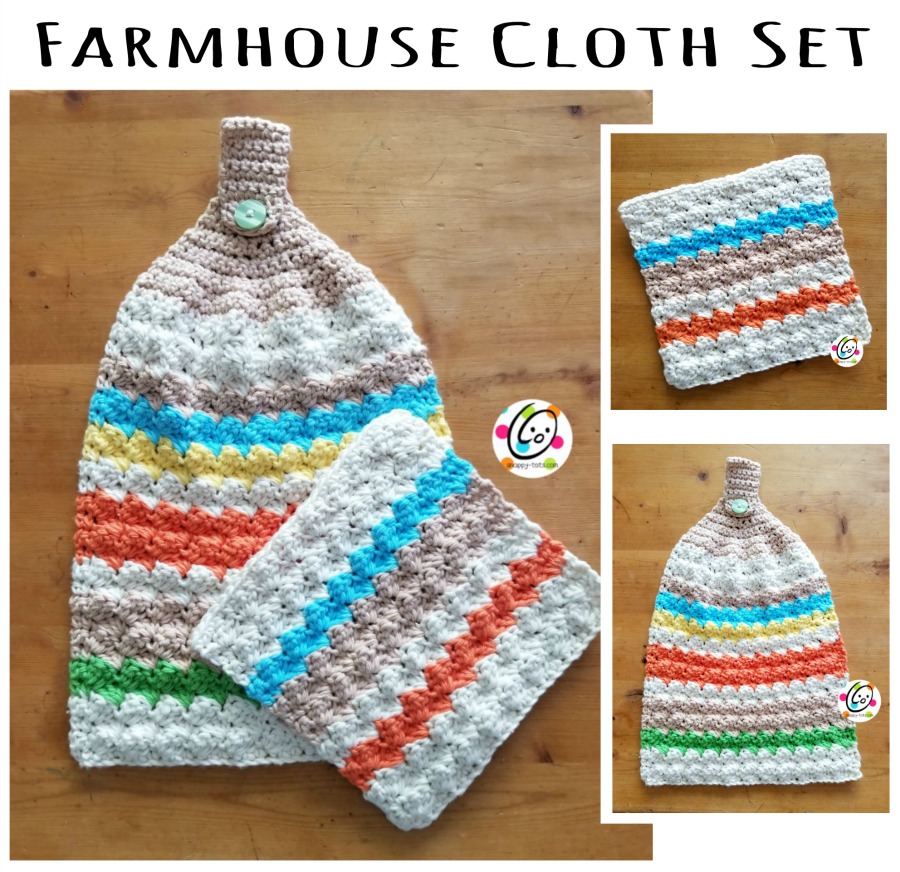
Free Patterns: Farmhouse Cloth Set
I recently designed a lapghan project with a neat texture and a snappy friend asked about making a similar dish cloth. I am so glad she did because it was fun to whip these up. I hope you like how they turned out!
I have included tips for making blankets, place mats and cloths of any size.
An ad-free, downloadable PDF which includes both of these patterns with all of the photos is available to purchase.
“Make Ahead Monday” project. Get this pattern FREE for a limited time: CLICK HERE to download the pdf of this pattern for free until 11/15/23 with coupon code: mam23 Make sure you enter the coupon code and it changes to free BEFORE checking out.
Customize The Size
Want to make cloths in a different size? This is such an easy stitch combo that you will want to make blankets, place mats and more!
I desperately need some place mats and I think these will make great ones. They are quick, thick and an easy pattern to remember so it is also great for bigger projects too.
So, how do you go about making any size you want? It’s easy with the following steps:
- Create a chain to the length you want. Count your chain sts and make sure you have a multiple of 3. Then add one more chain. Sc in the second chain from hook and in each chain across. I like to start with one row of sc to make a nice edge.
2-4. Ch 2, turn, hdc in same st, *(sc, 2dc) in next st, sk 2*, repeat until 2 sts remain (after last sk 2), sc in next st, hdc in last st.
5. Change yarn color if desired. Repeat previous step until the project is the desired length, changing colors as desired. Tip: end on wrong side of piece.
Striping tip: Always change colors when starting a row on the right side of the cloth. Work yarn colors in even number of rows (2, 4, 6, etc).
Last row: Ch 1, turn, sc in each st to end of row. Finish off and weave in all ends.
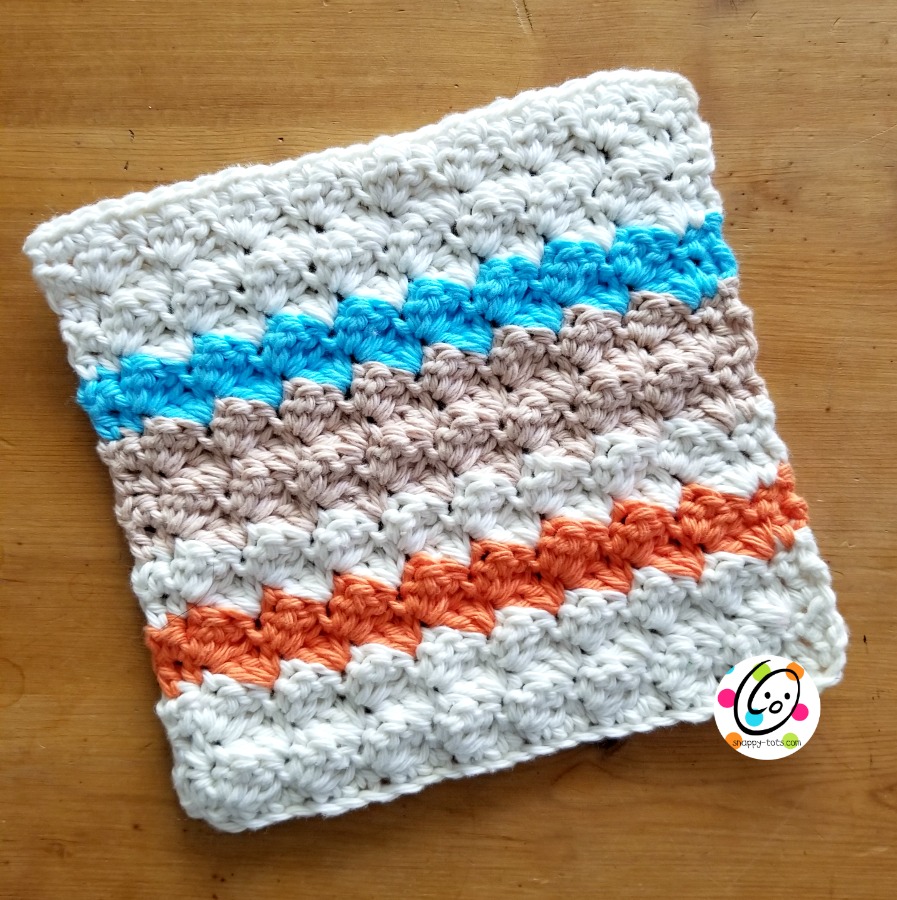
Farmhouse Wash Cloth
Materials
- Cotton Yarn: 80 – 95 yards Sample Yarns: Red Heart Scrubby Smoothie
- Crochet Hooks: I/5.5 mm
- Miscellaneous: Yarn needle for weaving in ends
Details
- Finished Measurement: 7.25” square
Tips
- First stitch of each row is worked into the same stitch as the turning chain.
- The beginning chain is not counted as a stitch unless noted in pattern.
- Numbers at the beginning of each line may refer to steps and not indicate number of rows.
Disclaimers
This pattern was written for specific yarn weights. When substituting yarns, please choose yarns of similar weight/thickness.
Directions
- With an I hook and cotton yarn, ch 28, sc in 2nd ch from hook and in each ch across. (27sts)
2-4. Ch 2, turn, hdc in same st, *(sc, 2dc) in next st, sk 2*, repeat until 2 sts remain (after last sk 2), sc in next st, hdc in last st.
5. Change yarn color if desired. Repeat previous step until cloth is square, changing colors as desired.
Striping tip: Always change colors when starting a row on the right side of the cloth. Work yarn colors in even number of rows (2, 4, 6, etc).
6. Ch 1, turn, sc in each st to end of row. Finish off and weave in all ends.
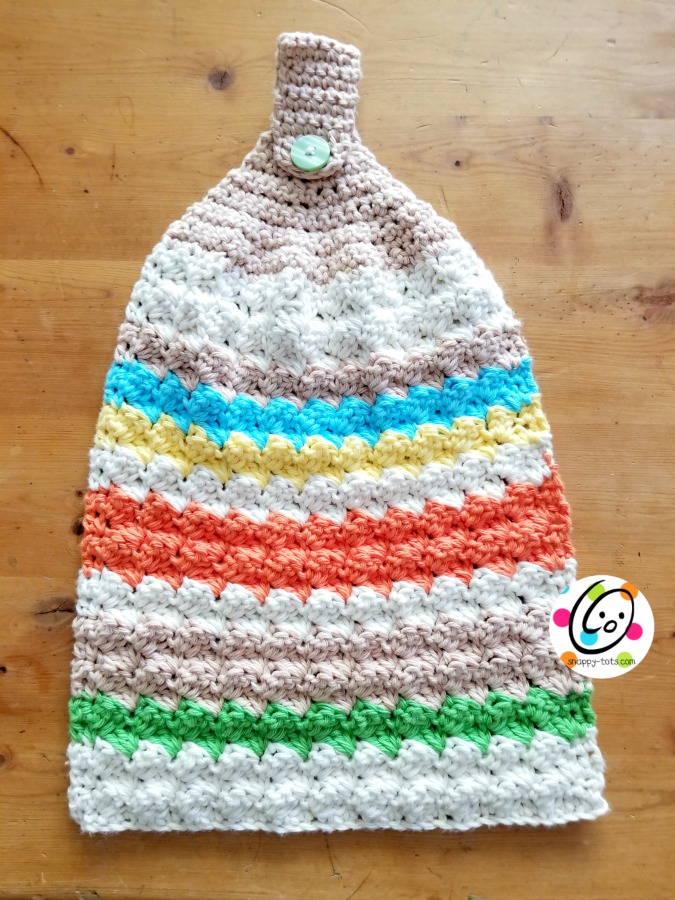
Farmhouse Hanging Towel
Materials
- Cotton Yarn: 200 yards
- Crochet Hook: I/5.5 mm Sample Yarns: Red Heart Scrubby Smoothie
- Miscellaneous: Yarn needle for weaving in ends, 1” button for closure
Details
- Finished Measurements: 17” long x 10” wide
Tips
- First stitch of each row is worked into the same stitch as the turning chain.
- Numbers at the beginning of each line may refer to steps and not indicate number of rows.
Disclaimer
This pattern was written for specific yarn weights. When substituting yarns, please choose yarns of similar.
Directions
1. With an I hook and cotton yarn, ch 37, sc in 2nd ch from hook and in each ch across. (36sts)
2-4. Ch 2, turn, hdc in same st, *(sc, 2dc) in next st, sk 2*, repeat until 2 sts remain (after last sk 2), sc in next st, hdc in last st.
5. Change yarn color if desired. Repeat previous step until cloth is 14” long, changing colors as desired.
Striping tip: Always change colors when starting a row on the right side of the cloth. Work yarn colors in even number of rows (2, 4, 6, etc).
6. This step starts the top section. Ch 1, turn, *sc2tog, sc 7*, repeat to end of row. (32sts)
7. Ch 1, turn, *sc2tog, sc 6*, repeat to end of row. (28sts)
8. Ch 1, turn, *sc2tog, sc 5*, repeat to end of row. (24sts)
9. Ch 1, turn, *sc2tog, sc 4*, repeat to end of row. (20sts)
10. Ch 1, turn, *sc2tog, sc 3*, repeat to end of row. (16sts)
11. Ch 1, turn, sc in each st to end of row.
12. Ch 1, turn, *sc2tog, sc 6*, repeat once. (14sts)
13. Ch 1, turn, *sc2tog, sc 5*, repeat once. (12sts)
14. Ch 1, turn, *sc2tog, sc 4*, repeat once. (10sts)
15. Ch 1, turn, sc in each st to end of row.
16. Ch 1, turn, *sc2tog, sc 3*, repeat to end of row. (8sts)
17. Ch 1, turn, *sc2tog, sc 2*, repeat to end of row. (6sts) 18-32. Ch 1, turn, sc in each st to end of row.
33. This step creates the button hole. Ch 1, turn, sc 2, ch 3, sk 2, sc 2.
34. Ch 1, turn, sc2tog, sc 2 in space, sc2tog. Finish off and weave in end. Button: with yarn needle and matching yarn, sew button to top of cloth before the skinny section begins.
Pin To Save This Set For Later


