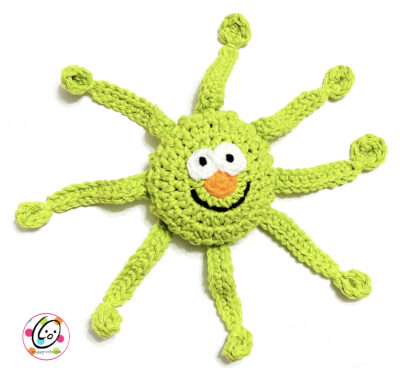
Weekly Wash #42: Spider Scrubbies
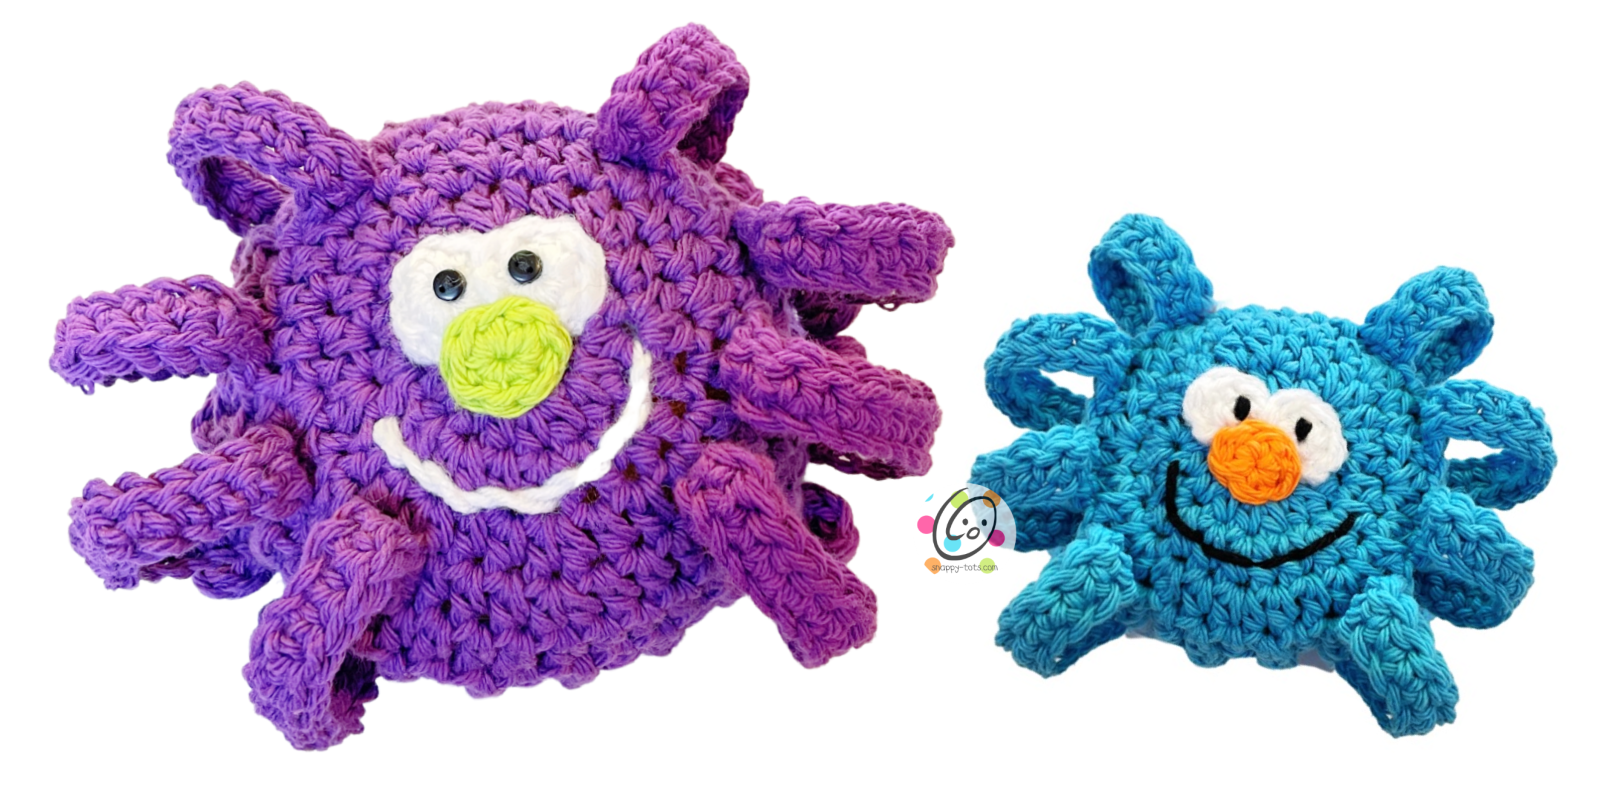
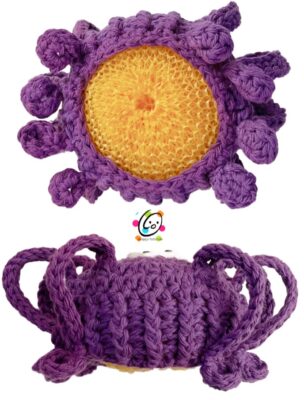
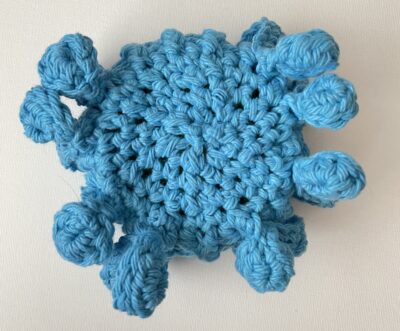
These are designed to slip over jumbo net scrubbers. I understand these jumbo scrubbers might not be available everywhere so I added a smaller version too.
You could also slip these over something of similar size, like a rock if you found the right-sized one.
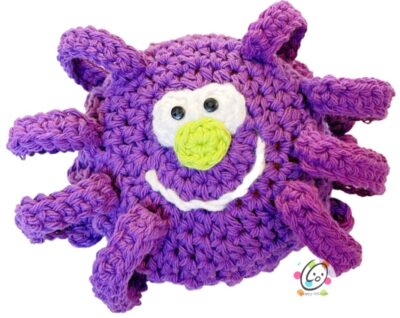
An Octopus Too
By attaching the legs at the bottom you can create an octopus too!
Spider Scrubbies Pattern
The crochet pattern for these scrubbers is available for free below.
Materials
- Yarn: 125-150 yards for body and legs, small amounts of a contrasting color for the nose, and white yarn Yarn note: Use cotton yarn for scrubbers. I suggest Sugar N Cream. Acrylic yarn, such as Red Heart Super Saver, is better for rock covers that are going to be outside.
- Crochet Hook: H (5mm)
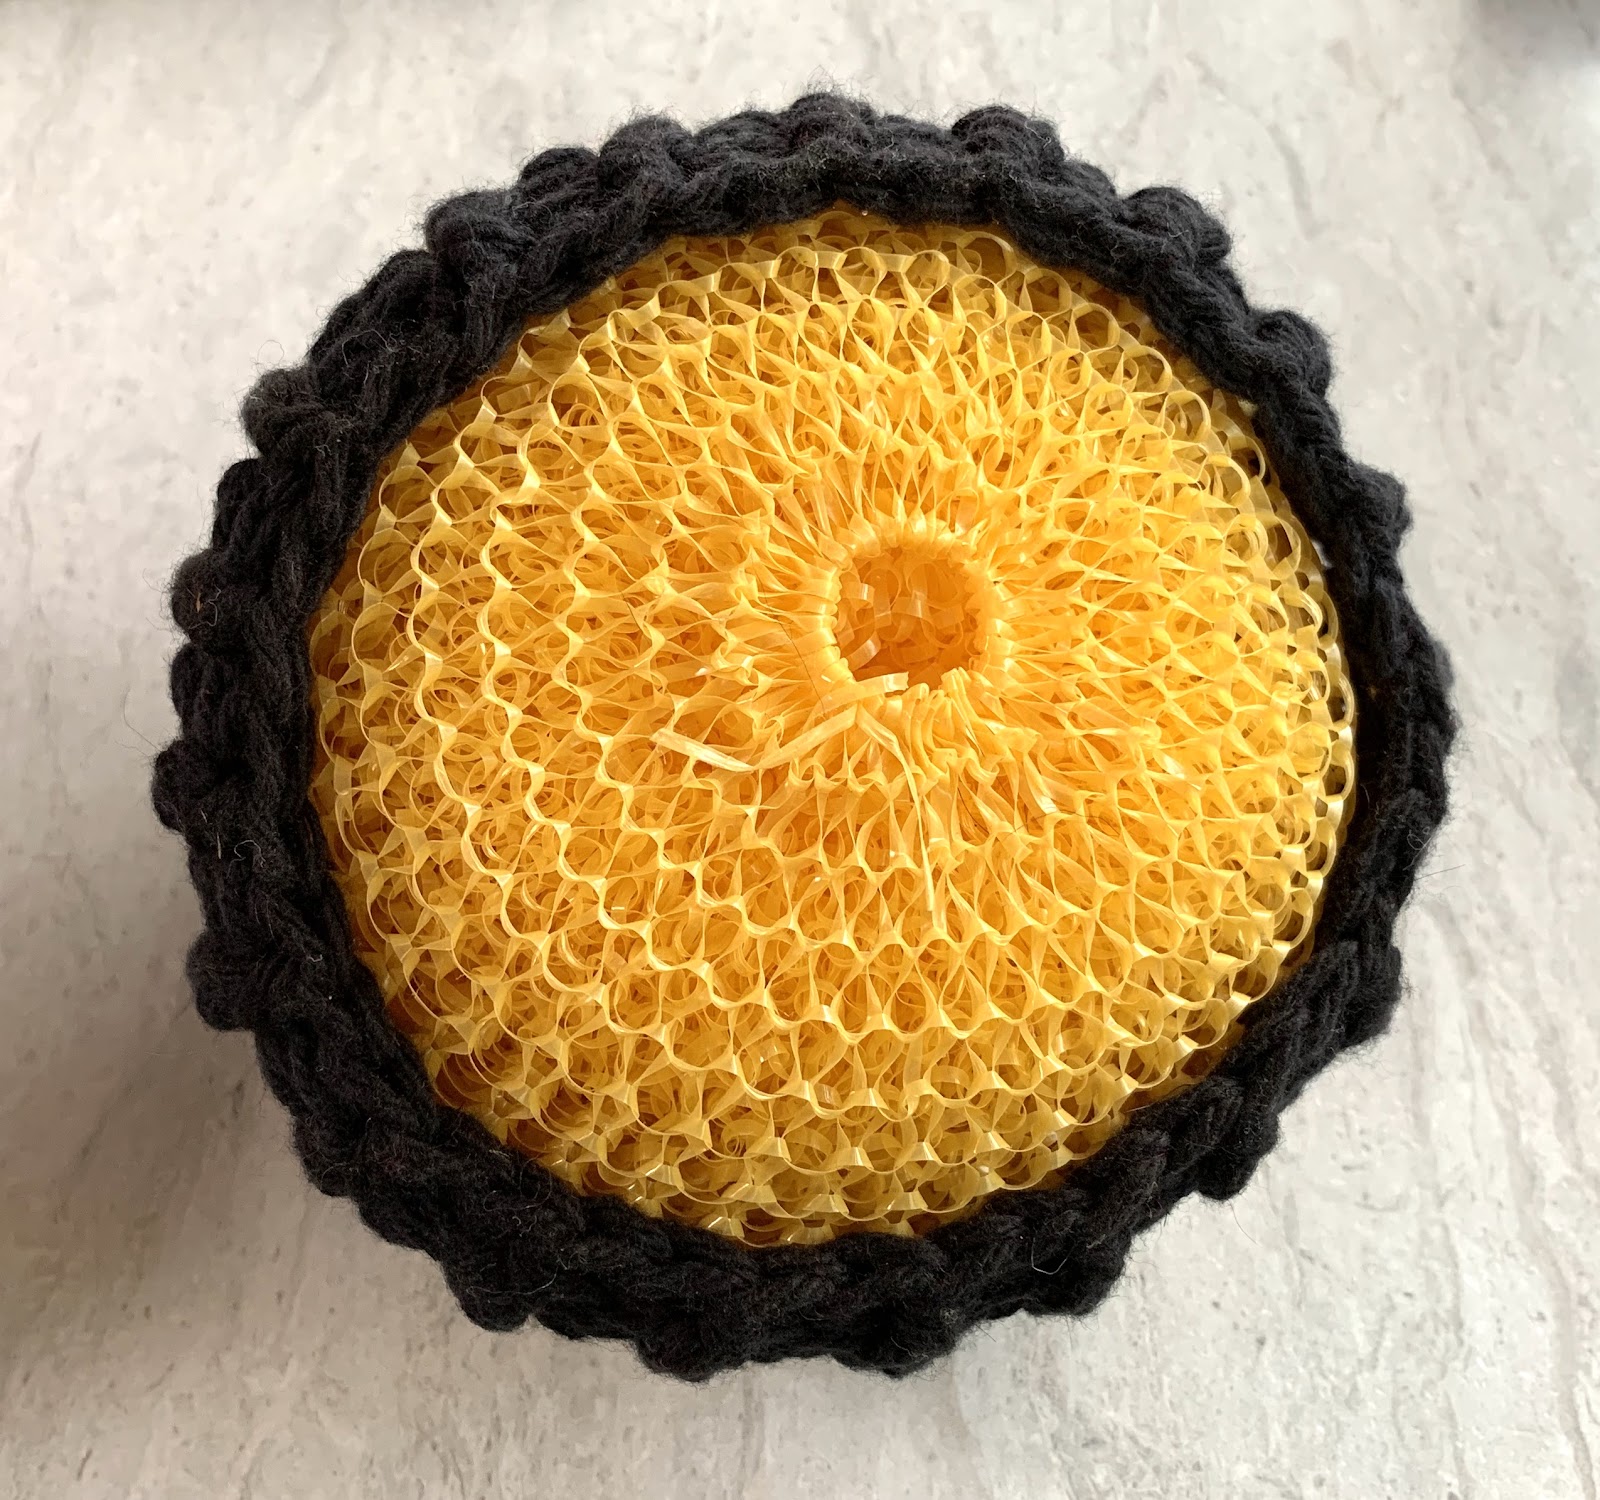
- Miscellaneous: Yarn needle for weaving in ends, 2 small black buttons for eyes, sewing needle, black thread, large 4” net scrubber. I used these scrubbers that I picked up at my dollar store: https://lolaproducts.com/products/jumbo-plastic-mesh-scourer or a 3″ net scrubber for the smaller spiders.
Details
Finished Measurements: Regular – 3.5” wide x 1.5” high (when slipped over a net scrubber) Large – 4.5” wide x 2.5” high (when slipped over a net scrubber)
Directions – Large Spider Scrubby
1. With an H hook and ww yarn (purple in sample), start with a magic circle of 8 sc sts (or preferred method for starting a circle of 8 sc sts), pull closed and sl st to join. (8sts)
2. Ch 1, 2hdc in each st to end of round, sl st to join. (16sts)
3. Ch 1, *hdc, 2hdc in the next st*, repeat to end of round, sl st to join. (24sts)
4. Ch 1, *hdc 2, 2hdc in the next st*, repeat to end of round, sl st to join. (32sts)
5. Ch 1, *hdc 3, 2hdc in the next st*, repeat to end of round, sl st to join. (40sts)
6-7. Ch 1, hdc in the same st and in each st to the end of the round, sl st to join.
8-11. Ch 1, *FPHDC around the next post, BPHDC around the next post*, repeat to end of round, sl st to join.
12. Ch 1, *sc2tog, sc 6*, repeat to end of round, sl st to join. (35sts) Finish off and weave in ends.
Optional: closed bottom
For my young grand kids I wanted to make these so the scrubber wasn’t exposed so I worked additional decrease rounds. This option could also be used to make this into a stuffed spider.
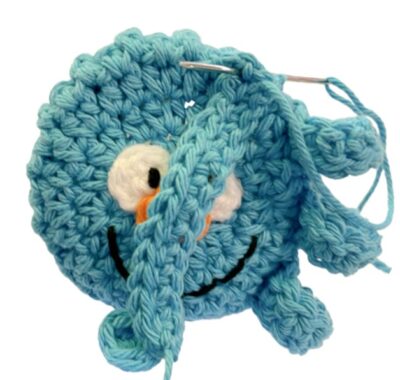
First, I added the face. I inserted the nylon scrubber.
Attach matching yarn to any st on the bottom edge.
1. Ch 1. *sc2tog, sc 5*, repeat to end of round, sl st to join. (30sts)
2. Ch 1, *sc2tog, sc 3*, repeat to end of round, sl st to join. (24sts)
3. Ch 1, *sc2tog, sc 2*, repeat to end of round, sl st to join. (18sts)
4. Ch 1, *sc2tog, sc*, repeat to end of round, sl st to join. (12sts)
5. Ch 1, *sc2tog*, repeat to end of round, sl st to join. (6sts) Finish off, leaving a long tail.
With a yarn needle, use the yarn tail to weave in and out of remaining sts. Pull to close and secure the yarn tail.
Face
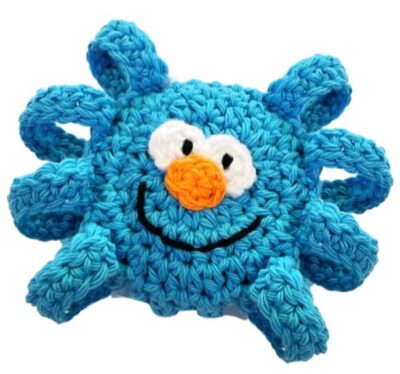
Eyes (make 2)
With an H hook and white yarn, create a magic circle of 8 sc sts (or preferred method for starting a circle of 8 sc sts), pull closed and sl st to join. (8sts) Finish off, leaving a tail for sewing in place.
With a yarn needle and yarn tail, sew eyes to the middle/beginning of the spider. With a sewing needle and black thread, sew one button on top of each eye for the pupils. If this will be used for small children you might want to stitch the pupils in place with black yarn and a yarn needle.
Nose (make 1)
With an H hook and contrasting yarn (lime green in sample), create a magic circle of 8 sc sts (or preferred method for starting a circle of 8 sc sts), pull closed and sl st to join. (8sts) Finish off, leaving a tail for sewing in place.
With a yarn needle and yarn tail, sew nose in place, overlapping the bottom edge of the eyes.
Mouth: With a yarn needle and white or black yarn, stitch mouth in place.
Legs (make 8)
1. Leave a long yarn tail in the beginning for sewing this end to the body. With an H hook and ww yarn to match the body, ch 20, 5hdc in 2nd ch from hook, sl st in the next st, sc in each st to end of row.
2. Ch 1, turn, sl st in each sc st and hdc st. Sl st in first st after the 5hdc from previous row. Finish off, leaving a yarn tail for sewing in place.
Use the beginning yarn tails and a yarn needle to sew each of the flat edges of the legs to the spider. See main photo for placement. Tip: I lay the leg across the face to sew the leg on. Then flip the leg down and this helps it stand out. See photo below.
Bottom of legs: Wrap the last yarn tail around the leg, right before the circle created by the 5hdc. Pull snug and secure the end. Use the rest of the yarn and a yarn needle to sew this point to the bottom edge of the scrubber.
Directions – Regular Spider Scrubby
1. With an H hook and ww yarn (turquoise in sample), start with a magic circle of 8 sc sts (or preferred method for starting a circle of 8 sc sts), pull closed and sl st to join. (8sts)
2. Ch 1, 2hdc in each st to end of round, sl st to join. (16sts)
3. Ch 1, *hdc, 2hdc in the next st*, repeat to end of round, sl st to join. (24sts)
4. Ch 1, *hdc 2, 2hdc in the next st*, repeat to end of round, sl st to join. (32sts)
5. Ch 1, hdc in the same st and in each st to the end of the round, sl st to join.
6-8. Ch 1, *FPHDC around the next post, BPHDC around the next post*, repeat to end of round, sl st to join.
9. Ch 1, *sc2tog, sc 2*, repeat to end of round, sl st to join. (24sts) Finish off and weave in ends.
Optional: closed bottom
For my young grand kids I wanted to make these so the scrubber wasn’t exposed so I worked additional decrease rounds. This option could also be used to make this into a stuffed spider.
First, I added the face. I inserted the nylon scrubber.
Attach matching yarn to any st on the bottom edge.
1. Ch 1, *sc2tog, sc 2*, repeat to end of round, sl st to join. (18sts)
2. Ch 1, *sc2tog, sc*, repeat to end of round, sl st to join. (12sts)
3. Ch 1, *sc2tog*, repeat to end of round, sl st to join. (6sts) Finish off, leaving a long tail.
With a yarn needle, use the yarn tail to weave in and out of remaining sts. Pull to close and secure the yarn tail.
Face
Eyes (make 2)
With an H hook and white yarn, create a magic circle of 6 sc sts (or preferred method for starting a circle of 6 sc sts), pull closed and sl st to join. (6sts) Finish off, leaving a tail for sewing in place.
With a yarn needle and yarn tail, sew eyes to the middle/beginning of the spider. With a sewing needle and black thread, sew one button on top of each eye for the pupils. If this will be used for small children you might want to stitch the pupils in place with black yarn and a yarn needle.
Nose (make 1)
With an H hook and contrasting yarn (orange in sample), create a magic circle of 6 sc sts (or preferred method for starting a circle of 6 sc sts), pull closed and sl st to join. (6sts) Finish off, leaving a tail for sewing in place.
With a yarn needle and yarn tail, sew nose in place, overlapping the bottom edge of the eyes.
Mouth: With a yarn needle and white or black yarn, stitch mouth in place.
Legs (make 8)
1. Leave a long yarn tail in the beginning for sewing this end to the body. With an H hook and ww yarn to match the body, ch 16, 5hdc in 2nd ch from hook, sl st in the next st, sc in each st to end of row.
2. Ch 1, turn, sl st in each sc st and hdc st. Sl st in first st after the 5hdc from previous row. Finish off, leaving a yarn tail for sewing in place.
Use the beginning yarn tails and a yarn needle to sew each of the flat edges of the legs to the spider. See main photo for placement. Tip: I lay the leg across the face to sew the leg on. Then flip the leg down and this helps it stand out. See photo below.
Bottom of legs: Wrap the last yarn tail around the leg, right before the circle created by the 5hdc. Pull snug and secure the end. Use the rest of the yarn and a yarn needle to sew this point to the bottom edge of the scrubber.
Pin To Save For Later