
Free Pattern: Quick Little Pumpkin Pouch
🎃 A Little Pumpkin Full of Surprises!
Some pumpkins are for carving, some are for decorating, and some are just waiting to be filled with goodies!
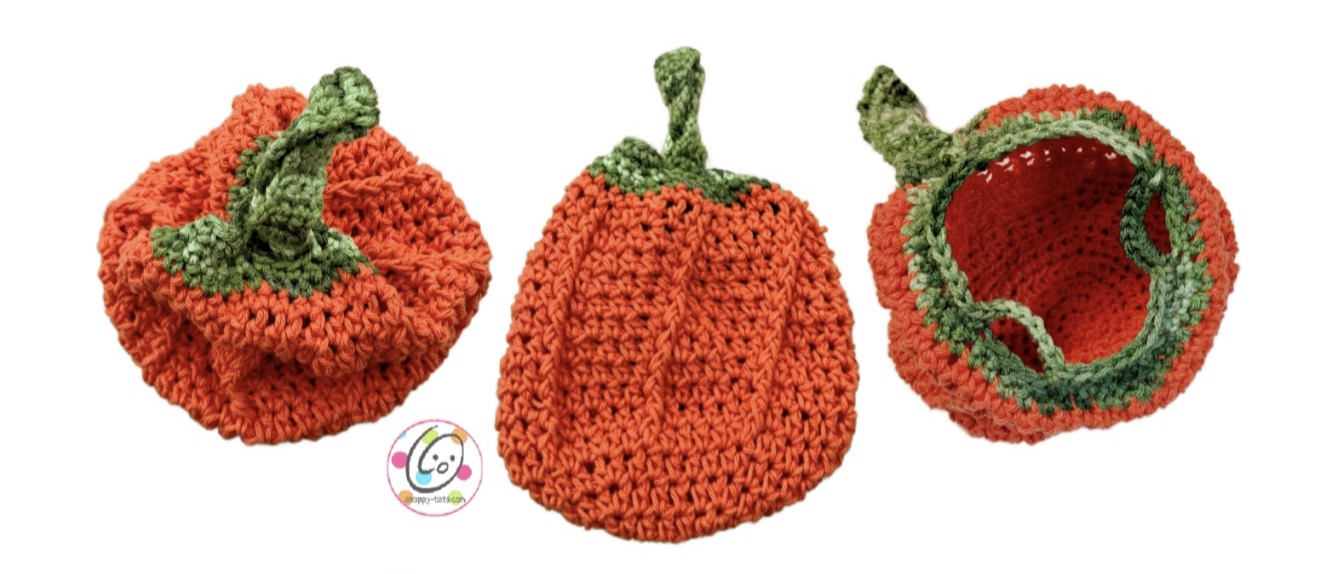
This cute crocheted Pumpkin Pouch is ready for Halloween treats, little surprises, or a bit of fall decorating. The long green handle loops through the top to close the pouch and gives it that fun pumpkin look.
It’s a great project for using your favorite fall colors, too!
🎃 Free PDF During the Event!
During 13 Days of Snappy Trick-or-Treating, the Pumpkin Pouch PDF is available FREE in the Freebie Files for Snappy Tots newsletter subscribers!
Already receive my newsletter? Head to the Freebie Files to get your copy.
Visit the Freebie FilesYou can also view the Pumpkin Pouch download page here .
Not Receiving the Newsletter Yet?
You can sign up to receive the Snappy Tots newsletter and get access to the Freebie Files. I’d love to have you join the fun!
🚪 It’s Snappy Trick-or-Treating Time!
This free pattern is one of the surprises in our 13 Days of Snappy Trick-or-Treating!
We’re opening colorful Halloween doors filled with free crochet patterns, printables, discounts, and other Snappy surprises.
All the doors stay open through November 1, 2026, so there’s still time to collect your treats!
🎃 Visit the Halloween DoorsFree Crochet Pattern: Pumpkin Pouch
The complete pattern is available to follow right here on the blog. You can also use the Freebie Files section above to get the downloadable version.
🧶 Materials and Details
- Yarn: worsted weight – 70 yards burnt orange, 30 yards variegated green
- Crochet Hook: I (5.5mm); J (6mm)
- Notions: Yarn needle for weaving in ends, measuring tape, scissors
- Finished Measurements (measured flat): 8.5” x 8.5”
💡 Tips
- The first stitch of each row is worked into the same stitch as the turning chain unless worked in the round.
- Numbers at the beginning of each line may refer to steps and not indicate number of rows.
- Stitch count remains the same unless noted at end of row/round.
- If you have any questions about this pattern please contact [email protected].
🎃 Directions
This starts at the bottom edge.
1. With a J hook and orange worsted weight yarn, start with a magic circle of 8 sc sts (or preferred method of starting a circle of 8 sc sts), pull closed and sl st to join. (8sts)
2. Ch 1, 2sc in each st to end of round, sl st to join. (16sts)
3. Ch 1, *hdc, 2hdc in the next st*, repeat to end of round, sl st to join. (24sts)
4. Ch 1, *hdc 3, 2hdc in the next st*, repeat to end of round, sl st to join. (30sts)
5. Ch 1, *hdc 4, 2hdc in the next st*, repeat to end of round, sl st to join. (36sts)
6. Ch 1, *hdc 5, 2hdc in the next st*, repeat to end of round, sl st to join. (42sts)
7. Ch 1, *hdc 6, 2hdc in the next st*, repeat to end of round, sl st to join. (48sts)
8. Ch 1, *FPHDC around the next post, hdc 5*, repeat to end of round, sl st to join. Stitch count should remain the same.
Tip: When working post sts and regular sts next to each other it is easy to end up working around the post and in the st of that post. Make sure there is an empty st behind your post st and 5 posts between each FPHDC.
9. Repeat the previous round for an additional 9 rounds.
10. Ch 1, sc in each st to end of round, sl st to join.
11. Finish off the current yarn and change to green yarn and an I hook. This step creates the long handle loop. Ch 1, FPDC around the first orange post st, hdc 2 (in the next sts on the top edge, FPDC around the next orange post st, hdc 2, FPDC around the next post st.
12. Ch 1, turn, sc2tog, sc 3, sc2tog. (5sts)
13. Ch 1, turn, sc2tog, sc, sc2tog. (3sts)
14. Ch 1, turn, sc 3.
15. Repeat the previous row for an additional 29 rows. Finish off, leaving a long tail for sewing the layers together. Fold the end of the handle towards the inside of the basket. Use a yarn needle and the yarn tail to sew the short end near the beginning of the stem/handle where it starts to narrow.
16. Start in the first stitch behind the edge of the handle. Ch 1, sc in each st to end of round, including the same sts from the handle/stem. Sl st to join. (48sts)
17. Ch 1, *sc2tog, sc 4*, repeat to end of round, sl st to join. (40sts)
18. Ch 1, *sc 3, sc2tog, sc 5, sl st in the next st, ch 8, sk 3, sl st in the next st*, repeat once, sc 3, sc2tog, sc 5, sl st to join.
19. Ch 1, sc 10, sc 8 around the chain, sc 10, sc 8 around the chain, sc 10, sl st to join. (46sts) Finish off and weave in ends.
Pull the long handle through one loop and then the other. This will close the top of the pouch.
📖 Common Abbreviations
This pattern uses US crochet terms.
| beg | beginning |
| ch | chain |
| sl | slip |
| st | stitch |
| sp | space |
| sc | single crochet |
| hdc | half double crochet |
| dc | double crochet |
| tr | treble/triple crochet |
| bp | back post |
| fp | front post |
| blo | back loop only |
| flo | front loop only |
| sc2tog | single crochet 2 sts together |
| hdc2tog | half double crochet 2 sts together |
| dc2tog | double crochet 2 sts together |
| * * | repeat instructions |
| yo | yarn over |
🍂 Make It Yours!
This little pouch doesn’t have to be orange!
- Classic pumpkin: Orange with a green stem.
- Farmhouse fall: Try cream or white with a sage green stem.
- Colorful Halloween: Make a purple or black pumpkin for a spooky twist.
- Gift giving: Fill one with wrapped candy, little gifts, or crochet goodies.
🍬 More Halloween Treats!
Don’t forget to visit our 13 Days of Snappy Trick-or-Treating for more crochet fun!
And while you’re here, Snappy Tots patterns are 31% off through November 1, 2026. No coupon needed!
🚪 Open More Halloween Doors