
Free Pattern: Just Call Him Goose
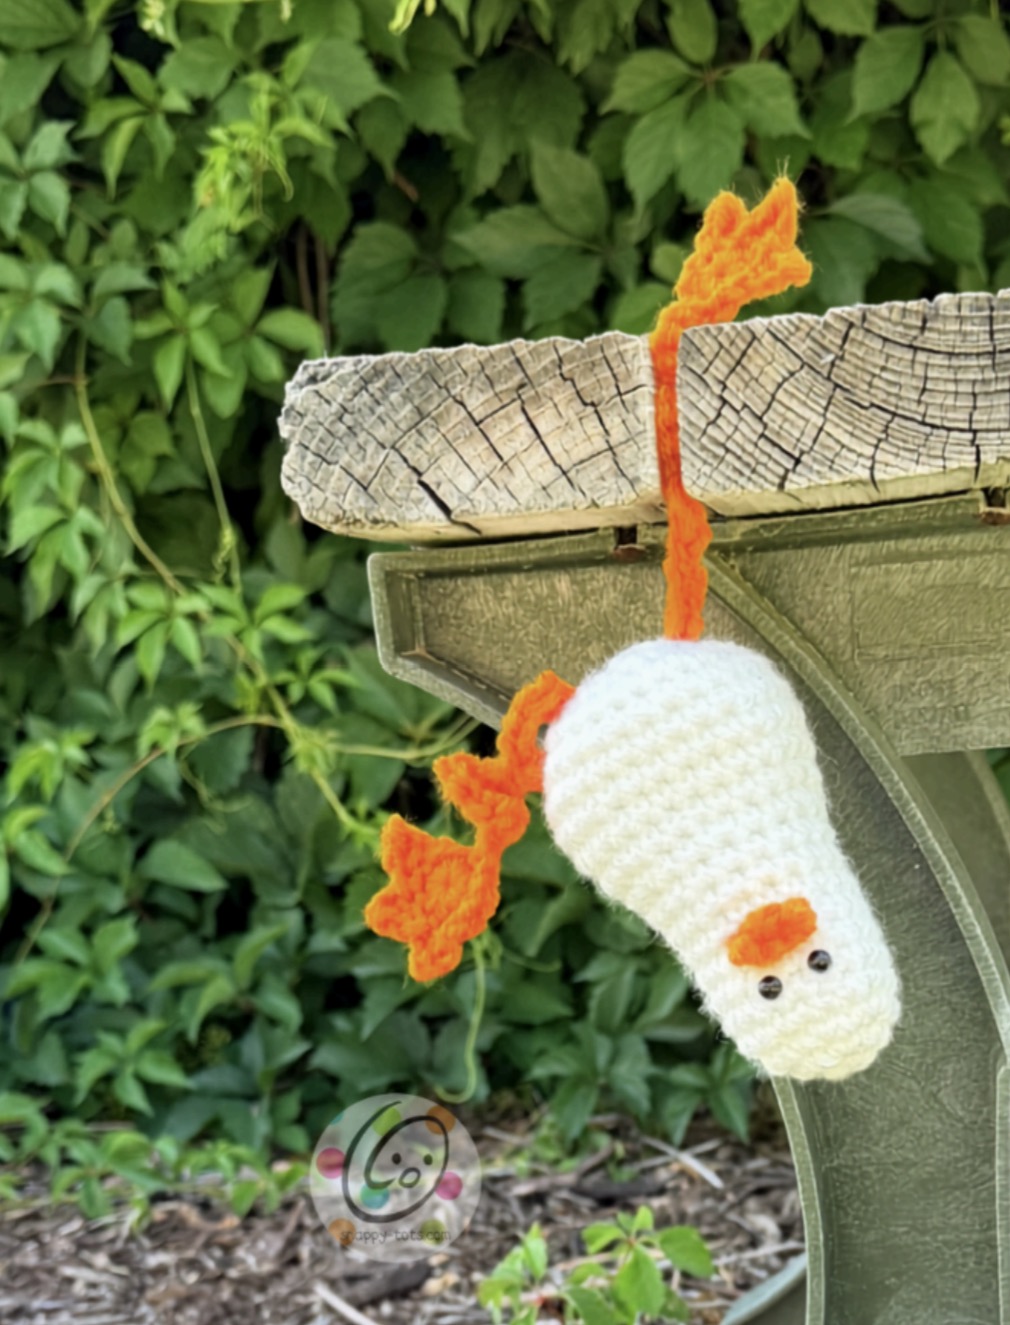
Since porch and desk geese have been bringing a lot of joy, I thought we could use an adventure goose, an emotional support goose, a little buddy to hang out with when we could use a friend.
Meet Just Call Him Goose! He’s small enough to take along on adventures, perch somewhere special, or simply keep you company.
This little goose has a round body, a sweet beak, and long, playful legs. You can even make him a sunhat for his next outing!
The complete goose pattern and bonus sunhat instructions are included below.
Free on the Blog or Printable PDF
This crochet pattern is available to view for free right here on the Snappy Tots blog. Prefer a clean, printer-friendly copy? An ad-free downloadable PDF with the complete pattern and photos is AVAILABLE FOR A SMALL FEE.
↓ VIEW THE FREE PATTERNPrintable PDF
Ravelry PDF — Coming Soon Etsy PDFThe printable version is available to purchase for a small fee on Etsy. Ravelry coming soon!
Materials & Details
- Yarn: Worsted weight in small amounts. Sample: Red Heart Super Saver Soft White, Pumpkin
- Crochet Hooks: F (3.5mm), H (5mm)
- Supplies: Yarn needle for weaving in ends, stuffing and poly pellets (or just stuffing), 2 tiny safety eyes (or black buttons with needle and thread)
- Optional: Measuring tape, scissors, 3 glass aquarium rocks (approximately 1” each)
- Gauge: Not needed for the project
- Measurements: Body – 4.5” tall x 3” at widest point; Legs – 4” long
💡 Pattern Tips
- The first stitch of each row is worked into the same stitch as the turning chain unless noted.
- Numbers at the beginning of each line may refer to steps and not indicate number of rows.
- Stitch count remains the same unless noted at end of row/round.
- If you have any questions about this pattern please contact [email protected] .
Beak (make 1)
1. Leave a long tail in the beginning to use for sewing in place when needed. With an F hook and worsted weight yarn (Sample: Pumpkin), ch 5, sc in the 2nd ch from hook and in each ch across. (4sts)
2. Ch 1, turn, sc2tog, sc2tog. (2sts)
3. Ch 1, turn, sc2tog. Finish off and weave in end. Set aside.
Goose
This starts at the top of the head.
1. With an H hook and worsted weight yarn (Sample: Soft White), start with a magic loop of 6 sc sts (or preferred method for starting a circle of 6 sc sts), pull closed and place a marker for working in the round. (6sts)
2. 2sc in each st to end of round. (12sts)
3. *sc, 2sc in the next st*, repeat to end of round. (18sts)
4. Sc in each st to end of round.
5. Repeat the previous round for an additional 6 rounds.
6. *2sc in the next st, sc 2*, repeat to end of round. (24sts)
7. *2sc in the next st, sc 11*, repeat once. (26sts)
8. *2sc in the next st, sc 12*, repeat once. (28sts)
9. *2sc in the next st, sc 13*, repeat once. (30sts)
Add the Face
Stop and add the face at this point. Insert 2 safety eyes approximately 5-6 rounds from the top of the head.
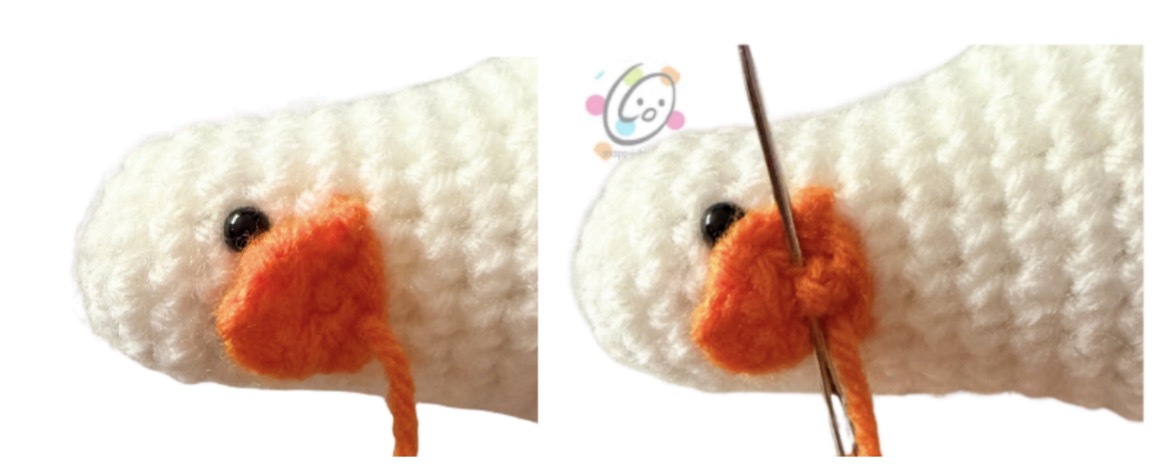
With a yarn needle, use the yarn tail from the beak to sew the beginning edge below the eyes.
Tip: The sample beak was sewn upside down first (see photos below) and then folded down. This helps the beak point out away from the goose.
10. Sc in each st to end of round.
11. Repeat the previous round for an additional 2 rounds.
Stop and stuff the goose. Stuff the top half with stuffing. If poly pellets will be used, place those in a baby sock or nylon first to prevent the pellets from working through stitches. If poly pellets will not be used, stuff the full body with stuffing.
12. *sc2tog, sc*, repeat to end of round. (20sts)
13. *sc2tog*, repeat to end of round. (10sts)
Finish stuffing the goose. If you want additional weight for the goose, a few craft/aquarium gems could be added.
14. *sc2tog*, repeat to end of round. Finish off, leaving a long tail for sewing.
With a yarn needle, use the yarn tail to weave in and out of the remaining sts. Pull to close and secure the yarn.
Legs (make 2)
These start at the feet.
For longer or shorter legs, adjust the amount of chains at the beginning of step 3.
For straight legs, on step 3 sl st in each ch back to the foot.
1. With an H hook and worsted weight yarn (Sample: Pumpkin), start with a magic loop of 6 sc sts (or preferred method for starting a circle of 6 sc sts), pull closed and place a marker for working in the round. (6sts)
2. *ch 3, sl st in the 2nd ch from hook, hdc in the 3rd ch, sl st in the next st on the circle*, repeat 2 more times, sl st 3 on circle.
3. Ch 15, sl st in the 2nd ch from hook, sl st in the 3rd ch, *3sc in the next ch, sl st 2*, repeat to end of ch, sl st in the same st on the foot. Finish off and weave in ends.
With a yarn needle and matching yarn, sew the end of the chain against the bottom of the goose.
7” Goose Sunhat
1. With an H hook and worsted weight yarn, start with a magic loop of 6 sc sts (or preferred method for starting a circle of 6 sc sts), pull closed and place a marker for working in the round. (6sts)
2. 2sc in each st to end of round. (12sts)
3. *sc, 2sc in the next st*, repeat to end of round. (18sts)
4-5. Sc in each st to end of round.
6. Sl st in the next st. This is the new beginning of the round. Each round will be joined from this point on. Ch 1, hdc in the same st, hdc in the next st, 2hdc in the next st, *hdc 2, 2hdc in the next st*, repeat to end of round, sl st to join. (24sts)
7. Ch 1, FPSC around each post to end of round, sl st to join.
8. Ch 1, *hdc, 2hdc in the next st*, repeat to end of round, sl st to join. (36sts)
9. Ch 1, *hdc, 2hdc in the next st*, repeat to end of round, sl st to join. (54sts)
10. Sl st in each st to end of round. Finish off and weave in ends.
Chin Straps
Chin straps: with an H hook and matching yarn, sl st in a st (from the ridge created by step 6) on the inside of the hat. Ch 30. Finish off and tie a small knot in the end. Repeat for the second strap, directly across from the first one.
🎉 Your Goose Is Ready!
Your little adventure buddy is ready to go wherever life takes you! Make a sunhat, choose a favorite perch, and let the goose adventures begin.
🖨️ Prefer a Printer-Friendly PDF?
For a small fee, you can purchase an ad-free downloadable PDF containing the complete Just Call Him Goose crochet pattern, sunhat instructions, and photos.
Ravelry PDF — Coming Soon GET THE PDF ON ETSY| beg | beginning |
| ch | chain |
| sl st | slip stitch |
| st | stitch |
| sp | space |
| sc | single crochet |
| hdc | half double crochet |
| dc | double crochet |
| tr | treble/triple crochet |
| bp | back post |
| fp | front post |
| blo | back loop only |
| flo | front loop only |
| sc2tog | single crochet 2 sts together |
| hdc2tog | half double crochet 2 sts together |
| dc2tog | double crochet 2 sts together |
| * | repeat instructions |
| yo | yarn over |
| FPSC | front post single crochet |
Show Me Your Goose!
I love seeing what you make from my patterns! Share your finished project on social media and tag #snappytots so I can see your creation.
Contact & Snappy Spots
Come hang out with Snappy Tots for new patterns, giveaways, events, goose nonsense and lots of crochet fun.
Thank you for crocheting with me!
Thank you for crocheting with Snappy Tots. I hope you have a wonderful day!