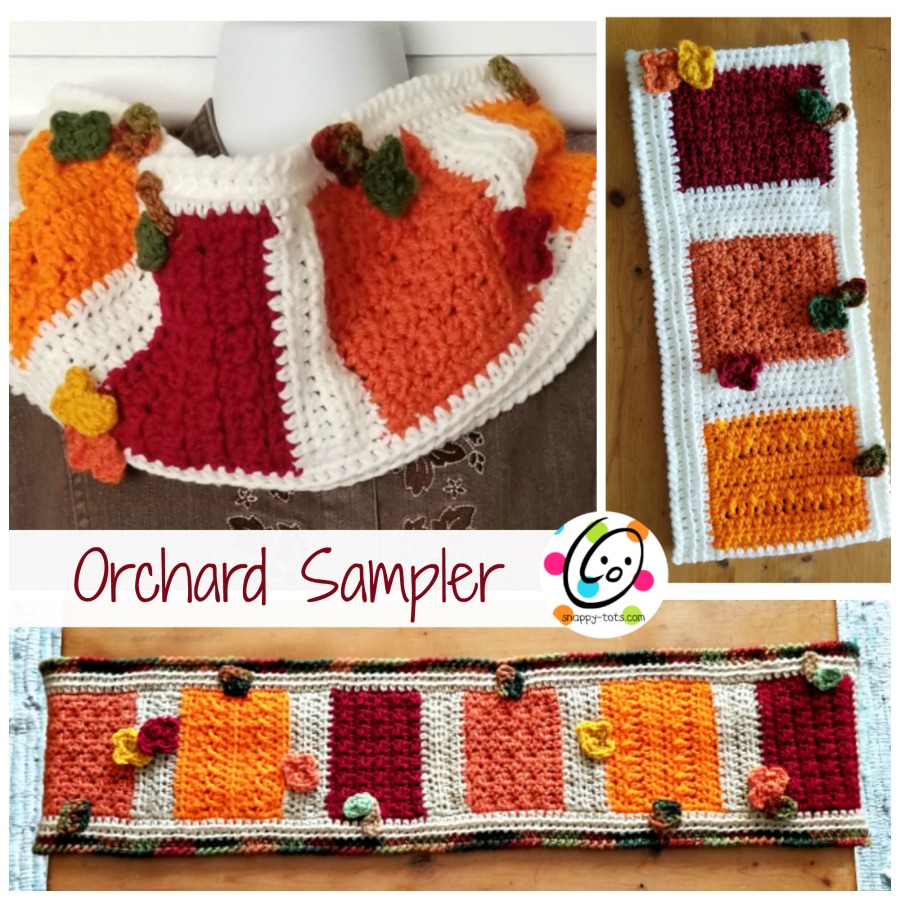
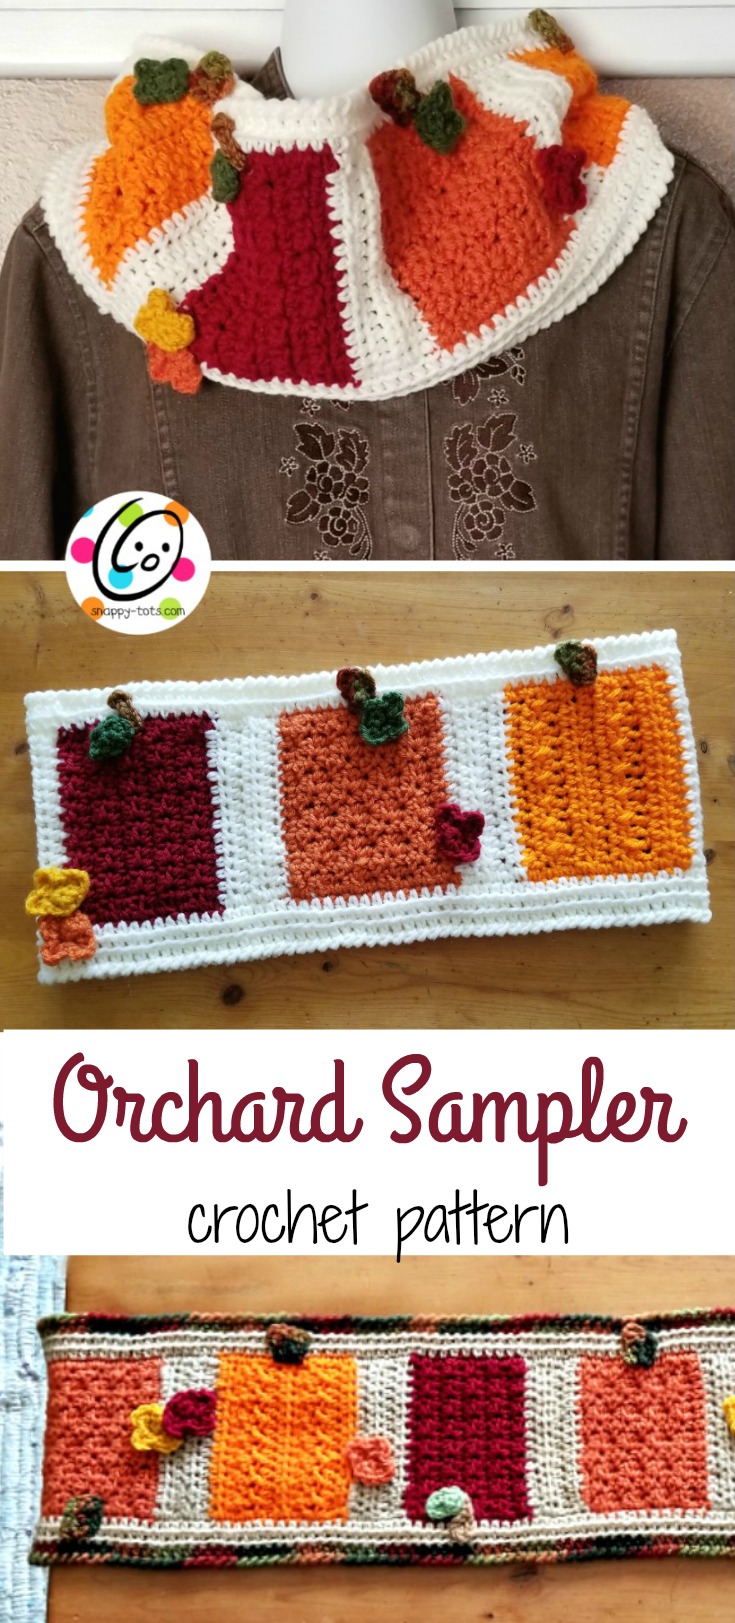
Free Pattern: Orchard Sampler Cowl and Runner
It is fun playing with different stitches to create texture and it is perfect for pumpkins. I wanted a fall sampler for a table runner and as I was making it I thought it would be a pretty cowl too. This “Orchard Sampler” has pumpkins and apples.
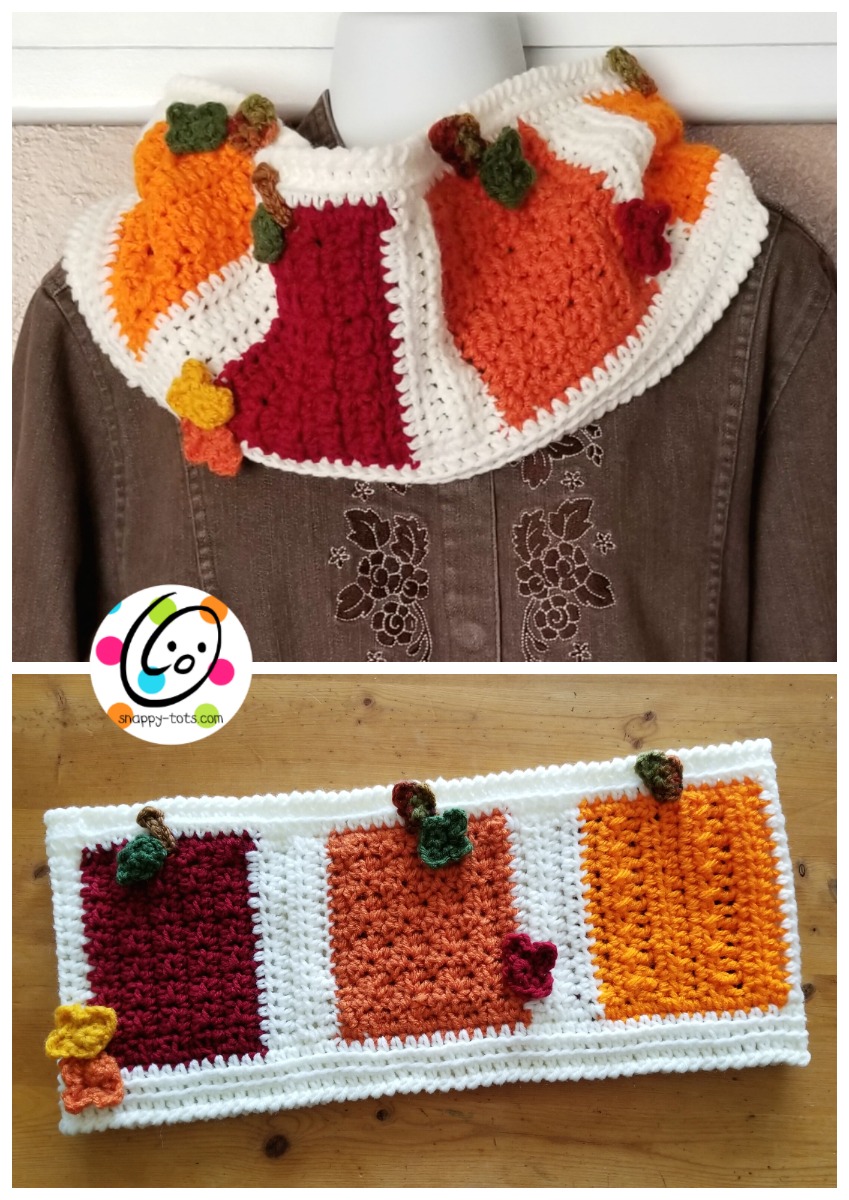
Orchard Sampler Cowl and Table Runner Crochet Pattern
Scroll down to view the free pattern or purchase an ad-free, downloadable PDF version from my Ravelry Shop.
FREE FOR 72 hours: CLICK HERE to download the pdf of this pattern for free until 9/17/22 with coupon code: almostfall
Make sure you enter the coupon code and it changes to free BEFORE checking out.
Materials
- Yarn: Worsted weight.
Sample colors for cowl: Red Heart Super Saver – Carrot, Pumpkin, Burgundy, Soft White. Fall, Cafe; Red Heart With Love Cornsilk.
Sample colors for runner: Red Heart Super Saver – Carrot, Pumpkin, Burgundy, Buff. Fall, Cafe; Red Heart With Love Cornsilk. - Crochet Hooks: H, I
- Notions: yarn needle
Details
- Gauge: Not needed for this project
- Finished Measurements: Cowl – 7” x 16.5” (measured flat); Runner – 7.5” wide x 35.5” long
Tips
- Stitch count remains the same unless noted at end of row.
- Number at beginning of line refers to a step and not necessarily the number of rounds.
- The border rounds help even up the sides. If needed, get the finished project wet, pin to a towel to straighten up the edges. Allow to dry.
Special Stitch
Reverse SC between posts: Insert hook, from front to back, before the next post to the right. Pull up a loop, YO and pull through 2 loops on hook.
Tips for this stitch:
- Take it slow.
- Be patient. It takes some practice and the outcome is worth it!
- Don’t work the sts too tight.
Tutorial on Reverse sc: https://www.mooglyblog.com/reverse-single-crochet-crab-stitch/
Please note the tutorial shows the sc worked in the STITCH. Please insert your hook between the posts instead.
Project Description
The project starts by working back and forth in rows, creating a strip 4.25” wide x 33”. There will be six textured/colored sections. These can be made into pumpkins, apples or a combination of both.
When strip is complete, the short ends will be joined and a band will be worked in the round at the top and bottom of the piece.
Leaves and stems are added last.
The directions are written for color changes as shown in the main sample above, with two dark red (Burgundy) apples, two burnt orange (Carrot) pumpkins and two brighter orange (Pumpkin) pumpkins. Substitute colors as desired.
Directions – Cowl
Tutorial photos show the dividers in Red Heart Super Saver Buff. These sections are listed as “Soft White” for the cowl.
1. With an I hook and burnt orange yarn (Carrot), ch 16, sc in 2nd ch from hook and in each ch across. (15sts)
2-9. Ch 2, turn, hdc in same st, sk 1, (sc, hdc) in next st, *hdc in next st, sk 1, (sc, hdc) in next st*, repeat to end of row.
10. Ch 1, turn, sc in each st to end of row. Pumpkin section complete.
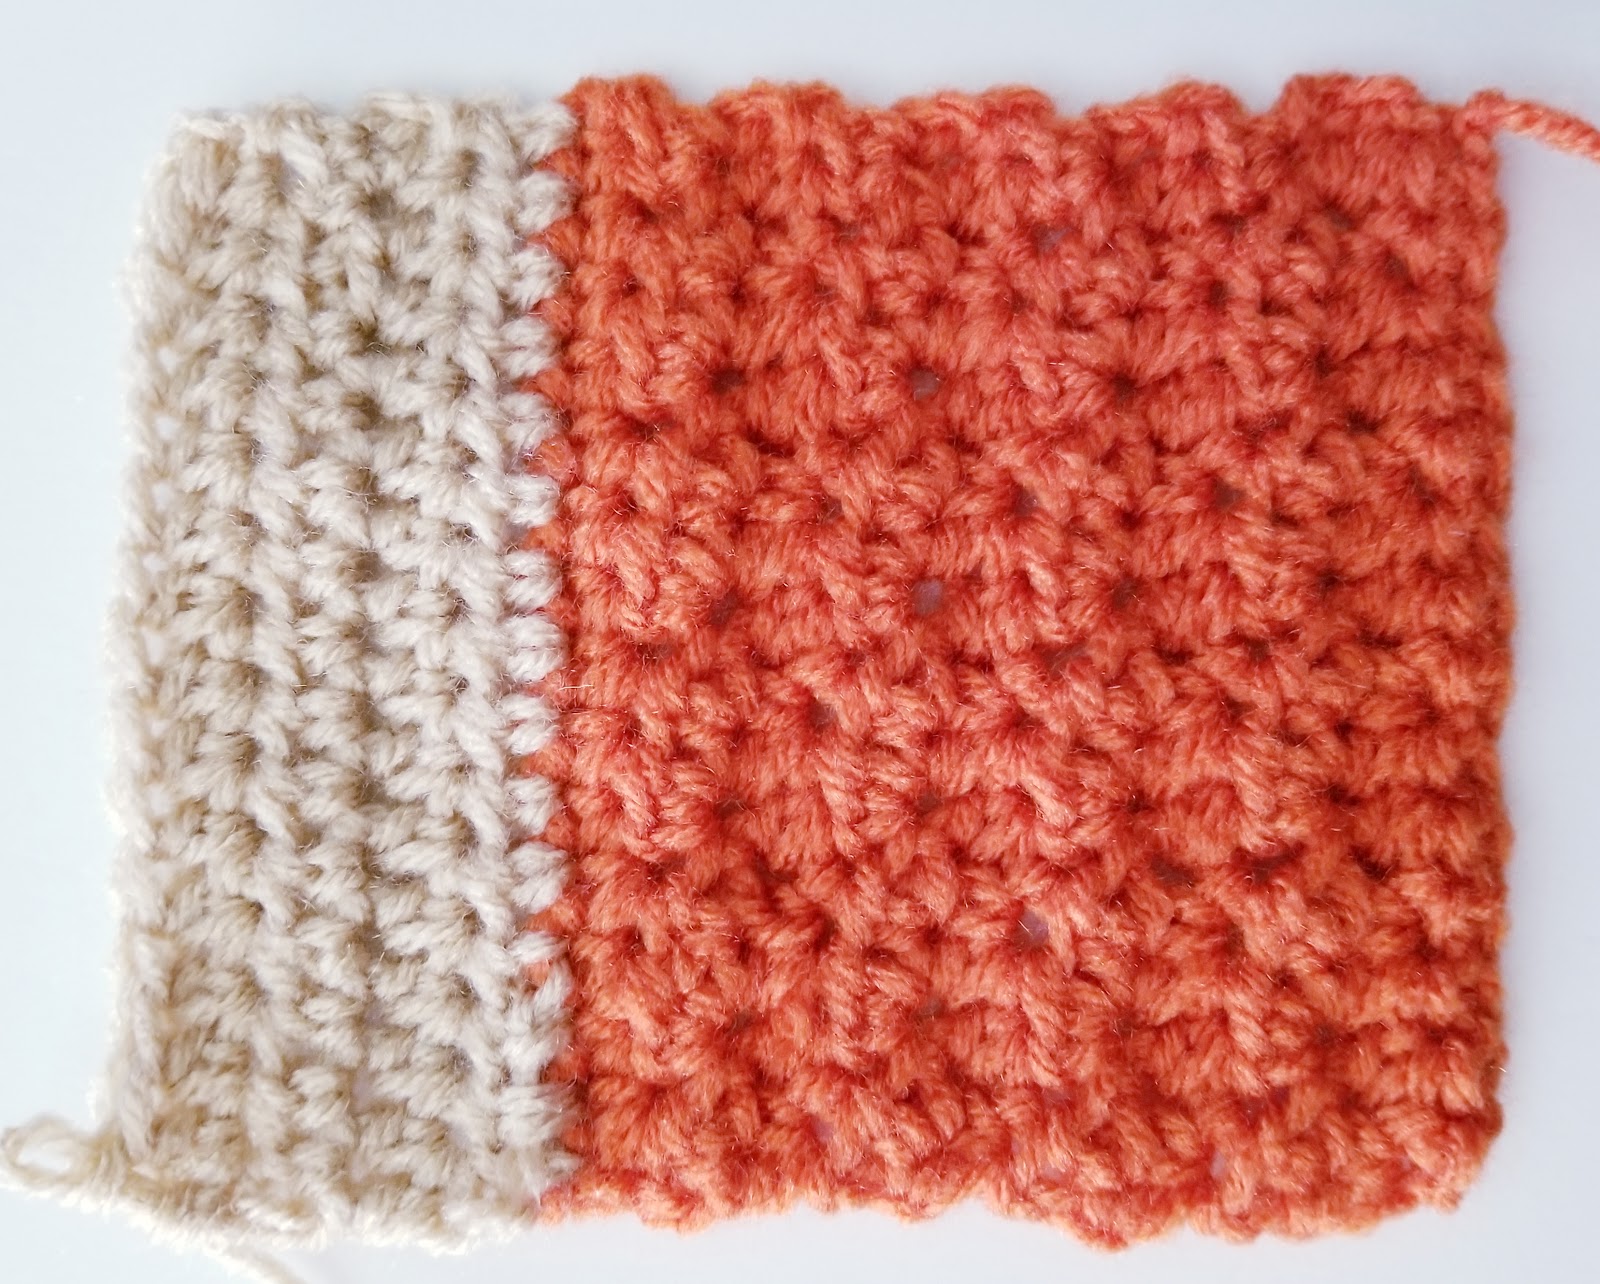
11. Change to off white yarn (Soft White). This section creates the first divider. Ch 2, turn, hdc in same st and in each st to end of row.
12-14. Ch 2, turn, hdc in same st and in each st to end of row.
15. Change to brighter orange yarn (Pumpkin). Ch 2, turn, hdc in same st and in each st to end of row.
16. Ch 2, turn, hdc in same st and in each st to end of row.
17. Ch 2, turn, hdc in same st, *tr in space between next two posts (see graphic below), hdc in next st*, repeat to end of row.


18-20. Ch 2, turn, hdc in same st and in each st to end of row.
21. Ch 2, turn, hdc in same st, *tr in space between next two posts, hdc in next st*, repeat to end of row.
22-23. Ch 2, turn, hdc in same st and in each st to end of row.
Pumpkin section complete.
24. Change to off white yarn (Soft White). Ch 2, turn, hdc in same st and in each st to end of row.

25-27. Ch 2, turn, hdc in same st and in each st to end of row.
28. Change to dark red yarn (Burgundy). Ch 2, turn, hdc in same st, *sc in next st, hdc in next st*, repeat to end of row.
29-37. Ch 2, turn, hdc in same st, *sc in next st, hdc in next st*, repeat to end of row.
Apple section complete.
38. Change to off white yarn (Soft White). Ch 2, turn, hdc in same st and in each st to end of row.
39-41. Ch 2, turn, hdc in same st and in each st to end of row.
42. Change to burnt orange yarn (Carrot). Ch 1, turn, sc in same st and in each st to end of row.
43-50. Ch 2, turn, hdc in same st, sk 1, (sc, hdc) in next st, *hdc in next st, sk 1, (sc, hdc) in next st*, repeat to end of row.
51. Ch 1, turn, sc in each st to end of row.
Pumpkin section complete.
Repeat rows 11 – 41.
Please note: the second bright orange pumpkin starts on the opposite side of the cowl than the first one. The texture will be slightly different.
Do not finish off the yarn.
Assembly
Fold piece right sides together, matching up the short ends. Ch 1 turn. Working through both layers, sl st in each st to end of row.
Turn cowl piece right side out.
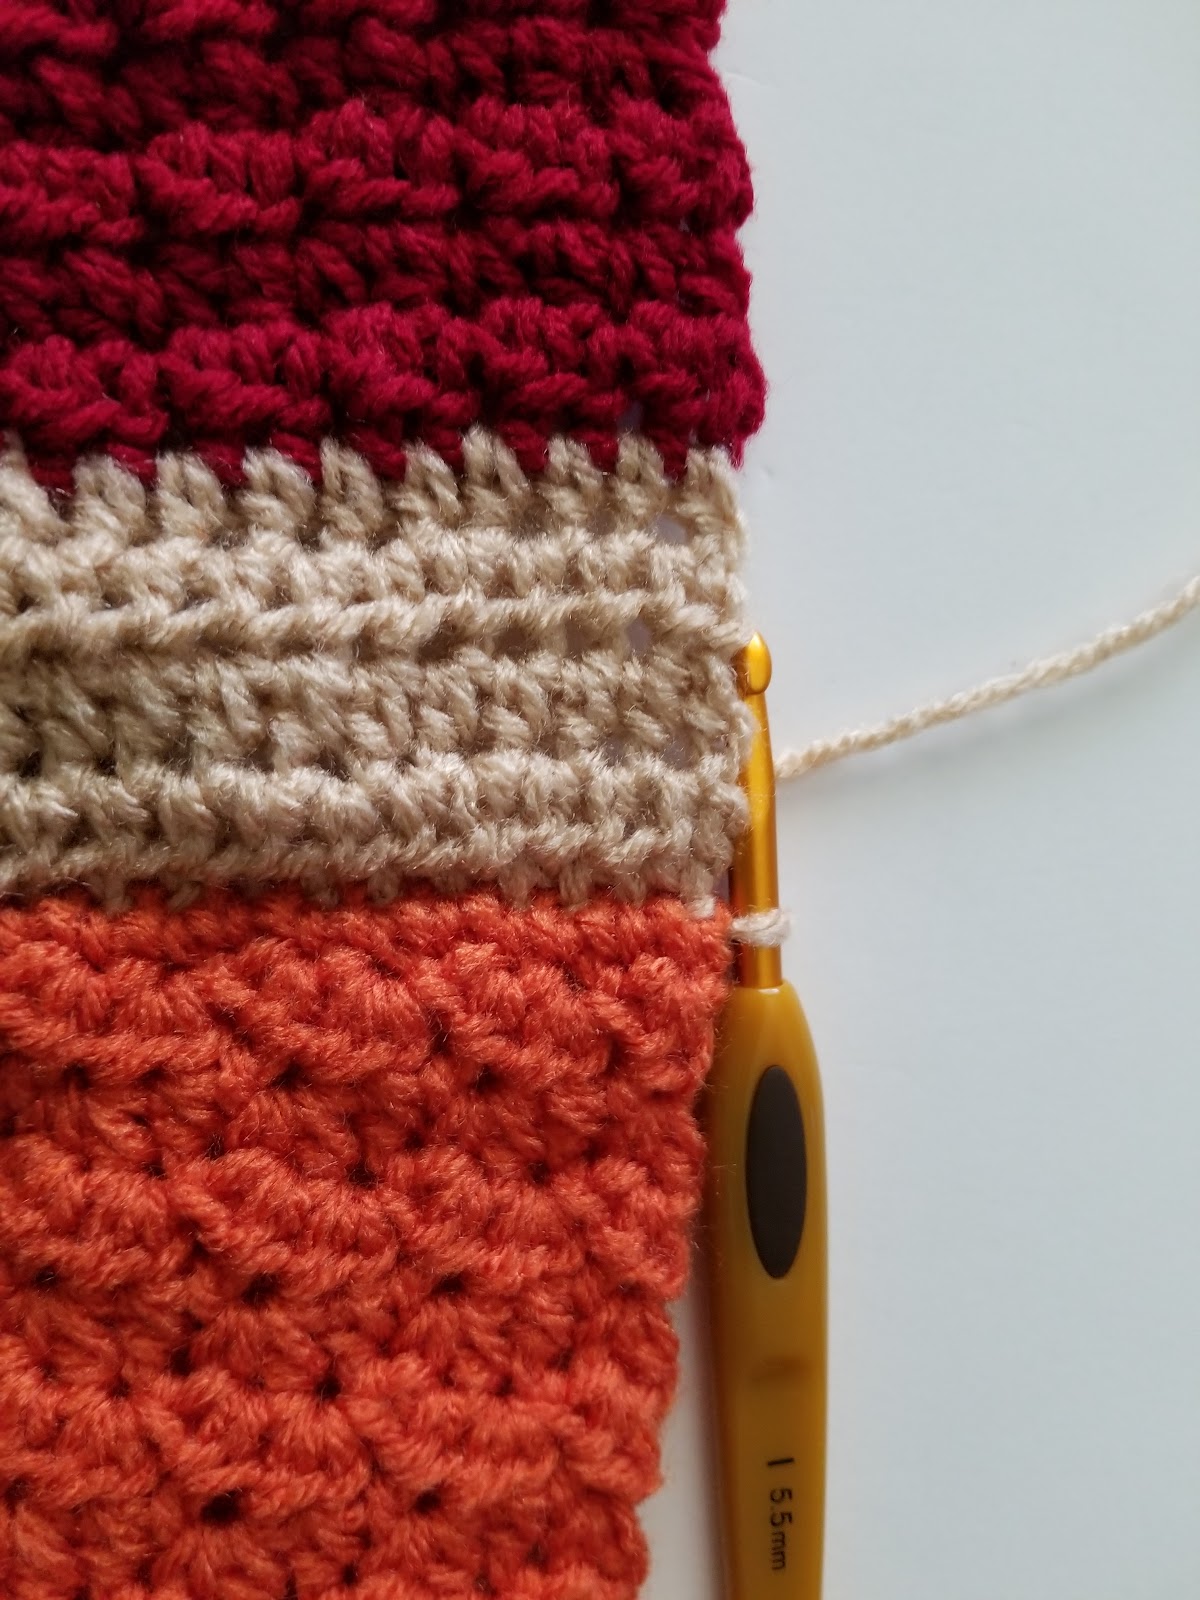
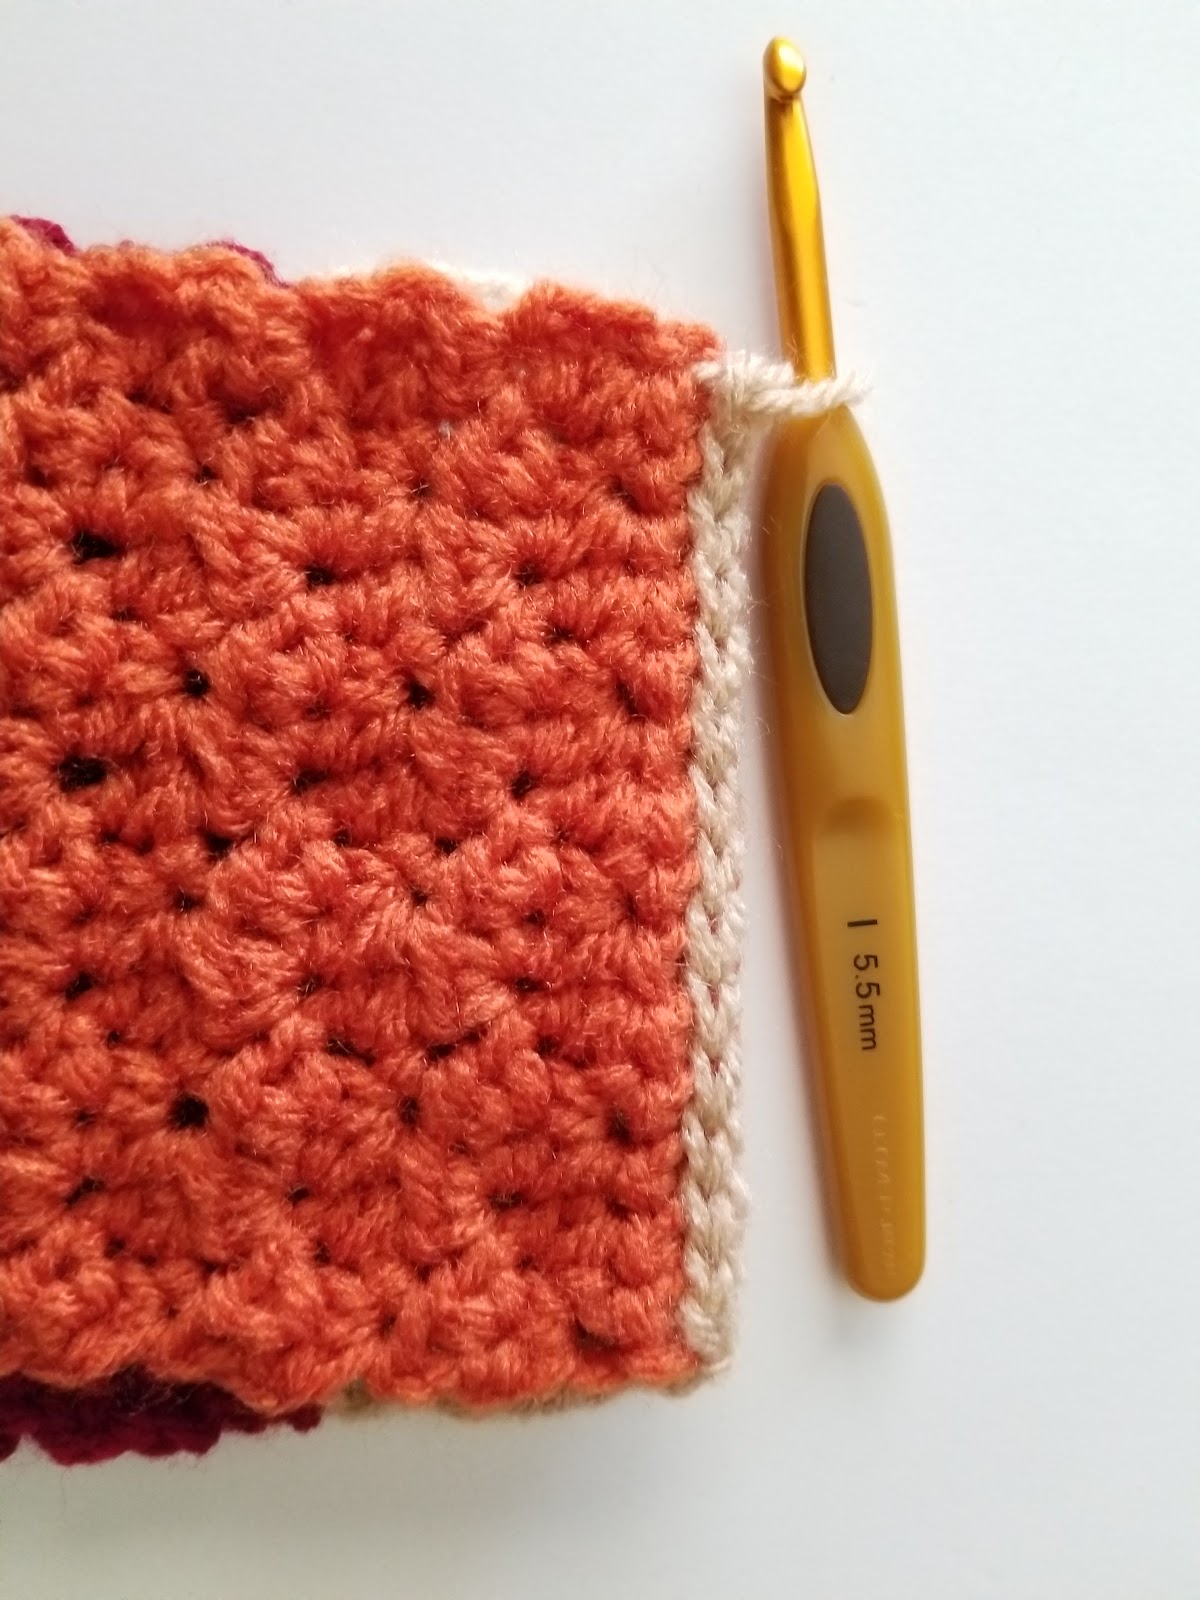
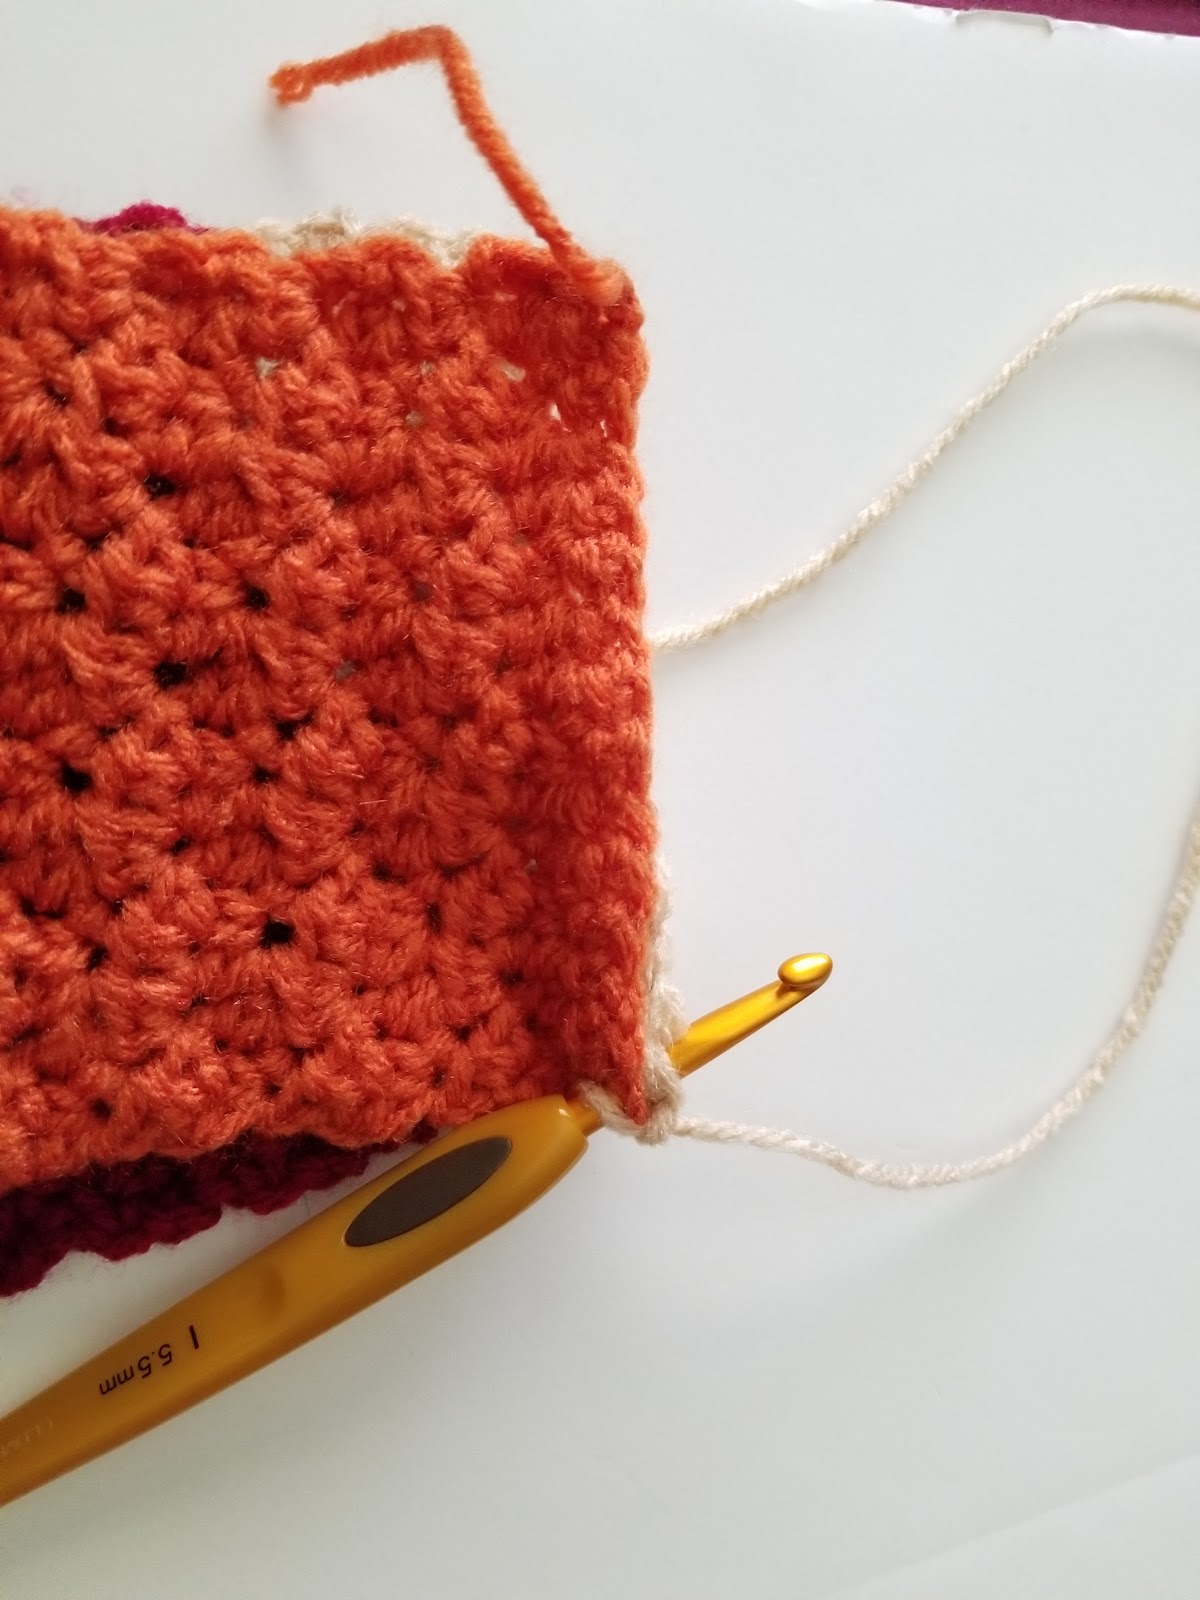
1. Ch 1. This step is worked around one long edge of the cowl.
Sc evenly to end of round, changing yarn to match each section, sl st in first st at end of round to join. (stitch count will vary).
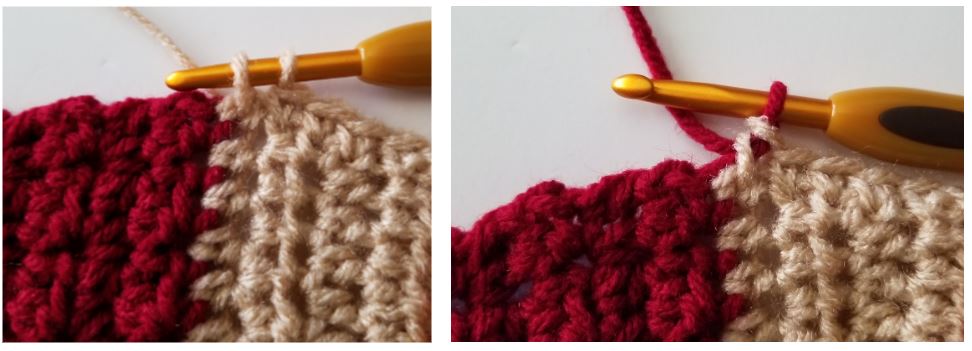
Tip for color changes:
At the end of current color section, finish the last st with the new color. See photos below.
2. The following rounds are worked with Soft White (same color as divider sections). Ch 2, hdc in same st and in each st to end of round, sl st to join.
3. Work this step in BLO. Ch 2, hdc in BLO of each st to end of round, sl st to join.
4. For this round, the sts will be worked between the posts of the previous round. Reverse sc between each post to end of round. Finish off and weave in ends.
Note: See last page of pattern for help with this st if needed.
5. Attach Soft White yarn to a divider section on opposite edge of cowl. Ch 1, sc evenly to end of round, changing yarn to match each section, sl st in first st at end of round to join. (stitch count will vary)
6. The following rounds are worked with Soft White (same color as divider sections). Ch 2, hdc in same st and in each st to end of round, sl st to join.
7-8. Work this step in BLO. Ch 2, hdc in BLO of each st to end of round, sl st to join.
Note: step #8 can be omitted if desired. This is an extra round that is not on the opposite edge of the cowl. It is designed this way so the bottom edges of the pumpkins and apples can easily be seen when cowl is worn.
9. For this round, the sts will be worked between the posts of the previous round. Reverse sc between each post to end of round. Finish off and weave in ends.
Stems & Leaves

Pumpkin Stems (make one per pumpkin)
1. With an H hook and variegated yarn (or color of choice), ch 4, sc in 2nd ch from hook, sc 2. (3sts)
2. Ch 1, turn, sc 3.
3. Ch 2, turn, 2hdc in same st, sc 2. Finish off, leaving a tail for sewing stem to cowl.
Apple Stems (make one per apple)
With an H hook and brown yarn (or color of choice), ch 5, sc in 2nd ch from hook, ch 2, sl st in same st, sl st in each st to end of row. Finish off, leaving a tail for sewing stem to cowl.
Leaves
There is a leaf by 4 of the pumpkins/apples. There are also 1-2 leaves randomly sewn near the base of some of the pumpkins/apples. The apple leaves are rounded on one edge and a point at the other (photo below, left). The “fall” leaves are rounded at one edge and have three points at the other (photo below, right).
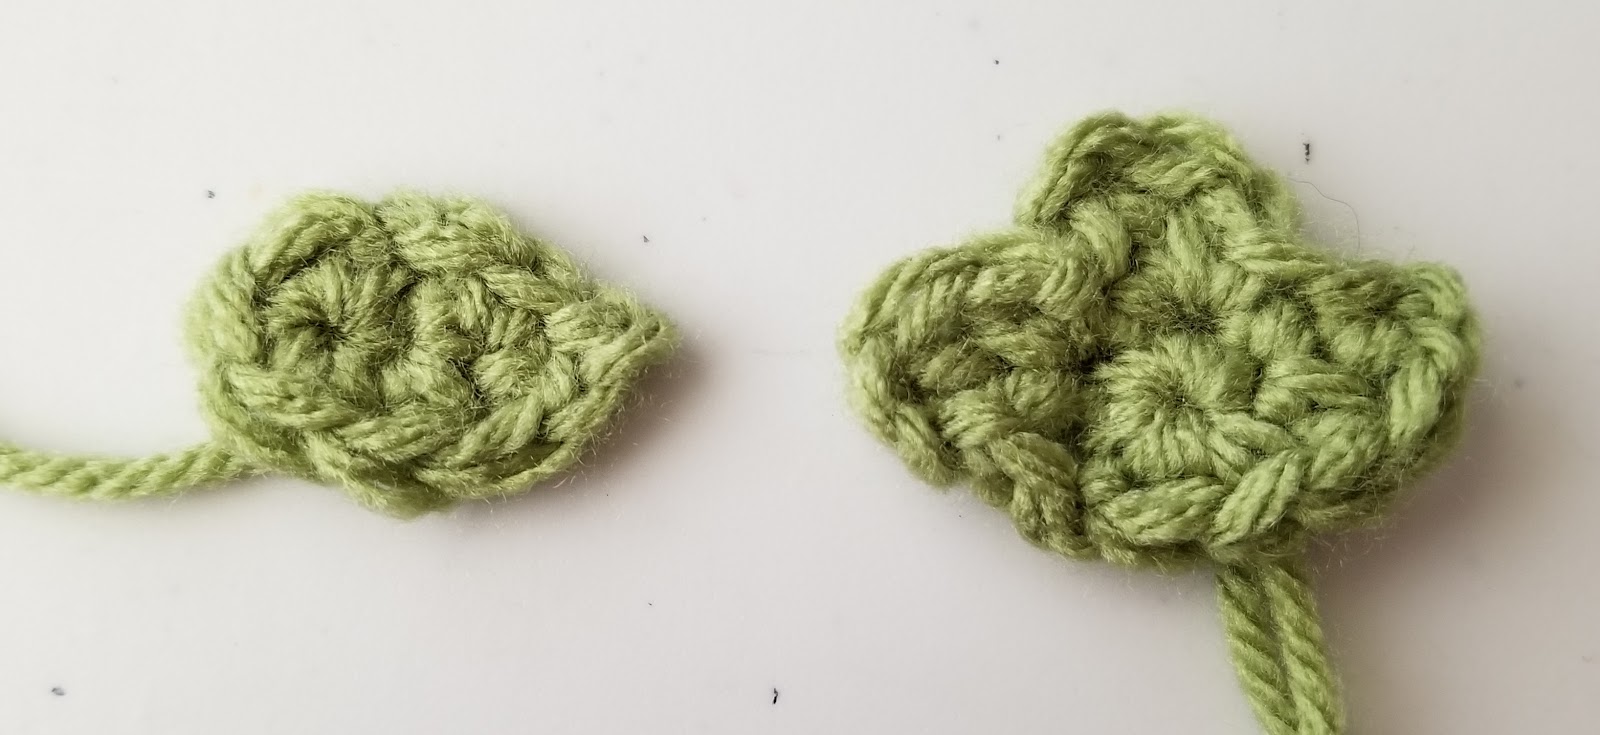
Apple Leaf
1. With an H hook and yarn color of choice, create a magic circle of 5 sts (or preferred method for starting a circle of 5 sc sts), pull closed and place a marker for working in the round. Do not join. (5sts)
2. (hdc, dc) in next st, ch 2, sl st in 2nd ch from hook, sc in side of previous dc, sl st in next st on leaf. Finish off, leaving a tail for sewing leaf to cowl.
Fall Leaf
1. With an H hook and yarn color of choice, create a magic circle of 6 sts (or preferred method for starting a circle of 6 sc sts), pull closed and place a marker for working in the round. Do not join. (6sts)
2. (hdc, dc) in next st, ch 2, sl st in side of previous dc, sl st in next st, *(hdc, dc) in same st, ch 2, sl st in side of previous dc, sl st in next st*, repeat once. Finish off, leaving a tail for sewing leaf to cowl.
Assembly
With a yarn needle, use each yarn tail to sew the leaves and stems in place.
Directions – Runner

Follow directions for cowl, #1-51. Repeat rows 22-37, ending after the second apple (or sixth color section).
Finish off and weave in ends.
1. For tips on changing colors to match the sections, see the bottom of page 4. Ch 1, pivot to work across the long edge. Sc evenly to end of the long side, changing yarn to match each section. (sc, ch 1, sc) in the corner, sc in each st across short end, (sc, ch 1, sc) in the corner. Sc evenly to end of the second long side, changing yarn to match each section, (sc, ch 1, sc) in the corner, sc in each st across short end, sl st in first st to join. Finish off and weave in ends.
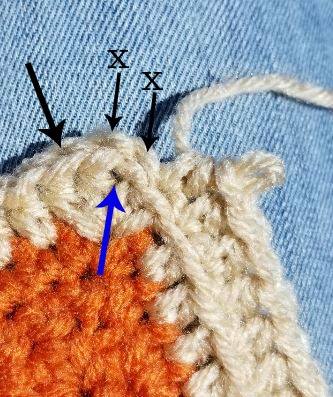
2. With an I hook and Buff yarn (color to match divider sections), attach to a stitch on the side of a divider section. Ch 2, hdc in same st, hdc in each st around outer edge, working (2hdc, ch 1, 2hdc) in each corner, Sl st in first st of round to join.
Tip for each border round: The corner clusters are worked into the space designated by the blue arrow and worked around the two sts designated by the short arrows. The next st to work into is designated by the long arrow.
3-4. These rows are worked in the BLO. Ch 2, hdc in each st around outer edge, working (2hdc, ch 1, 2hdc) in each corner ch 1 space. Sl st in first st of round to join.
5. Change to variegated yarn. Ch 2, hdc in each st around outer edge, working (2hdc, ch 1, 2hdc) in each corner ch 1 space. Sl st in first st of round to join.
6. For this round, the sts will be worked between the posts of the previous round. Reverse sc between each post to end of round. Finish off and weave in ends.
Note: See last page of pattern for help with this st if needed.
Stems and Leaves: Follow instructions on pages 5-6 for the stems and leaves.
Since this is meant to be in the middle of the table, I alternated the tops/stems on each section. See main photo.
Pin To Save For Later