
Free Pattern: Frosty Wraps
Snowman are one of my favorite things to collect. I always say I can’t make a real snowman so I collect them instead.
Every year I add a few snowmen to my crochet patterns. These “Frosty Wraps” are my latest design.
I designed this as a quick gift project. It is a great stashbuster and would be great for gifts and craft fairs.

Frosty Wraps Crochet Pattern
The pattern is available to follow along below for free.
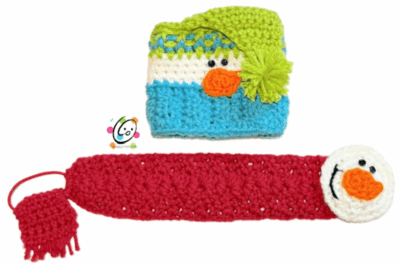
Frosty Wraps
Instructions included for a wrap-around cozy and slide on cozy.
Materials
- Yarn: less than 50 yards worsted weight yarn per band
- Crochet Hook: H (5mm)
- Supplies: Yarn needle for weaving in ends, scissors, tape measure, one or two tiny black buttons per cozy for eyes; child size hairbands (1 per band). Other size hairbands can be used. Just be aware of how much they stretch.
Measurements
- Finished Measurements: Wrap around: 12” long x 3.25” wide; Slide on: 4.5” long x 3” tall
- Gauge – check measurement along the way.
Tips – please take a second to read this section
- The first stitch of each row is worked into the same stitch as the turning chain unless noted.
- Numbers at the beginning of each line may refer to steps and not indicate number of rows.
- Stitch count remains the same unless noted at end of row/round.
- If you have any questions about this pattern please contact [email protected].
- Finger shape the pieces for a smooth edge (see tips on last page)
- Reminder: sc 3 = sc one st in each of the next 3 sts; 3sc in next st = work 3sc sts in the next (one) st
Wrap Around Version
1. With an H hook and worsted weight yarn (Sample: Red), ch 8, sc in the 2nd ch from hook and in each ch across. (7sts)
2. Ch 1, turn, hdc2tog, hdc, 4 dc in the next st, hdc, hdc2tog. (8sts)
3. Ch 1, turn, hdc2tog, hdc, 4 dc in the space between the 2nd and 3rd dc posts of the previous row, hdc, hdc2tog.
4. Repeat the previous row for an additional 19 rows. It should measure approximately 10” after the last row. This will wrap around mugs with a 9-10.5” circumference.
For really wide mugs (up to 12”) I suggest adding 3 more rows. This will measure 11.5” after the last row.
Finish off, leaving a long tail.
Wrap the narrow end of the crochet piece around the hair band. With a yarn needle, use the yarn tail to sew the layers together.
Scarf End
1. With an H hook and worsted weight yarn (Sample: Red), ch 8, sc in the 2nd ch from hook and in each ch across. (7sts)
2. Ch 1, turn, sc in the same st and in each st to end of row.
3. Repeat the previous row for an additional 4 rows. Finish off, leaving a long tail.
Wrap the end of the crochet piece around the hair band (see photo above). With a yarn needle, use the yarn tail to sew the layers together.
Fringe: Cut 8 pieces of matching yarn 5” long. With a crochet hook, pull the middle of one strand through a st at the end of the scarf. Pull the ends through the loop until snug against the scarf. Repeat for each piece.
Snowman Head
1. With an H hook and worsted weight yarn (Sampled: White), start with a magic circle of 8 sts (or preferred method for starting a circle of 8 sc sts), pull closed and place marker for working in the round. (8sts)
2. 2sc in each st to end of round. (16sts)
3. *sc, 2sc in next st*, repeat to end of round. (24sts)
4. *sc 3, 2sc in next st*, repeat to end of round. (30sts) Finish off, leaving a long tail.
Nose (make 2)
1. With an H hook and worsted weight yarn (Sample: Orange), start with a magic circle of 6sts (or preferred
method for starting a circle of 6 sc sts), sl st to join. (6sts)
2. Do not ch 1. (hdc, dc) in next st, ch 2, sl st in 2nd ch from hook, sc in post of previous dc, sl st in next st on
beginning circle. Finish off, leaving a tail for sewing in place.
With yarn needle and yarn tail, sew the nose in place.
Mouth and eyes: With yarn needle and black yarn or black embroidery floss, stitch mouth in place. With a sewing needle and black thread, sew buttons above nose.
Fold the wrap to check placement of the head. It needs to be on the opposite end of the scarf/elastic. At least of the head should overlap the end of the wrap.
Use a yarn needle and the yarn tail from the head to sew the head overlapping the end of the wrap.
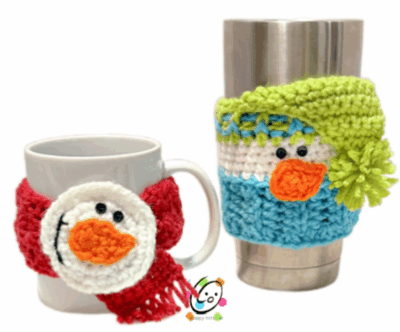
Wrap the band around a cup and slip the head through the elastic.
Slide On Version
- This is designed to fit around an 8.75” – 10” container. Add or subtract rows if desired.
1. With an H hook and worsted weight yarn (Sample: Blue), ch 5, hdc in the 2nd chain from hook and across. (4sts)
2-20. Working in BLO, ch 1, turn, hdc in each st to end of row.
21. This step is worked across the long edge of the piece, at the edges of the rows. Work the following, evenly spaced. Ch 1, *hd2sc in next, hdc in next*, repeat to end of edge. (30sts) See help photos. This is the bottom edge of the piece.
22. Ch 1. Fold right sides together. Working through both layers/ends of the rectangle, loosely sl st evenly across short ends to join. Finish off and weave in ends.
23. Turn piece right side out. This step is done the same as step #21, but on the opposite opening. This step is worked across the long edge of the piece, at the edges of the rows.
Work the following, evenly spaced. Ch 1, *hd2sc in next, hdc in next*, repeat to end of edge. (30sts)
24. Finish off the current yarn and change to worsted weight yarn (Sample: White). Ch 1, sc in BLO of each st to end of round, sl st to join.
25. Ch 1, sc in the same st and in each st to end of round, sl st to join.
26. Repeat the previous round 2 more times.
27. Finish off the current yarn and change to worsted weight yarn (Sample: Lime Green). Ch 1, hdc in the same st and in each st to end of round, sl st to join.
28. Do not finish off the yarn. Change to contrasting yarn (Sample: Blue). Ch 1, *FPHDC around the next post, BPHDC around the next post*, repeat to end of round, sl st to join. Finish off the blue yarn.
29. Change back to the first yarn (Green). Ch 1, *FPHDC around the next post, BPHDC around the next post*, repeat to end of round, sl st to join.
30. Ch 1, sc in BLO of each st to end of round, sl st to join.
31. This step starts the hat tail. Ch 1, sc in the same st, sc 11. (12sts) Leave the remaining sts unworked.
32. Ch 1, turn, sc2tog, sc to end of row. (11sts)
33. Ch 1, turn, sc in the same st and in each st until 2 sts remain, sc2tog. (10sts)
34. Ch 1, turn, sc2tog, sc to end of row. (9sts)
35. Ch 1, turn, sc in the same st and in each st until 2 sts remain, sc2tog. (8sts)
36. Ch 1, turn, sc2tog, sc to end of row. (7sts)
37. Ch 1, turn, sc in the same st and in each st until 2 sts remain, sc2tog. (6sts)
38. Ch 1, turn, sc2tog, sc to end of row. (5sts)
39. Ch 1, turn, sc in the same st and in each st until 2 sts remain, sc2tog. (4sts)
40. Ch 1, turn, sc2tog, sc 2. (3sts)
41. Ch 1, turn, sc, sc2tog. (2sts)
42. Ch 1, turn, sc2tog. Finish off, leaving a long tail.
Fold the tip down as shown in the photo. Use a yarn needle and the yarn tail to sew the hat tip in place.
Pompom: Cut a piece of yarn 8” long. This will be used to tie around the middle of the pompom. Set aside.
- Wrap a strand of matching yarn (or choice of colors) around 3 fingers of your hand 4 times.
- Carefully slide the loops off your hand.
- Use the 8” piece to wrap around the middle of the yarn loops and snugly tie a knot.
- Hold onto the ends of this piece of yarn.
- Trim the loops and pom as desired.
- Use the yarn tails to tie the pompom to the tip of the hat.
Face: Follow instructions from page 3 for the nose and eyes.

Please visit Snappy Tots online for giveaways, new release announcements, events and fun.


These are so cute!! I want to make but you didn’t say if it was acrylic or cotton yarns nor brand like you normally do. Can you tell me please & thanks!