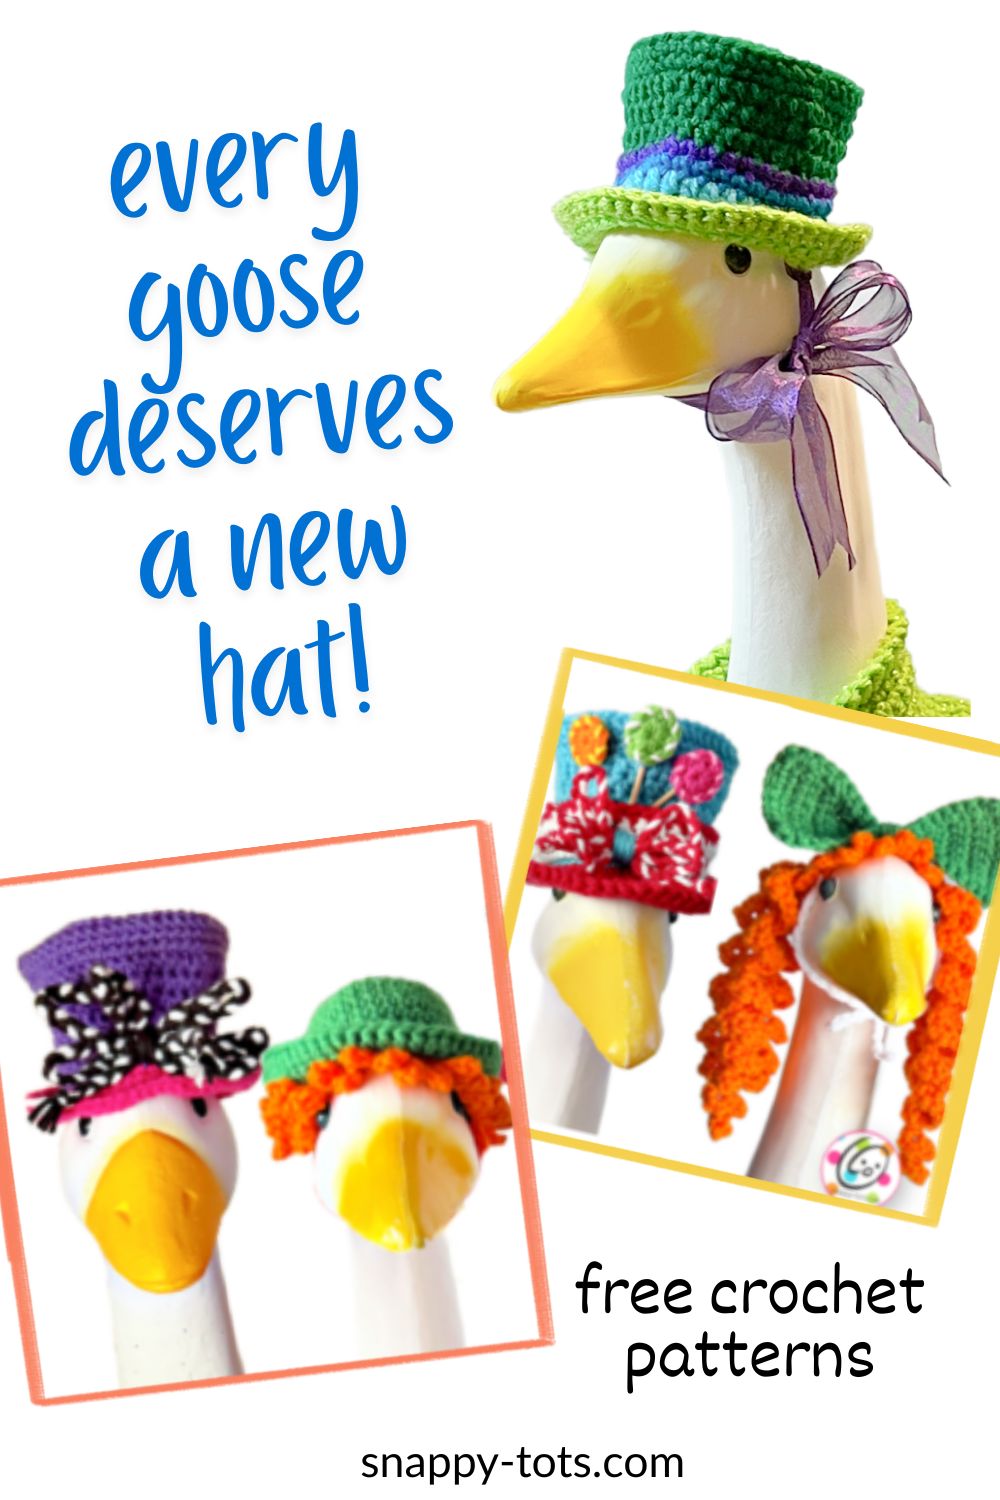
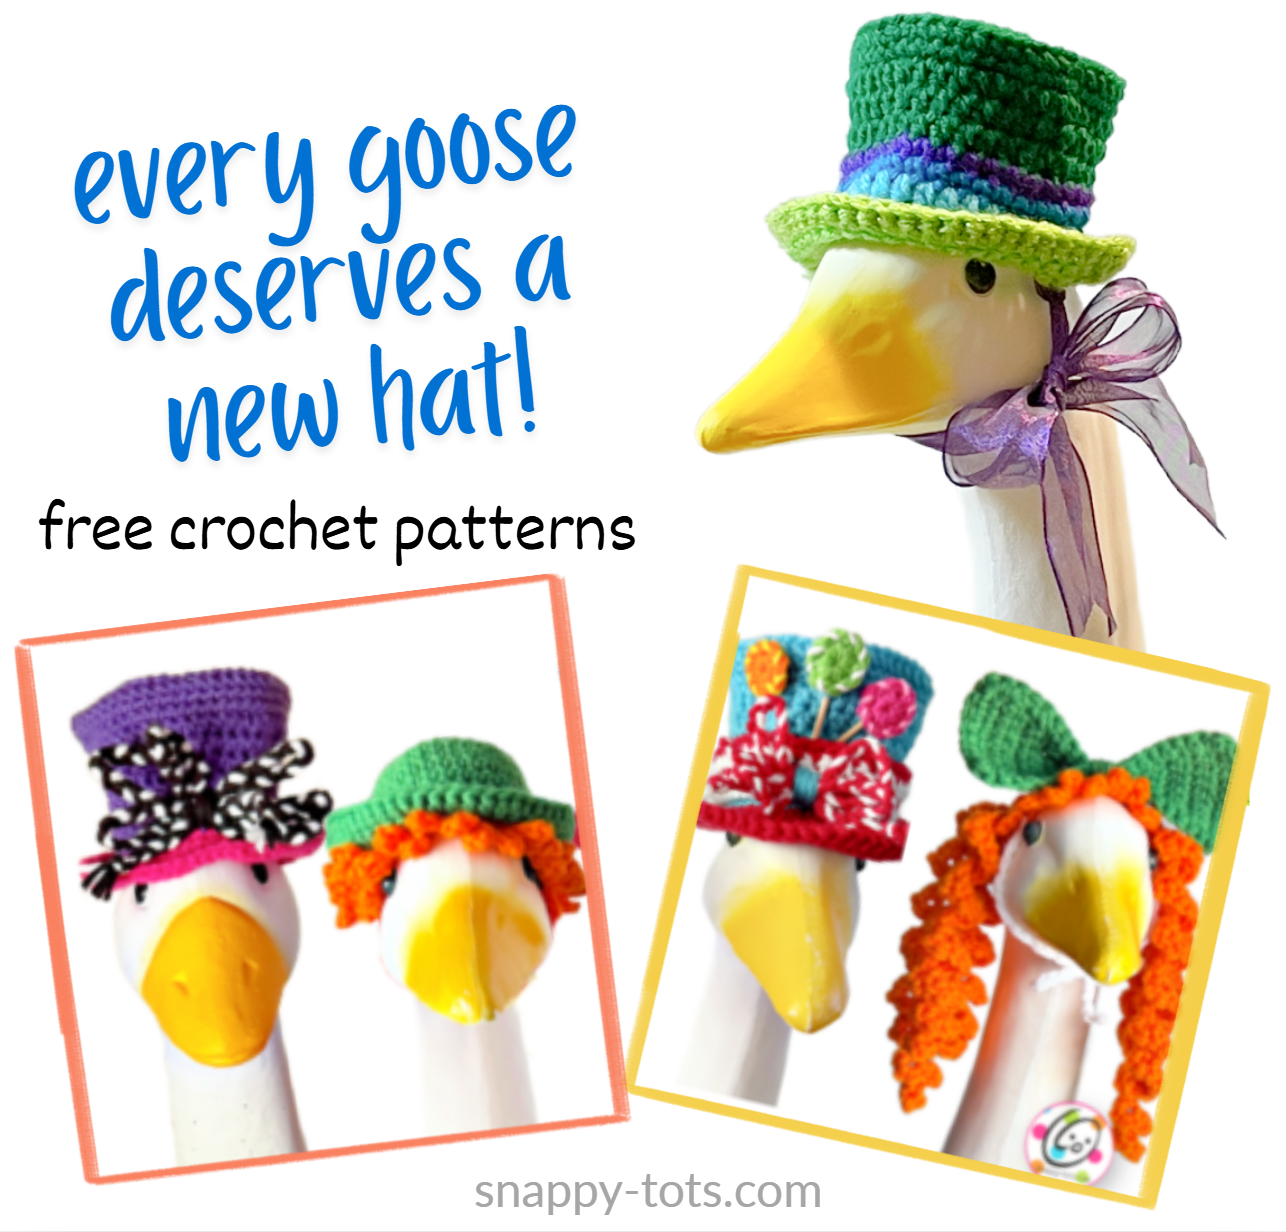
Free Pattern: Big Goose Hats and Hair
Because every goose deserves a fun new ‘do and hat!
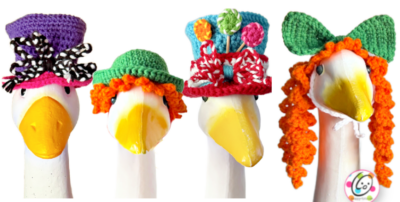
These hats and hair are designed for a 23″ and 28″ porch goose. You can buy a 23″ goose in my shops for a small fee: Etsy | Ravelry
Other sizes
Fun hats and hair are available for the small and desk sizes too: https://snappy-tots.com/stylish-hats-for-all-geese/
NEW! Goose News Each Monday
Big Goose Party Hats and Hair Patterns
The patterns for all styles shown are free below, to follow along here on my blog. A downloadable, ad-free pdf is also available to purchase for a small fee from my shops: Etsy | Ravelry
Materials
- Yarn: worsted weight; Sample yarns: Red Heart Super Saver Spring Green, Cherry, White, Turqua, Shocking Pink, Paddy Green, Pumpkin, Pretty N Pink; Bernat Value Light Damson (purple)
- Crochet Hooks: H (5mm), I (5.5mm)
- Supplies: Yarn needle for weaving in ends, skewers or small dowels (lollipops)
- Optional: Measuring tape, scissors, glue for attaching lollipops
Tips
- The first stitch of each row is worked into the same stitch as the turning chain unless noted.
- Numbers at the beginning of each line may refer to steps and not indicate number of rows.
- Stitch count remains the same unless noted at end of row/round.
- If you have any questions about this pattern please contact [email protected].
This is designed for a 23” goose statue like the one sold by Miles Kimball and a 28” cement goose.
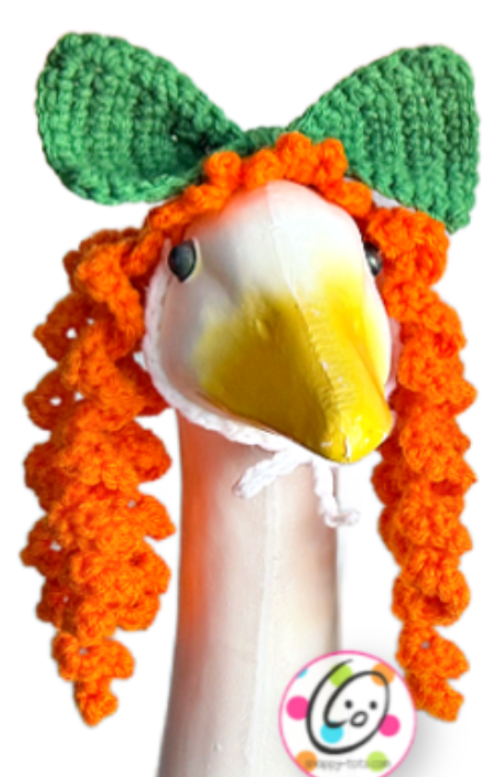
Long Ringlets Wig – 23” and 28” goose
23” use an H hook; 28” use an I hook
This starts with a small rectangle for the middle. There are three ringlets on each side.
1. With hook and worsted weight yarn (Sample: Pumpkin), ch 8, sc in the 2nd ch from hook, hdc 5, sc. (7sts)
2. Ch 1, turn, 2sc in the same st, hdc 5, 2sc. (9sts)
3. Ch 1, turn, 2sc in the same st, hdc 7, 2sc in the last st. (11sts)
4. Ch 1, turn, sc in the same st, hdc 9, sc.
5. Repeat the previous row 2 more times.
6. This step creates the loops. Ch 1, turn, sc2tog, ch 50, 2sc in the 2nd ch from hook, *sk 1, 3sc in the next ch*, repeat to end of chain, sl st in the same st on the main hair piece. First ringlet complete.
Sl st in the next st on the hairpiece. Ch 60, 2sc in the 2nd ch from hook, *sk 1, 3sc in the next ch*, repeat to end of chain, sl st in the same st on the main hair piece. Second ringlet complete.
Sl st in the next st on the hairpiece. Ch 50, 2sc in the 2nd ch from hook, *sk 1, 3sc in the next ch*, repeat to end of chain, sl st in the same st on the main hairpiece. Third loop complete.
Sc2tog. This step is worked across the edge of the hairpiece to create “bangs”. Ch 5, sl st in the corner of the piece, *ch 5, sl st in the next space*, repeat, evenly spacing the sl sts to create a total of 7 loops across this edge.
This step is worked across the beginning edge of the hairpiece. Ch 1, sc2tog, ch 50, 2sc in the 2nd ch from hook, *sk 1, 3sc in the next ch*, repeat to end of chain, sl st in the same st on the main hair piece. First ringlet on this side complete.
Sl st in the next st on the hairpiece. Ch 60, 2sc in the 2nd ch from hook, *sk 1, 3sc in the next ch*, repeat to end of chain, sl st in the same st on the main hair piece. Second ringlet on this side complete.
Sl st in th next st on the hairpiece. Ch 50, 2sc in the 2nd ch from hook, *sk 1, 3sc in the next ch*, repeat to end of chain, sl st in the same st on the main hair piece. Third ringlet on this side complete.
Sc2tog. Finish off and weave in ends.
For longer, less curly ringlets, hold on to each end of a ringlet and gently tug to stretch the sts just a bit.
Chin Ties: With the same size hook and worsted weight yarn to match the goose (Sample: White), sl st into a st on the inside of the flat middle piece, behind one ringlet. Ch 40 (ch 50 for 28” goose). Finish off and tie a knot in the end of the chain. Repeat for the opposite side.
Large Bow – 5-5.5” across
Make one. 23” use an H hook; 28” use an I hook
1. With hook and worsted weight yarn (Sample: Paddy Green), ch 9, sc in the 2nd ch from hook and in each ch across. (8sts)
2-3. Ch 1, turn, sc in the same st and in each st across.
4. Ch 1, turn, sc2tog, sc in each st across. (7sts)
5. Repeat previous step until 3 sts remain.
6. Ch 1, turn, sc in the same st, sc 2.
7. Ch 1, turn, 2sc in the same st, sc in each st across. (4sts)
8. Repeat previous step until 8 sts remain.
9. Ch 1, turn, sc in the same st and in each st across.
10. Repeat the previous row for an additional 2 rows.
11. This step is worked around the outer edge. Ch 1, turn, (hdc, sc) in the same st and in each st until 1 st remains, (sc, hdc, sc) in the last st, sc evenly down the side of the bow, (sc, hdc, sc) in the first st of the bottom edge, sc in each st until 1 st remains, (sc, hdc, sc) in the last st, sc evenly up the side of the piece, sl st to join. Finish off and weave in ends.
Middle: Cut a long piece of matching yarn. Secure one end behind the middle of the bow. Fold the bow in half (long edge to long edge) with right sides together. This will help the bow stand up when complete. Wrap the yarn around the piece several times, cinching in the middle. Use the remaining yarn to sew the bottom edge of the middle section to the hair piece.
Note: For the sample, I wanted the bow to stand up so I attached the bottom edge of the middle and about 1” on each side of the middle to the hair. If you sew the back of the middle of the bow to the hair the bow will lay flat on the hair.
Bowler/Derby Hat – 23” and 28” goose
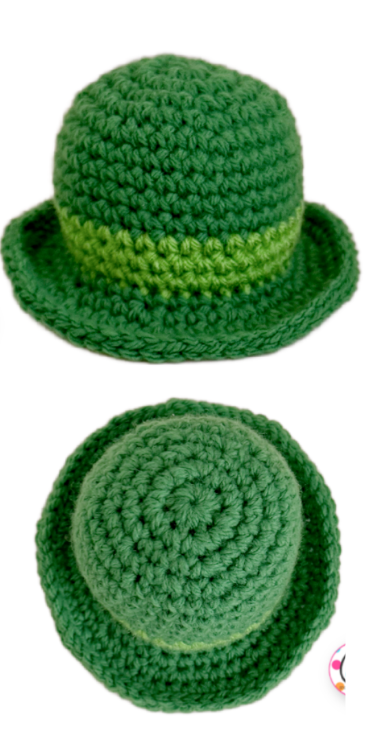
23” use an H hook, 28” use an I hook
1. With hook and worsted weight yarn (Sample: Paddy Green), start with a magic circle of 8 sc sts (or preferred method for creating a circle of 8 sc sts), pull closed and sl st to join. (8sts)
2. Ch 1, 2sc in each st to end of round, sl st to join. (16sts)
3. Ch 1, *sc 3, 2sc in the next st*, repeat to end of round, sl st to join. (20sts)
4. Ch 1, *sc, 2sc in the next st*, repeat to end of round, sl st to join. (30sts)
5. Ch 1, *sc 4, 2sc in the next st*, repeat to end of round, sl st to join. (36sts)
6. Ch 1, sc in each st to end of round, sl st to join.
7. Repeat the previous round for an additional 3 rounds.
8. Change to a different color for the hat band (Sample: Spring Green). No need to cut the main yarn. Ch 1, sc in each st to end of round, sl st to join.
9. Ch 1, sc in each st to end of round, sl st to join.
10. Repeat the previous round.
11. Finish off the current yarn and change back to the main yarn. Work this round in FLO. Ch 1, sc in the front loops of each st to end of round, sl st to join.
12. Ch 1, *sc 3, 2sc in the next st*, repeat to end of round, sl st to join. (45sts)
13. Ch 1, *2sc in the next st, sc 4*, repeat to end of round, sl st to join. (54sts)
14. Ch 1, *sc 5, 2sc in the next st*, repeat to end of round, sl st to join. (63sts)
15. Loosely sl st in each st to end of round. Finish off and weave in ends. Use your fingers to lightly tug the edges of the brim to create a smooth, rounded edge.
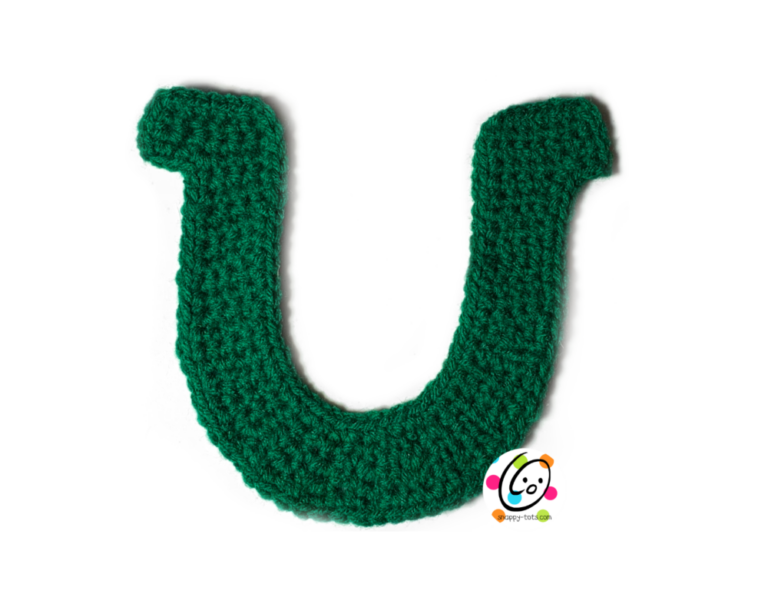
Short Hair (optional): This is worked into the remaining loops from step 11 on the inside of the hat. With the same hook and yarn for the hair (Sample: Pumpkin) *ch 7, sl st in the same st and next*, repeat to end of round. Finish off and weave in ends.
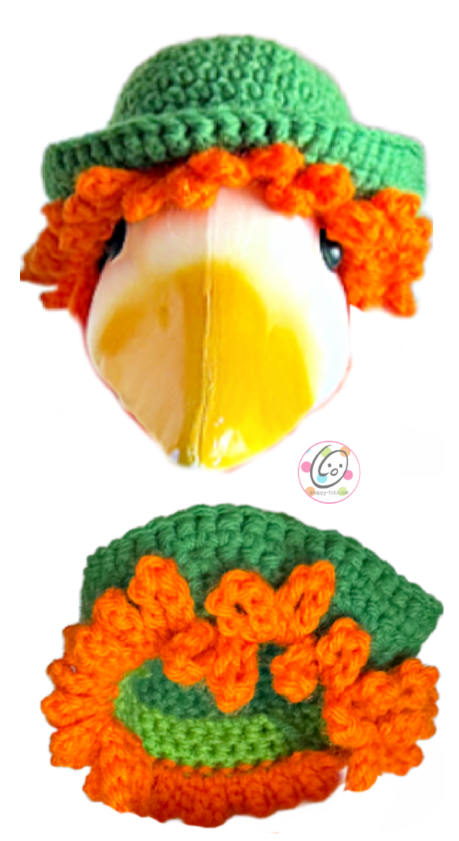
Chin Ties: With the same size hook and worsted weight yarn to match the goose (Sample: White), sl st into a st on the inside of the flat middle piece, behind one ringlet. Ch 40 (ch 50 for 28” goose). Finish off and tie a knot in the end of the chain. Repeat for the opposite side.
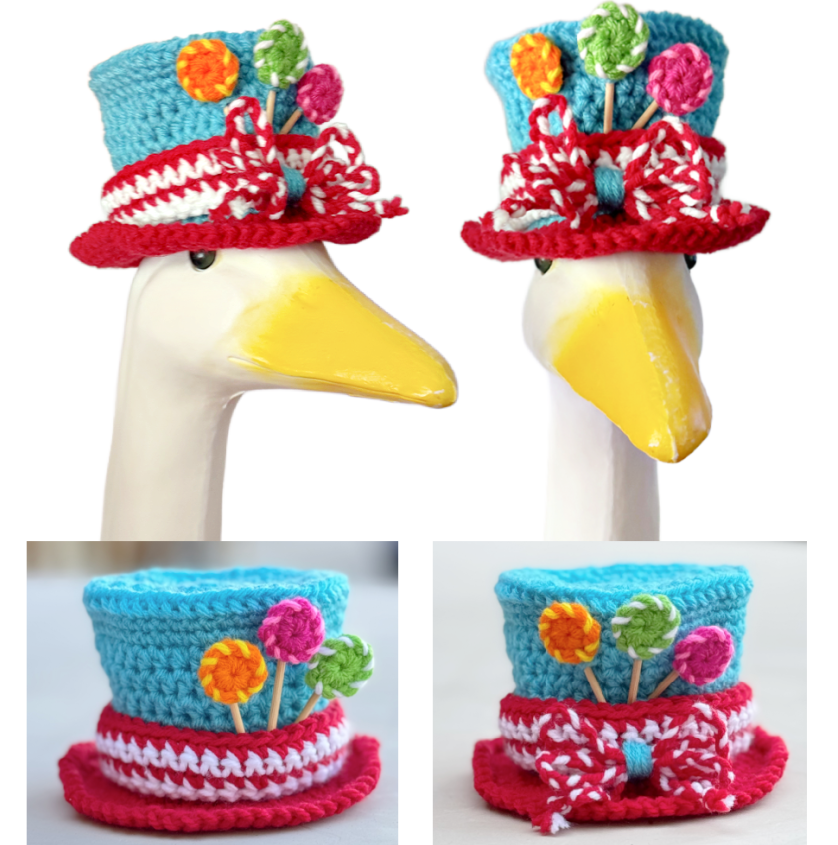
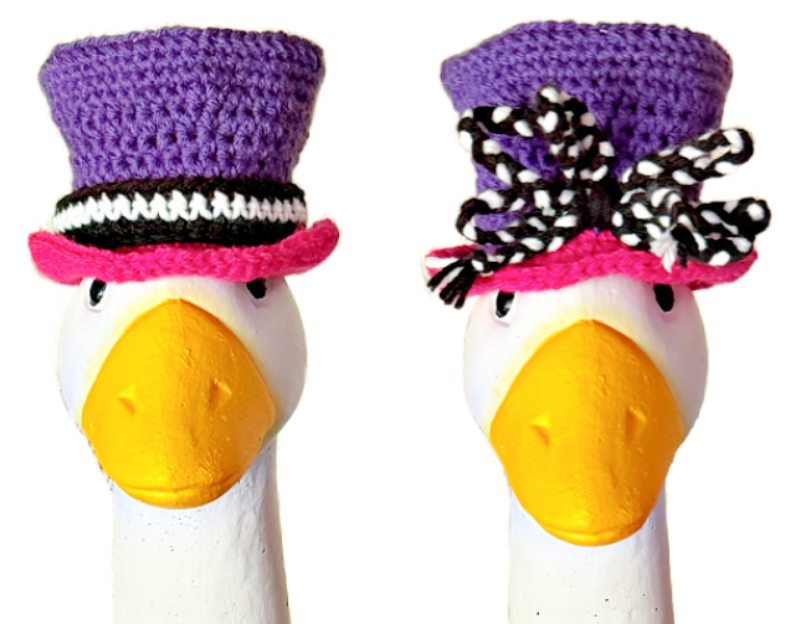
The Top Hats
The purple one is the sample for the 28” goose and the turquoise one is for the 23” goose. HOWEVER, either style/color combo could be made for either goose. Plus, I designed these so you could add or leave off whatever you would like to make them your own.
Top Hat – 23” goose
Short hair can be attached to this hat following the instructions from the Bowler/Derby hat.
1. With an I hook and worsted weight yarn (Sample: Turqua), start with a magic circle of 8 sc sts (or preferred method for creating a circle of 8 sc sts), pull closed and sl st to join. (8sts)
2. Ch 1, 2sc in each st to end of round, sl st to join. (16sts)
3. Ch 1, *sc, 2sc in the next st*, repeat to end of round, sl st to join. (24sts)
—— watch closely—— #3 and #4 are the same, but end with different stitch counts. It is easy to miss working the 2nd round.
4. Ch 1, *sc, 2sc in the next st*, repeat to end of round, sl st to join. (36sts)
5. Ch 1, *sc 5, 2sc in the next st*, repeat to end of round, sl st to join. (42sts)
6. Ch 1, *sc 6, 2sc in the next st*, repeat to end of round, sl st to join. (48sts) 3.5” across
7. Work this round in BLO and a little more snug than the previous rounds. Ch 1, sc in each st to end of round, sl st to join.
8-9. Ch 1, sc in the same st and in each st to end of round, sl st to join.
10. Ch 1, *hdc 4, hdc2tog*, repeat to end of round, sl st to join. (40sts)
11. Ch 1, sc in the same st and in each st to end of round, sl st to join.
12. Ch 1, *hdc 6, hdc2tog*, repeat to end of round, sl st to join. (35sts)
13-15. Ch 1, hdc in the same st and in each st to end of round, sl st to join.
16. Ch 1, FPSC around each post from the previous round, sl st to join.
17. Finish off the current yarn and change colors for a different brim if desired (Sample: Red). Ch 1, *sc 4, 2sc in the next st*, repeat to end of round, sl st to join. (42sts)
18. Ch 1, *sc 5, 2sc in the next st*, repeat to end of round, sl st to join. (49sts)
19. Ch 1, *sc 6, 2sc in the next st*, repeat to end of round, sl st to join. (56sts)
20. Ch 1, sc in the same st, sc 2, *2sc in the next st, sc 7*, repeat until 5 sts remain 2sc in the next st, sc 4, sl st to join. (63sts)
21. *ch 1, sl st in the next st*, repeat to end of round. Finish off and weave in ends.
Note: This creates a bumpy edge on the brim. For a smoother edge sl st in each st to end of round (without the ch 1 between each st).
Ties: Fold the hat in half to find the placement for the ties. With an H hook and worsted weight yarn to match the goose, attach the yarn to an inside loop (so it doesn’t show on the outside of the hat). Ch 30. Finish off and tie a knot in the end of the chain. Repeat for the opposite side.
Hatband (optional)
1. With an I hook and worsted weight yarn (Sample: White), ch 41, sc in the 2nd ch from hook and in each ch to end of row. (40sts)
2. Finish off the current yarn and change for the next stripe (Sample: Red). Ch 1, turn, sc in the same st and in each st to end of row.
3. Finish off the current yarn and change for the next stripe (Sample: White). Ch 1, turn, sc in the same st and in each st to end of row.
4. Finish off the current yarn and change for the next stripe (Sample: Red). Ch 1, turn, sc in the same st and in each st to end of row. Finish off, leaving a long tail for sewing the short ends together.
Wrap the band around the bottom of the hat, next to the brim. Line up the stripes. Use a yarn needle and yarn tail to sew the ends together.
Skip to “Embellishments” for additional items.
Top Hat – 28” goose
Short hair can be attached to this hat following the instructions from the Bowler/Derby hat.
1. With an I hook and worsted weight yarn (Sample: Purple), start with a magic circle of 8 sc sts (or preferred method for creating a circle of 8 sc sts), pull closed and sl st to join. (8sts)
2. Ch 1, 2sc in each st to end of round, sl st to join. (16sts)
3. Ch 1, *sc, 2sc in the next st*, repeat to end of round, sl st to join. (24sts)
—— watch closely—— #3 and #4 are the same, but end with different stitch counts. It is easy to miss working the 2nd round.
4. Ch 1, *sc, 2sc in the next st*, repeat to end of round, sl st to join. (36sts)
5. Ch 1, *sc 5, 2sc in the next st*, repeat to end of round, sl st to join. (42sts)
6. Ch 1, *sc 6, 2sc in the next st*, repeat to end of round, sl st to join. (48sts)
7. Ch 1, *sc 6, 2sc in the next st*, repeat to end of round, sl st to join. (54sts) 4.25” across
8. Work this round in BLO and a little more snug than the previous rounds. Ch 1, sc in each st to end of round, sl st to join.
9-10. Ch 1, sc in the same st and in each st to end of round, sl st to join.
11. Ch 1, *hdc 7, hdc2tog*, repeat to end of round, sl st to join. (48sts)
12. Ch 1, *hdc 4, hdc2tog*, repeat to end of round, sl st to join. (40sts)
13. Ch 1, sc in the same st and in each st to end of round, sl st to join.
14-16. Ch 1, hdc in the same st and in each st to end of round, sl st to join.
17. Ch 1, FPSC around each post from the previous round, sl st to join.
18. Finish off the current yarn and change colors for a different brim if desired (Sample: Red). Ch 1, *sc 4, 2sc in the next st*, repeat to end of round, sl st to join. (48sts)
19. Ch 1, *sc 5, 2sc in the next st*, repeat to end of round, sl st to join. (56sts)
20. Ch 1, sc in the same st, sc 2, *2sc in the next st, sc 7*, repeat until 5 sts remain 2sc in the next st, sc 4, sl st to join. (63sts)
21. Ch 1, *sc 8, 2sc in the next st*, repeat to end of round, sl st to join. (70sts)
22. *ch 1, sl st in the next st*, repeat to end of round. Finish off and weave in ends.
Note: This creates a bumpy edge on the brim. For a smoother edge sl st in each st to end of round (without the ch 1 between each st).
Ties: Fold the hat in half to find the placement for the ties. With an H hook and worsted weight yarn to match the goose, attach the yarn to an inside loop (so it doesn’t show on the outside of the hat). Ch 30. Finish off and tie a knot in the end of the chain. Repeat for the opposite side.
Hatband (optional)
1. With an I hook and worsted weight yarn (Sample: Black), ch 45, sc in the 2nd ch from hook and in each ch to end of row. (40sts)
2. Finish off the current yarn and change for the next stripe (Sample: White). Ch 1, turn, sc in the same st and in each st to end of row.
3. Finish off the current yarn and change for the next stripe (Sample: Black). Ch 1, turn, sc in the same st and in each st to end of row. Finish off, leaving a long tail for sewing the short ends together.
Wrap the band around the bottom of the hat, next to the brim. Line up the stripes. Use a yarn needle and yarn tail to sew the ends together.
Continue to “Embellishments” for additional items.
EMBELLISHMENTS
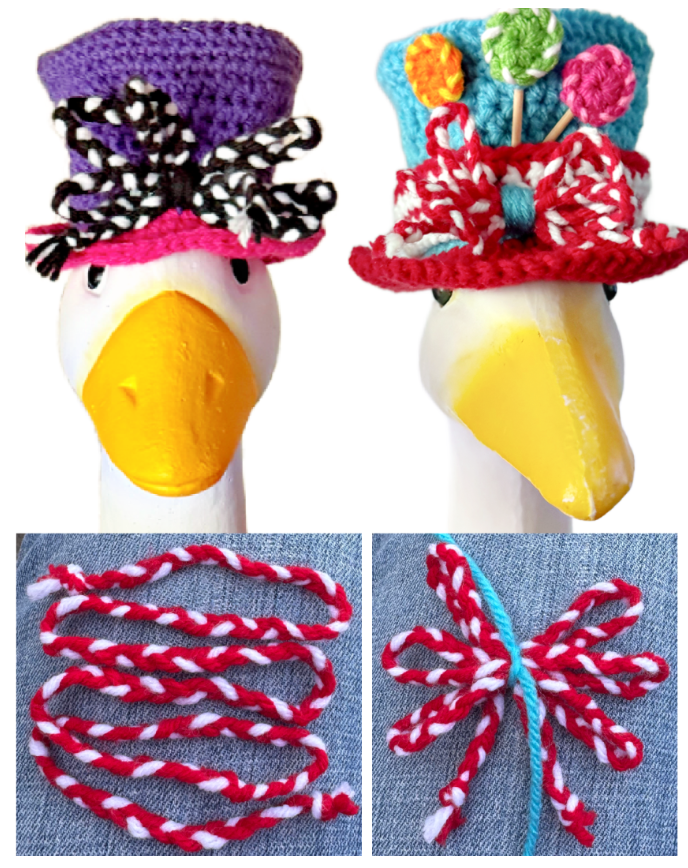
Polka Dot Bows
I LOVE how these braided bows turned out looking like they have polka dots! They are really easy to do. I have included two sizes. Depending on how you assemble them determines the width. If you follow the instructions below they should match my measurements pretty close.
Small Bow (red and white in sample) 2.5” across
Cut 3 strands of yarn 36” long. To get the polka dots you need to have 2 strands of a color (Sample: Red) and 1 strand of White.
Tie the 3 pieces together in a knot at one end and have someone hold this knot for you.
Braid the strands and tie a knot in the end.
Starting with one knot to your left, snake the braid back and forth as shown in the left photo. The bow will end up the width of your snake.
End with the opposite end on the right side. This way they will hang better as ties to the bow.
Cut a long piece of matching or contrasting yarn around the middle of the strand, pull snug and tie a knot. Wrap the yarn around the middle multiple times. Pull the yarn tail through the knot at the back of the bow to secure the wrap. Use the remaining yarn to tie the bow to the hat.
Large Bow (black and white in sample) 4” across
Cut 6 strands of yarn 48” long. To get the polka dots you need to have 4 strands of a color (Sample: Black) and 2 strands of White.
Tie the 6pieces together in a knot at one end and have someone hold this knot for you.
Separate the strands so the white are together. Braid the strands and tie a knot in the end.
Starting with one knot to your left, snake the braid back and forth as shown in the left photo. The bow will end up the width of your snake.
End with the opposite end on the right side. This way they will hang better as ties to the bow.
Cut a long piece of matching or contrasting yarn around the middle of the strand, pull snug and tie a knot. Wrap the yarn around the middle multiple times. Pull the yarn tail through the knot at the back of the bow to secure the wrap. Use the remaining yarn to tie the bow to the hat.
Lollipops (make 3)
Cut 3 small dowels (or skewers) 1.5-2” long.
With an H hook and worsted weight yarn of choice, create a magic circle of 8 sc sts (or preferred method for creating a circle of 8 sc sts), pull closed and sl st to join. (8sts) Finish off the yarn and weave in ends.
Use a contrasting or light shade of yarn and a yarn needle to wrap around the outer edge of the circle.
The best way to attach the lollipops to the dowels is with glue. I used a yarn needle and matching yarn to wrap the top of the dowel to the back. Insert the opposite end behind the hatband and glue or sew the end in place.
Lucky Top Hat
The version of this hat, shown in the photo below, can be found at this link: https://snappy-tots.com/free-pattern-mini-top-hat-and-bowties/
Pin to Save For Later