
Free Crochet Pattern: Mini Christmas Elf Goose Outfit
The Littlest Christmas Elves!
Free Mini Goose Elf Crochet Pattern
Boy or girl, these tiny Christmas helpers are ready to spread some holiday cheer!
Designed by Snappy Tots
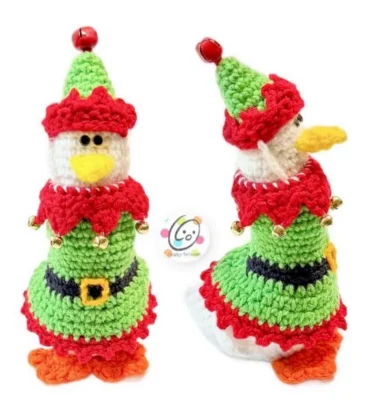
The elves have arrived in Snappyland! These little Christmas outfits are designed for my 7-inch Mini Dress Up Goose. With a few simple color changes, you can make a boy elf, a girl elf, or a whole flock of festive little helpers.
This pattern includes the elf outfit, pointed collar, belt, and matching hat. Add little jingle bells or a pompom for extra Christmas fun!
Want the Printable PDF?
Enjoy the free pattern below, or grab the convenient downloadable version to print and keep with your patterns.
Make a Boy or Girl Elf!
One basic pattern, two adorable Christmas looks! Choose your favorite or make both.
Boy Elf
Make the outfit in green with a black belt. Add the yellow buckle, red pointed collar, and matching elf hat.
Girl Elf
Make the green outfit through the black belt. After the belt, switch to red for the skirt portion. Skip the buckle.
Finish with the bottom-edge trim and add yarn hair or braids under the elf hat.
Mini Elf Crochet Pattern
Materials
- Yarn: 60 yards worsted weight yarn Sample Colors: Red Heart Super Saver – 30 yards Spring Green, 13 yards Cherry, Black, Saffron
- Crochet Hook: H (5mm)
- Supplies: Yarn needle for weaving in ends
- Optional: Measuring tape, scissors, 7 tiny jingle bells, 1 larger jingle bell for tip of hat (or a pompom)
Tips
- The first stitch of each row is worked into the same stitch as the turning chain unless noted.
- Numbers at the beginning of each line may refer to steps and not indicate number of rows.
- Stitch count remains the same unless noted at end of row/round.
- If you have any questions about this pattern please contact [email protected] .
This is designed to fit my Mini Dress Up Goose and Mini Dress Up Llama .
Outfit
This starts at the neck edge and is worked in rounds to the bottom edge.
- With an H hook and worsted weight yarn (Sample: Spring Green), ch 21, sl st in the last ch from hook to form a circle. Make sure the chain is not twisted. (21sts)
- Ch 1, sc in the same ch and in each ch to end of round, sl st in the first st to join.
- Ch 1, sc in the same st and in each st to end of round, sl st in the first st to join.
- Repeat the previous round for an additional 5 rounds.
- Ch 1, *sc 6, 2sc in the next st*, repeat to end of round, sl st to join. (24sts)
- Change to worsted weight yarn for the belt (Sample: Black). Ch 1, sc in each st to end of round, sl st to join.
- Ch 1, *sc 5, 2sc in the next st*, repeat to end of round, sl st to join. (28sts)
- Finish off the current yarn and change back to the main color. Ch 1, hdc in the same st and in each st to end of round, sl st to join.
- Ch 1, *hdc 13, 2hdc in the next st*, repeat once, sl st to join. (30sts)
- Ch 1, *hdc 4, 2hdc in the next st*, repeat to end of round, sl st to join. (36sts) Finish off and weave in ends.
Optional Trim On Bottom Edge: With an H hook and worsted weight yarn (Sample: Cherry). Start in any st on the bottom edge. *Ch 2, sl st in the 2nd ch from hook, sl st in the next 2 sts*, repeat to end of round. Finish off and weave in ends.
Collar
- With the top opening pointed away from you, use an H hook to attach worsted weight yarn (Sample: Cherry) to any st on the top edge. Ch 1, Sc in each st to end of round, sl st to join. (21sts)
- Ch 1, FPSC around each post to end of round, sl st to join.
- Ch 1, sc in the FLO of each st to end of round, sl st to join.
- This starts one peak. Ch 1, turn, sc in the same st, sc 2. (3sts) Leave the remaining sts unworked.
- Ch 1, turn, sc2tog, sc.
- Ch 2, turn, sl st in the next st. Sl st in the side of the peak, sl st in the last used st on the rim, sl st in the next st on the rim.
- Repeat steps 4-6 creating 7 peaks.
Trim: With a yarn needle and a long piece of worsted weight yarn (Sample: White), wrap around the sts on the top edge of the neck.
Bells: Use a sewing needle and matching thread to sew a small bell at the end of each point.
Buckle: With a yarn needle and long piece of worsted weight yarn (Sample: Saffron), create a square centered over the belt by taking small sts. See main photo.
Hat
- With an H hook and worsted weight yarn (Sample: Spring Green), start with a magic circle of 6 sc sts (or preferred method for starting a circle of 6 sc sts), pull closed and sl st to join. (6sts)
- Ch 1, *2sc in next st, sc 2*, repeat once, sl st to join. (8sts)
- Ch 1, *2sc in next st, sc 3*, repeat once, sl st to join. (10sts)
- Ch 1, *2sc in next st, sc 4*, repeat once, sl st to join. (12sts)
- Ch 1, *2sc in next st, sc 5*, repeat once, sl st to join. (14sts)
- Ch 1, *2sc in next st, sc 6*, repeat once, sl st to join. (16sts)
- Ch 1, *2sc in next st, sc 7*, repeat once, sl st to join. (18sts)
- This step starts the peaks around the bottom edge. Finish off the current yarn and change to red. Ch 1, *2sc in the same st, sc 5*, repeat to end of around, sl st to join. (21sts)
- Ch 1, FPSC around each post to end of round, sl st to join.
- Turn. *Ch 3, sl st in the 2nd ch from hook, ch 1, sk 1 st on the rim, sl st in the next 2 sts*, repeat to end of round. Finish off and weave in ends.
- With an H hook and matching yarn, sl st in each st around the bottom edge. Finish off and weave in ends.
With a yarn needle and matching yarn, sew the peaks to the hat to help them stay standing.
Sew a jingle bell or pompom to the top/tip of the hat.
Ties
This is the best way to hold the hat on top of the goose. If you don’t want the ties to show, simply pull the ties down under the suit. This should hold it in place, but if not, tie in a bow first, then tuck the bow and tails under the suit.
Fold the hat in half, choosing best peak placement for the front center. Mark a st at each edge of the hat. With an H hook and worsted weight yarn (Sample: white), sl st in one of the marked sts, ch 20, finish off. Tie a small knot in the end and trim yarn tail. Repeat for the opposite side.
Pattern copyright Snappy Tots 2026. This pattern may not be shared, copied or reproduced in part or whole. Items made from this pattern may be sold for profit.