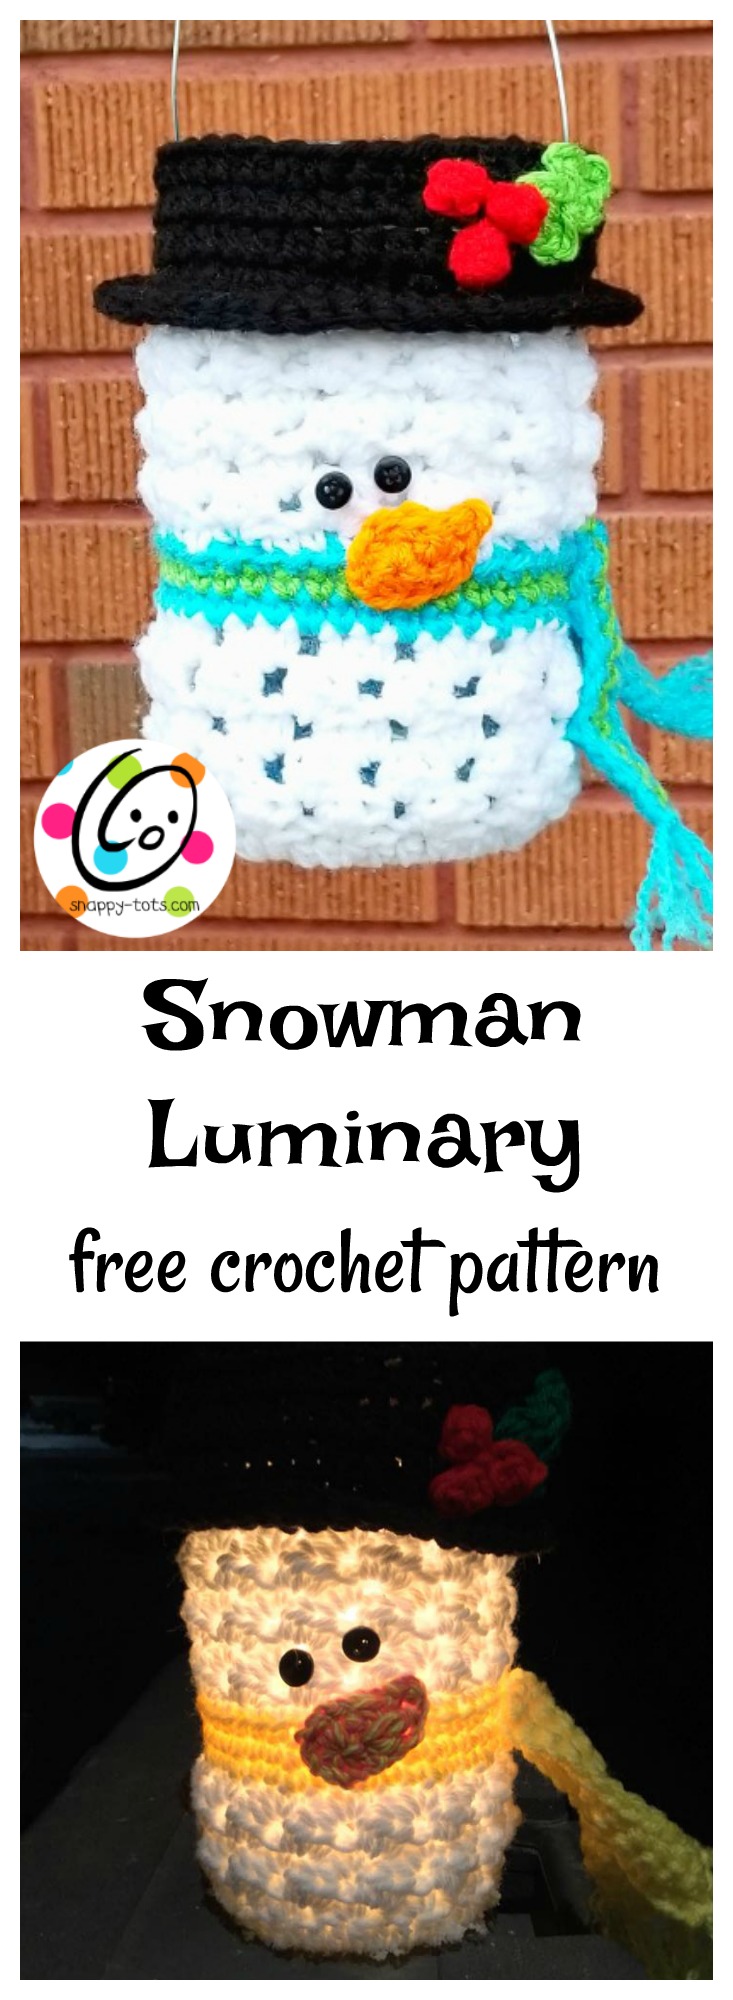
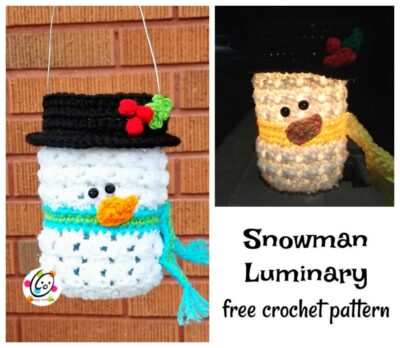
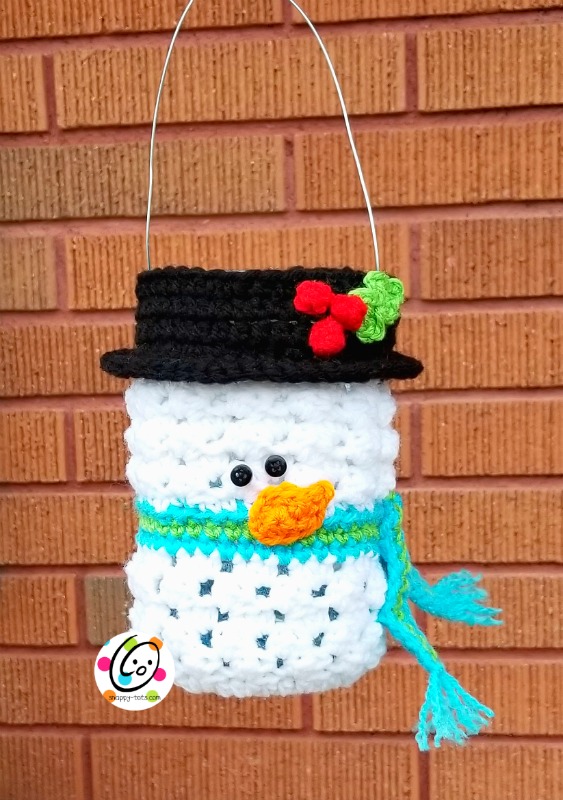
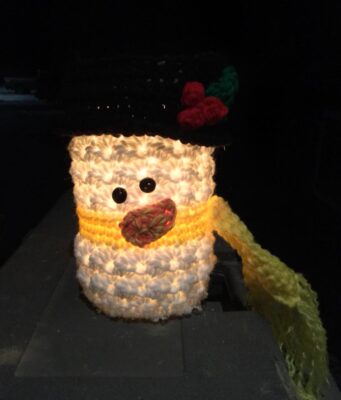
Free Pattern: Frosty Luminary
I’ll never have enough snowmen! Ever since I made my first crocheted luminary cover, Bonbon the Owl, I’ve wanted to make a snowman luminary. When Maria of Pattern Paradise invited me to be part of this year’s annual 12 Weeks of Christmas CAL it seemed the perfect time to make him.
Want to save this for later?
- CLICK HERE to add it to your favorites on Ravelry.
- You can purchase an ad-free, downloadable PDF of this pattern with all of the photos: Click HERE.
Snowman Luminary
Materials and Details
Yarn- worsted weight yarn in Red Heart Super Saver: White, Pumpkin, Cherry, Spring Green, Turqua, Black
Crochet Hook: H
Misc: yarn needle, stitch markers, scissors, measuring tape, 2 small black buttons for eyes, sewing needle, black sewing thread, pint mason jar (or similar)
Gauge: not necessary for this project
Tips First stitch of each row is worked into the same stitch as the turning chain unless noted. Numbers at the beginning of each line may refer to steps and not indicate number of rows. Reminder: “hdc 2” = work one hdc in each of the next 2 sts; “2hdc in next st”= an increase, work 2 hdc in one st.
Directions
1. With an H hook and white yarn, start with a magic circle of 8 sts (or preferred method for creating a circle of 8 sc sts), pull closed and sl st to join. (8sts)
2. Ch 1, 2sc in each st to end of round, sl st to join. (16sts)
3. Ch 2, *hdc, 2hdc in next st*, repeat to end of round, sl st to join. (24sts)
4. Ch 2, *hdc 2, 2hdc in next st*, repeat to end of round, sl st to join. (32sts)
5. Ch 2, hdc 2, *2hdc in next st, hdc 2*, repeat to end of round, sl st to join. (42sts)
6. Ch 1, (sc, 2hdc) in same st, sk 2, *(sc, 2hdc) in next st, sk 2*, repeat to end of round, sl st to join.
7. Ch 1, TURN, (sc, 2hdc) in same st, sk 2, *(sc, 2hdc) in next st, sk 2*, repeat to end of round, sl st to join. 8-10. Repeat previous round. The last round should be on the right side of the piece.
11. Change to turquoise yarn (or desired color for scarf). Ch 1, sc in each st to end of round, sl st to join.
12. Change to lime green yarn. Ch 1, sc in each st to end of round, sl st to join.
13. Change to turquoise yarn. Ch 1, sc in each st to end of round, sl st to join.
14. Change to white yarn. Work this round in BLO. Ch 1, sc in each st to end of round, sl st to join.
15. Ch 1, turn, (sc, 2hdc) in same st, sk 2, *(sc, 2hdc) in next st, sk 2*, repeat to end of round, sl st to join. 16-20. Repeat previous round. The last round should be on the right side of the piece.
21. Change to black yarn. Ch 1, sc in each st to end of round, sl st to join.
22. Work this round in BLO. Ch 1, sc in each st to end of round, sl st to join. Note: The hat brim will be added to the front loops of this round. 23-24. Ch 2, hdc in each st to end of round, sl st to join.
25. Ch 2, *hdc 5, hdc2tog*, repeat to end of round, sl st to join. (36sts) Finish off and weave in ends.
Hat Brim:
1. With top of piece towards you, use an H hook to attach black yarn to one of the front loops from step #22. Ch 1, *sc 6, 2sc in next st*, repeat to end of round, sl st to join. (48sts)
2. Ch 1, *sc 5, 2sc in next st*, repeat to end of round, sl st to join. (56sts) Finish off and weave in ends.
Holly (make 1) With an H hook and lime green yarn ch 6, sl st in 2nd ch from hook, sl st in next ch, (sc, ch 1, sl st) in next ch, sl st in next ch, (sc, ch 1, hdc, ch 1, sl st, hdc, ch 1, sl st) all in the next ch. Working across the back edge of the chain, sl st in next ch, (sc, ch 1, sl st) in next ch, sl st 2. Finish off, leaving a tail for sewing to “hat”.
Berries (make 3): With an H hook and red yarn, create a magic circle of 3 sts (or preferred method for creating a circle of 3 sc sts), pull closed and sl st to join. (3sts). Finish off, leaving a yarn tail for sewing to “hat”.
Assembly: Use a yarn needle and yarn tails to sew the holly and berries to the “hat”.
Nose:
1. With an H hook and orange yarn, start with a magic circle of 6sts (or preferred method for starting a circle of 6 sc sts), sl st to join. (6sts)
2. Do not ch 1. (hdc, dc) in next st, ch 2, sl st in 2nd ch from hook, sc in post of previous dc, sl st in next st on beginning circle. Finish off, leaving a tail for sewing in place.
With yarn needle and yarn tail, sew nose in place. I chose to sew the nose overlapping the scarf. It is important to keep our face warm too, right? You can choose to sew the nose anywhere you would like.
Mouth and eyes: With yarn needle and black yarn or black embroidery floss, stitch mouth in place. With a sewing needle and black thread, sew buttons above nose.
Scarf Ends Piece (make 1)
1. With an H hook and turquoise yarn (or desired color for scarf), ch 25, sc in 2nd ch from hook and in each ch across. (24sts)
2. Change to lime green yarn. Ch 1, turn, sc in each st to end of row.
3. Change to turquoise yarn. Ch 1, turn, sc in each st to end of row. Finish off and weave in ends.
Cut 6 pieces of yarn 8” long. Fold each piece in half and use a crochet hook to pull the center loop through a spot at the end of the scarf piece, pull the ends through the loop until snug. Repeat, adding 3 pieces to each end. Pull the yarn ends apart for a frizzy look. Fold the scarf piece in half. With matching yarn and a yarn needle, sew the center fold to the snowman’s scarf. Use the yarn to also attach the ends to the snowman’s body if desired.
Finishing
Handle Wire option: Here is a great video tutorial on adding a wire hanger to the top of your jar: DIY Wire hanger
Crochet option: With G hook and yarn color of choice, ch 81. 3hdc in 2nd ch from hook, hdc in each ch until 1 ch remains, 6hdc in last ch. Working across back side of beginning chain, hdc in each ch to end of row, sl st to join. Ch 1, sl st in each st around handle piece, sl st to join. Finish off and weave in ends. With yarn needle and matching yarn, sew one end of handle under the drawstring knot. Repeat for other handle end.
Slip snowman cover over the mason jar.
I hope you enjoyed making this quick and easy project. I would love to see your creations. Please add your project to Ravelry and/or share online and include #snappytots.
Thanks for crocheting with me!
~ Heidi