
Free Pattern: Little Halloween Banner
SNAPPY TOTS FREE CROCHET PATTERN
Little flags, friendly frights and three fun ways to decorate!
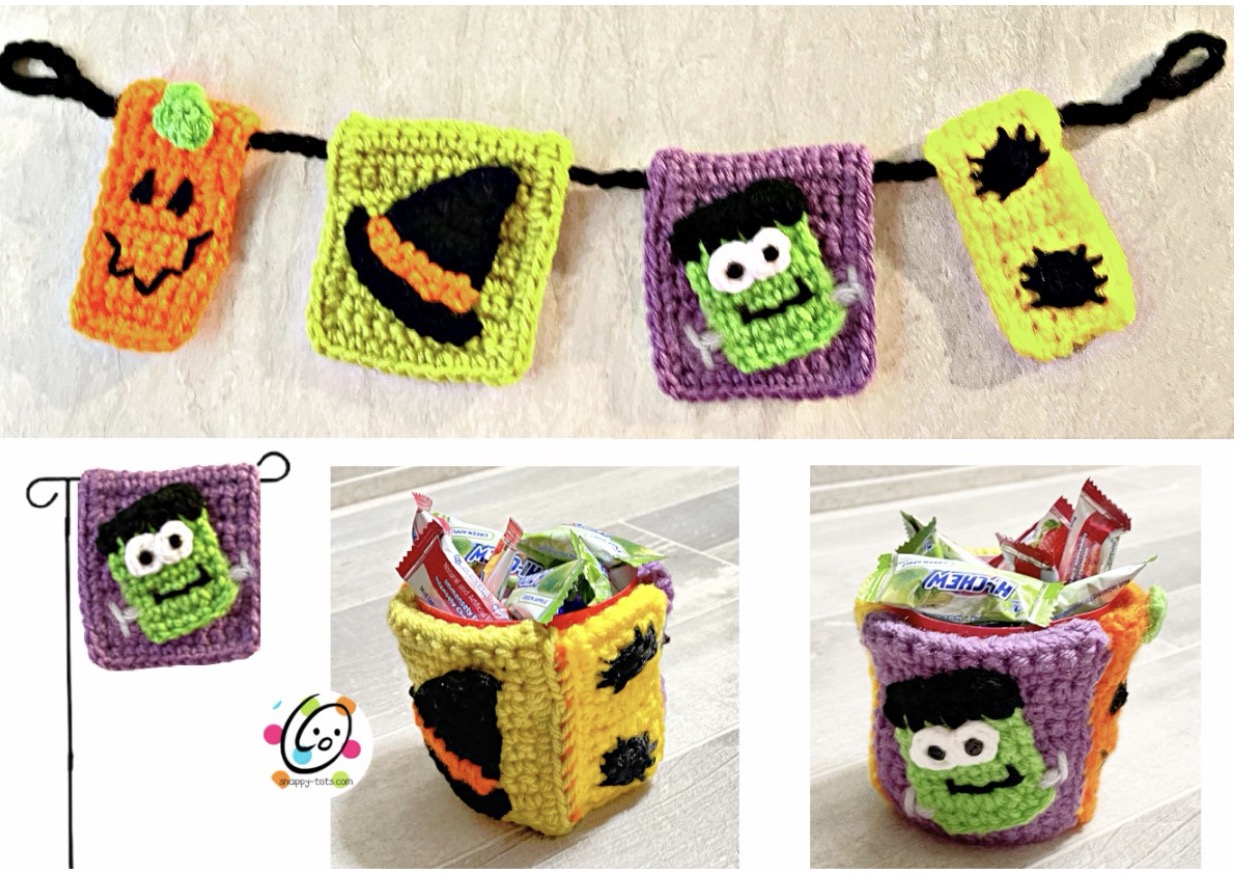
A little Frank, a witch hat, a pumpkin and some spiders are ready to bring a bit of Halloween fun to your decorations! Make a mini banner, display a single flag or stitch the flags together for a little treat basket.
Choose your favorite Halloween colors and make a little something for a shelf, a tiny display or a spot that needs some spooky cheer. Your porch geese might even want to help show off the finished banner!
CHOOSE YOUR PATTERN FORMAT
Free on the Blog or Printable PDF
This crochet pattern is available to view for free right here on the Snappy Tots blog. Prefer a clean, printer-friendly copy? An ad-free downloadable PDF with the complete pattern and photos is also available for a small fee.
Itty Bitty Halloween Flags Crochet Pattern
LET’S GET STARTED
Materials & Details
- Yarn: less than 50 yards each of RHSS Pumpkin, Spring Green, White, Black, Medium Purple, Bright Yellow, Light Grey; Loops and Threads Impeccable Citron
- Crochet Hook: H (5mm)
- Miscellaneous: Yarn needle, 2 tiny black buttons for the eyes, sewing needle, black thread
- Optional for treat basket version: plastic container (a red solo cup cut to the right height works great)
- Optional for mini single flag version: small flag holder or wire hanger to make a small flag holder (you will also need wire cutters)
- Measurement: wide flag – 3.25” long x 3” wide; narrow flag – 3.25” long x 1.75” wide; Treat basket – 3.5” high x 4” across
Directions
Follow the instructions to make the 4 flags as shown (for the treat basket version too). See “Variations” below for finishing the project.
Wide Flag (Purple, Green in sample)
1. With an H hook and yarn color of choice, ch 11, sc in the 2nd ch from hook and in each ch across. (10sts)
2. Ch 1, turn, sc in the same st and in each st to end of row.
3. Repeat the previous step for an additional 14 rows.
4. This step is worked around the outer edge of the piece. Ch 1, sc in the same st, sc 14 sts evenly down the side, (sc, ch 1, sc) in the first st of the bottom row, sc 8, (sc, ch 1, sc) in the last st, sc 15 sts evenly up the side, ch 1, sl st in the first st of the row. Finish off, leaving a long tail for sewing the flag casing.
Skip to “Casing”.
Narrow Flag (Orange, Yellow in sample)
1. With an H hook and yarn color of choice, ch 6, sc in the 2nd ch from hook and in each ch across. (5sts)
2. Ch 1, turn, sc in the same st and in each st to end of row.
3. Repeat the previous step for an additional 14 rows.
4. This step is worked around the outer edge of the piece. Ch 1, sc in the same st, sc 14 sts evenly down the side, (sc, ch 1, sc) in the first st of the bottom row, sc 3, (sc, ch 1, sc) in the last st, sc 15 sts evenly up the side, ch 1, sl st in the first st of the row. Finish off, leaving a long tail for sewing the flag casing.
Casing
These can be sewn on before or after the casing. Be aware of two things: If sewing before the casing make sure the items aren’t sewn too high on the flag; If sewing after the casing, make sure to not sew the casing shut.
To create the casing, fold the top edge back against the wrong side between the 4-5 rows (approximately 1.5”). With a yarn needle, use the yarn tail to sew the edge in place. Leave the ends open.
Appliques
Frank
1. With an H hook and green yarn, ch 7, sc in the 2nd ch from hook and in each ch across. (6sts)
2-6. Ch 1, turn, sc in the same st and in each st to end of row.
7. Change to black yarn. Ch 1, turn, (sc, dc) in the same st, *sc in the next st, dc in the next st*, repeat until 1 st remains, (sc, dc) in the last st. (8sts)
8. Ch 1, turn, sc2tog, sc 4, sc2tog. (6sts) Finish off and weave in ends.
Eyes (make 2)
With an H hook and white yarn, create a magic circle of 4 sc sts (or preferred method for creating a circle of 4 sc sts), pull closed and sl st to join. (4sts) Finish off, leaving a tail for sewing in place.
With a yarn needle and yarn tails, sew eyes in place. With a sewing needle and thread, sew a tiny black button to each white eyepiece.
With a yarn needle and black yarn, st the mouth in place.
With a yarn needle, use the yarn tails to sew the head to a wide flag.
With a yarn needle and gray yarn, take a few sts at each edge of the neck to create screws.
Witch Hat
Top of Hat
1. This starts at the tip. With an H hook and black yarn, ch 2, 2sc in the 2nd ch from hook. (2sts)
2. Ch 1, turn, 2sc in the same st, sc. (3sts)
3. Ch 1, turn, sc in the same st, sc 2.
4. Ch 1, turn, 2sc in the same st, sc, 2sc in the last st. (5sts)
5. Ch 1, turn, 2sc in the same st, sc 3, 2sc in the last st. (7sts)
6. Ch 1, turn, sc in the same st and in each st across.
7. Finish off the black yarn. Change to orange yarn for the hat band. Ch 1, turn, sc in the same st and in each st to end of row.
8. Ch 1, turn, sc in the same st and in each st to end of row. Finish off and weave in ends.
Hat Brim: With an H hook and black yarn, ch 11, sl st in the 2nd ch from hook and in each ch across until 1 ch remains, sl st in the last st. Finish off, leaving a long yarn tail for sewing.
With a yarn needle, use the yarn tails to sew the hat pieces to a wide flag.
Pumpkin
Smile and Eyes: With a yarn needle and black yarn create these by taking small stitches in the flag.
Stem
1. With an H hook and green yarn, ch 4, sc in the 2nd ch from hook, sc 2. (3sts)
2. Ch 1, turn, sc2tog, sl st. Finish off, leaving a long tail for sewing.
With a yarn needle, use the yarn tail to sew the stem to the top area of the flag.
Spiders
With an H hook and black yarn, create a circle of 4 sc sts (or preferred method of starting a circle of 4 sc sts), pull closed and sl st to join. (4sts) Finish off, leaving a long tail for sewing to the flag.
With a yarn needle, use the yarn tail to sew the body to the flag and stitch 8 legs. See main photo for placement.
Variations
Banner
String: With an H hook and black yarn, ch 10, sl st in the last ch from hook to form a loop, ch 70, sl st in the 10th ch from hook to form the second loop. Finish off and weave in ends. These loops are used for hanging the banner.
Use a crochet hook, inserted through the casing, to pull the loop through each banner piece.
More flags could be added to create a longer banner. Make sure to add 12 chains to the “ch 70” section per wide flag and 8 chains per narrow flag.
Mini Single Flag
I saw a tiny flag holder in a hardware store and thought it was so cute for little displays. One could be made from a wire coat hanger. Measure the length you would need, including enough to make a loop in one end to keep the flag in place. Cut with some wire cutters and bend as desired.
Treat Basket
After making the flags I thought they would make a cute mug wrap. I made the flags as instructed, even with the casings. I like how it adds some thickness around the top.
Line up the edges of 2 completed flags, wrong sides together. With a yarn needle and contrasting yarn, whip stitch the edges together. I chose to use the inner loop from each piece, but you could work through both. Repeat, adding more blocks until complete.
For the inside, I didn’t have just the right size container so I cut a red solo cup to the right height. It works perfectly!
🎃 Your Itty Bitty Halloween Decorations Are Finished!
Hang your banner, tuck a little flag into a display or fill your treat basket with a few Halloween goodies!
🖨️ Prefer a Printer-Friendly PDF?
For a small fee, you can purchase an ad-free downloadable PDF that includes the complete Itty Bitty Halloween Flags pattern and photos. Choose your favorite shop below.
Common Crochet Abbreviations
| Abbreviation | Meaning |
|---|---|
| beg | beginning |
| ch | chain |
| sl st | slip stitch |
| st | stitch |
| sp | space |
| sc | single crochet |
| hdc | half double crochet |
| dc | double crochet |
| tr | treble/triple crochet |
| bp | back post |
| fp | front post |
| blo | back loop only |
| flo | front loop only |
| sc2tog | single crochet 2 sts together |
| hdc2tog | half double crochet 2 sts together |
| dc2tog | double crochet 2 sts together |
| * | repeat instructions |
| yo | yarn over |
SHOW OFF YOUR PROJECT
Show Me Your Itty Bitty Halloween Flags!
I love seeing what you make from my patterns! Share your finished project on social media and tag #snappytots so I can see your creation.
© Snappy Tots 2026. This pattern cannot be shared, copied or reproduced in part or whole. Items made from this pattern may be sold for profit.
Contact & Snappy Spots
Come hang out with Snappy Tots for new patterns, giveaways, events, goose nonsense and lots of crochet fun.
Thank you for crocheting with me!
Thank you for crocheting with Snappy Tots. I hope you have a wonderful day!