
Free Pattern: Spooky Tree
SNAPPY TOTS FREE CROCHET PATTERN
A little Halloween tree with pumpkin baskets and a ghostly friend!
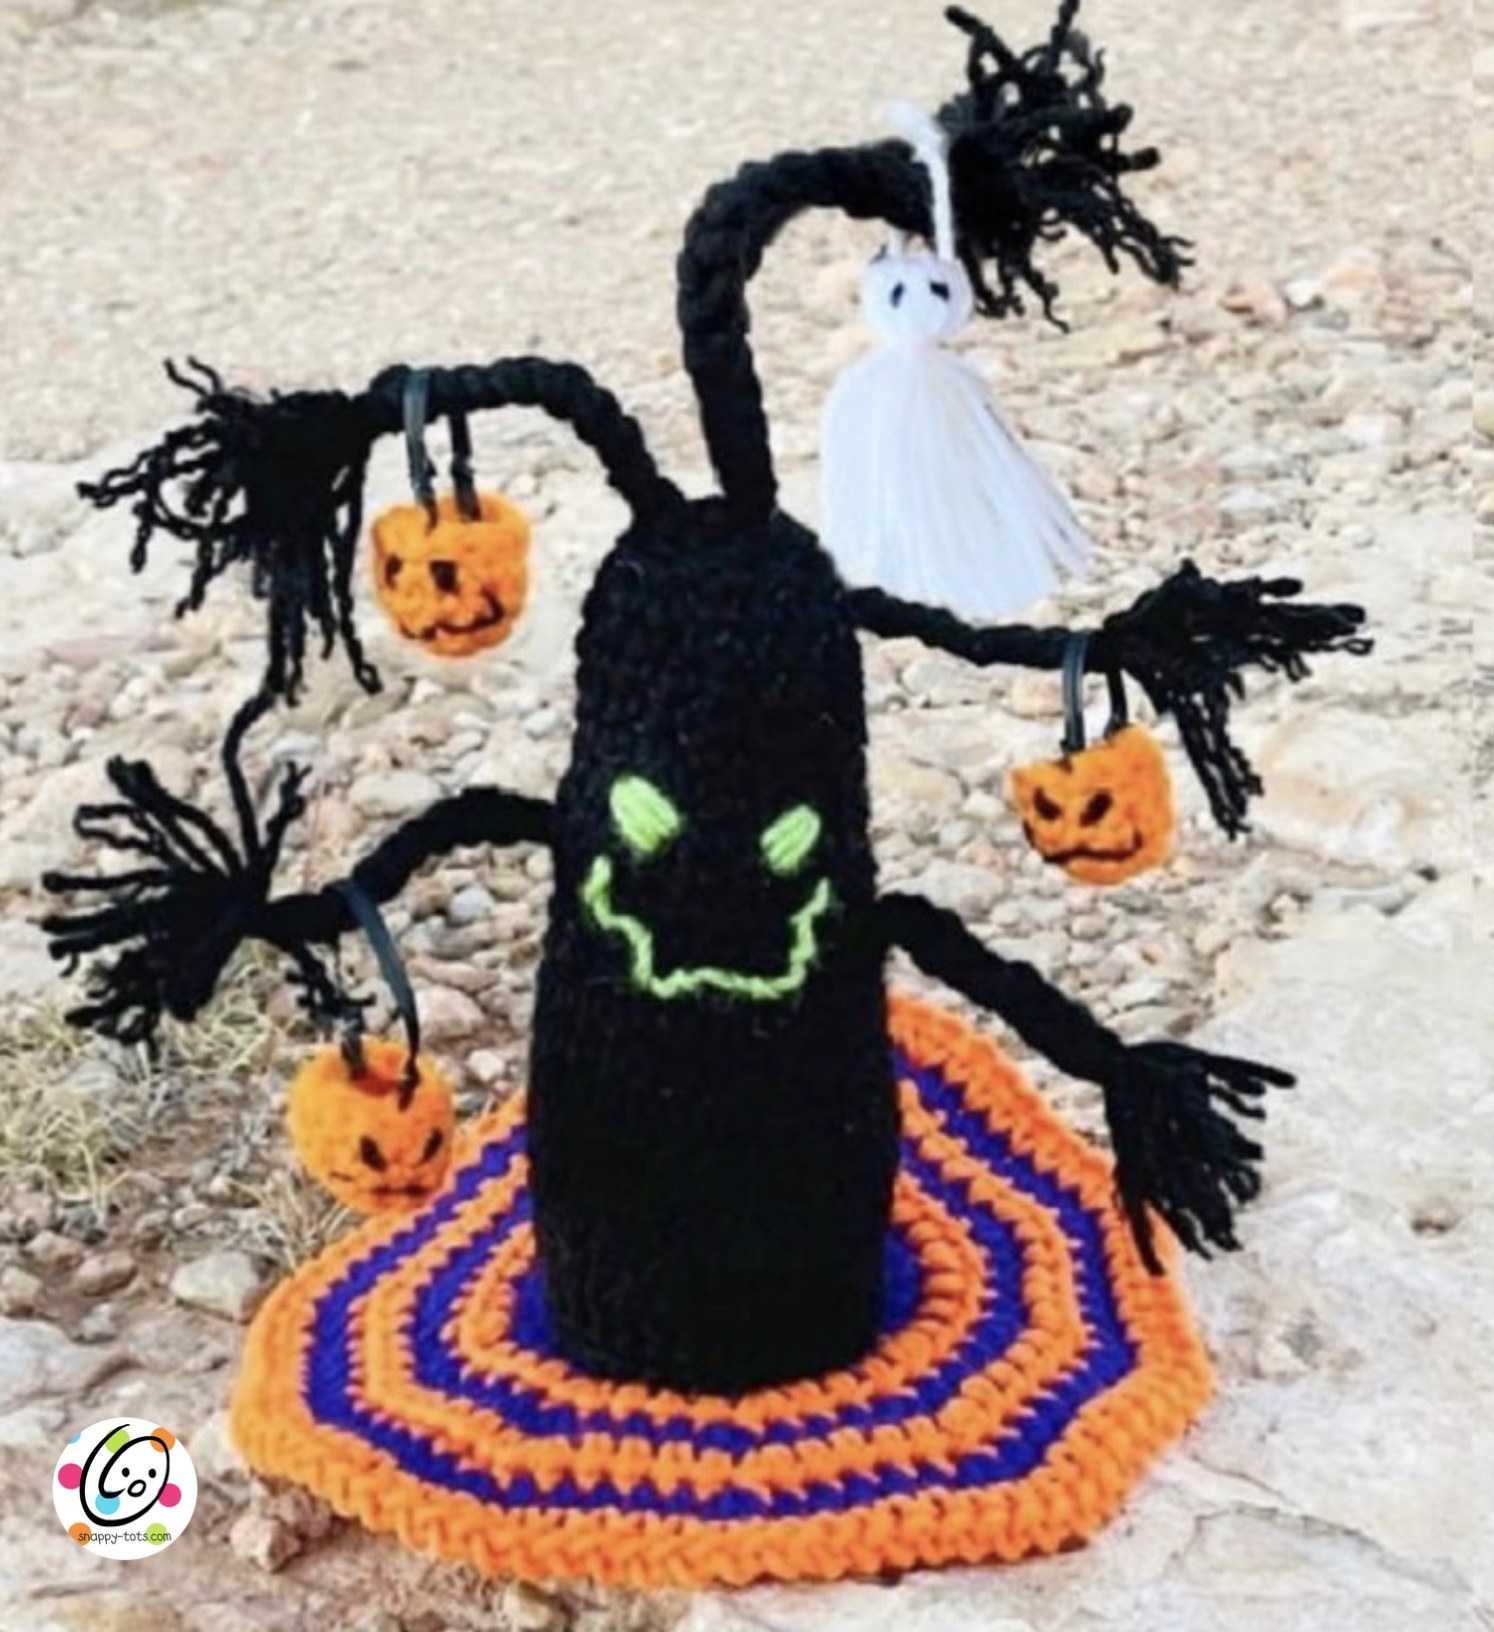
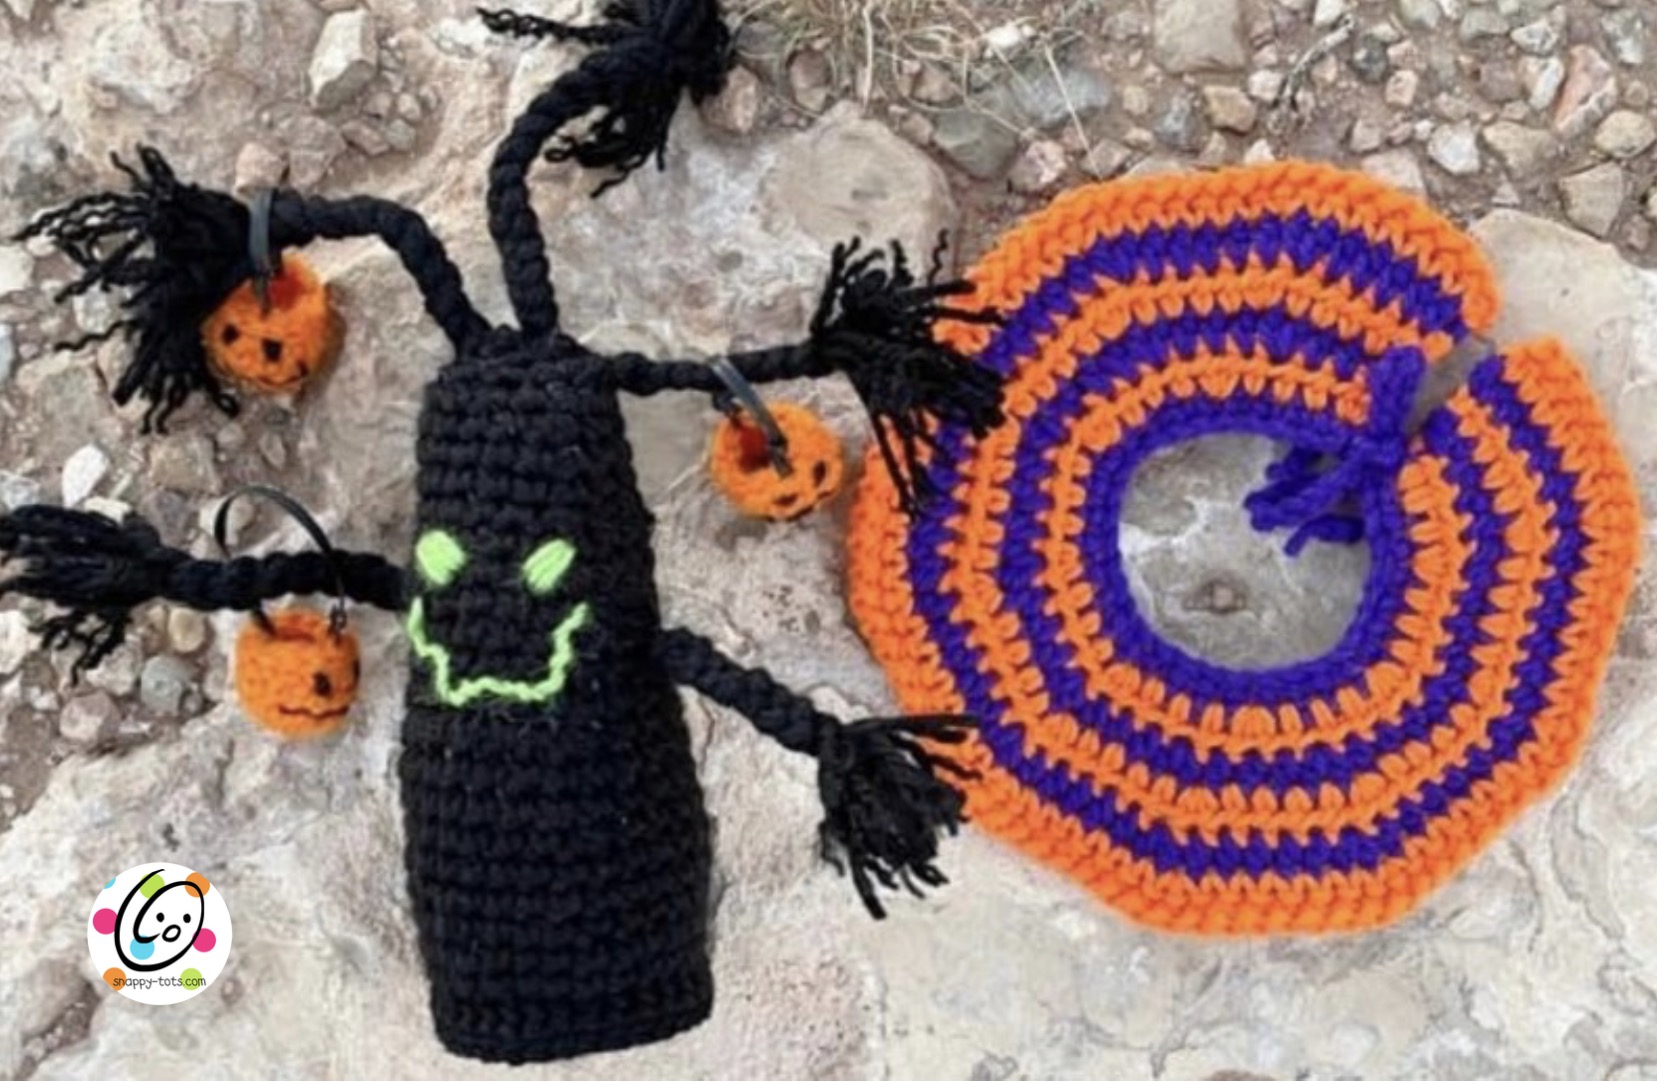
A little spooky, a little silly and ready for Halloween! This crocheted tree has braided branches for hanging tiny pumpkin baskets and a ghost tassel. A colorful striped mat finishes the display.
Make the whole little scene for a shelf or tabletop, or crochet a few pumpkin baskets to add to your own Halloween decorations.
13 DAYS OF SNAPPY TRICK-OR-TREATING
🎃 Welcome to the Snappy Tots Halloween House!
Spooky Tree is our first free pattern for 13 Days of Snappy Trick-or-Treating! We’re starting with a little Halloween decorating fun. Visit the event page to see what’s happening and follow along.
CHOOSE YOUR PATTERN FORMAT
Free on the Blog or Printable PDF
The complete Spooky Tree crochet pattern is available to view for free right here on this post. Scroll down or use the button to jump to the instructions.
Prefer a clean, printer-friendly copy? An ad-free downloadable PDF with the complete pattern and photos is also available for a small fee on Ravelry and Etsy.
A LITTLE EXTRA TREAT FOR NEWSLETTER FRIENDS
🎃 Free PDF During the Event!
During 13 Days of Snappy Trick-or-Treating, the Spooky Tree PDF is available FREE in the Freebie Files for Snappy Tots newsletter subscribers!
Already receive my newsletter? Head to the Freebie Files to get your copy.
Not Receiving the Newsletter Yet?
You can sign up to receive the Snappy Tots newsletter and get access to the Freebie Files. I’d love to have you join the fun!
Spooky Tree Crochet Pattern
LET’S GET STARTED
Materials & Details
- Worsted weight yarn: Black – 125 yards, Purple – 25 yards, Orange 40 yards; Small amounts of white, green
- Crochet Hook: H (5mm)
- Notions: Yarn needle for weaving in ends, stuffing, one black twisty tie per pumpkin basket (yarn could be used instead)
- Optional: Measuring tape, scissors; Weight for base – ⅕ cup glass beads OR 1 cup popcorn, poly pellets, or rice in a nylon sock
- Finished Measurements:
- Tree (without branches): 6” tall x 2.75” across base
- Tree Skirt: 7.5” across/ 2.5” wide
- Pumpkin Baskets: 1” tall
- Gauge: not needed for this project.
Tree
This starts at the bottom.
1. With an H hook and black ww yarn, start with a magic circle of 8 sc sts (or preferred method for creating a circle of 8 sc sts), pull closed and sl st to join. (8sts)
2. Ch 1, 2sc in each st to end of round, sl st to join. (16sts)
3. Ch 1, *sc, 2sc in the next st*, repeat to end of round, sl st to join. (24sts)
4. Ch 1, *sc 3, 2sc in the next st*, repeat to end of round, sl st to join. (30sts)
5. Work this round in the BLO. Ch 1, sc in the BLO of each st end of round, sl st to join.
6. Ch 1, *sc 8, sc2tog*, repeat to end of round, sl st to join. (27sts)
7. Ch 1, sc in each st to end of round, sl st to join.
8. Ch 1, sc2tog, sc in each st to end of round, sl st to join. (26sts)
9-10. Ch 1, sc in each st to end of round, sl st to join.
11. Ch 1, *sc 11, sc2tog*, repeat once, sl st to join. (24sts)
12-13. Ch 1, sc in each st to end of round, sl st to join.
14. Ch 1, *sc 10, sc2tog*, repeat once, sl st to join. (22sts)
15. Ch 1, sc in each st to end of round, sl st to join.
16. Ch 1, *sc 9, sc2tog*, repeat once, sl st to join. (20sts)
17-18. Ch 1, sc in each st to end of round, sl st to join.
19. Ch 1, *sc 8, sc2tog*, repeat once, sl st to join. (18sts)
20. Ch 1, sc in each st to end of round, sl st to join.
21. Ch 1, *sc 7, sc2tog*, repeat once, sl st to join. (16sts)
22-23. Ch 1, sc in each st to end of round, sl st to join.
24. Ch 1, *sc 6, sc2tog*, repeat once, sl st to join. (14sts)
25. Ch 1, *sc 5, sc2tog*, repeat once, sl st to join. (12sts) Add more stuffing as needed.
26. Work this round in the BLO. Ch 1, *sc2tog*, repeat to end of round, sl st to join. (6sts) Finish off, leaving a yarn tail for closing the end round.
With a yarn needle, use the yarn tail to weave in and out of the remaining sts. Pull to close and secure the end.
Tree Branches (make 5)
Cut 9 pieces of black yarn 12” long per branch.
Use a crochet hook to pull 4 strands through a spot in the tree where you want a branch. Pull the other 5 strands through a spot next to the first one. Divide the strands into thirds and tightly braid. This is very important and the reason the branches stand out on their own. Use one of the 4” pieces of black yarn to tie around the end of the braid, leaving 1-2” of yarn at the end. Trim the ends if needed, but I suggest doing them uneven.
Pull some of the strands apart for a frizzy look.
Repeat for each branch.
Pumpkin Baskets (make 3 or desired amount)
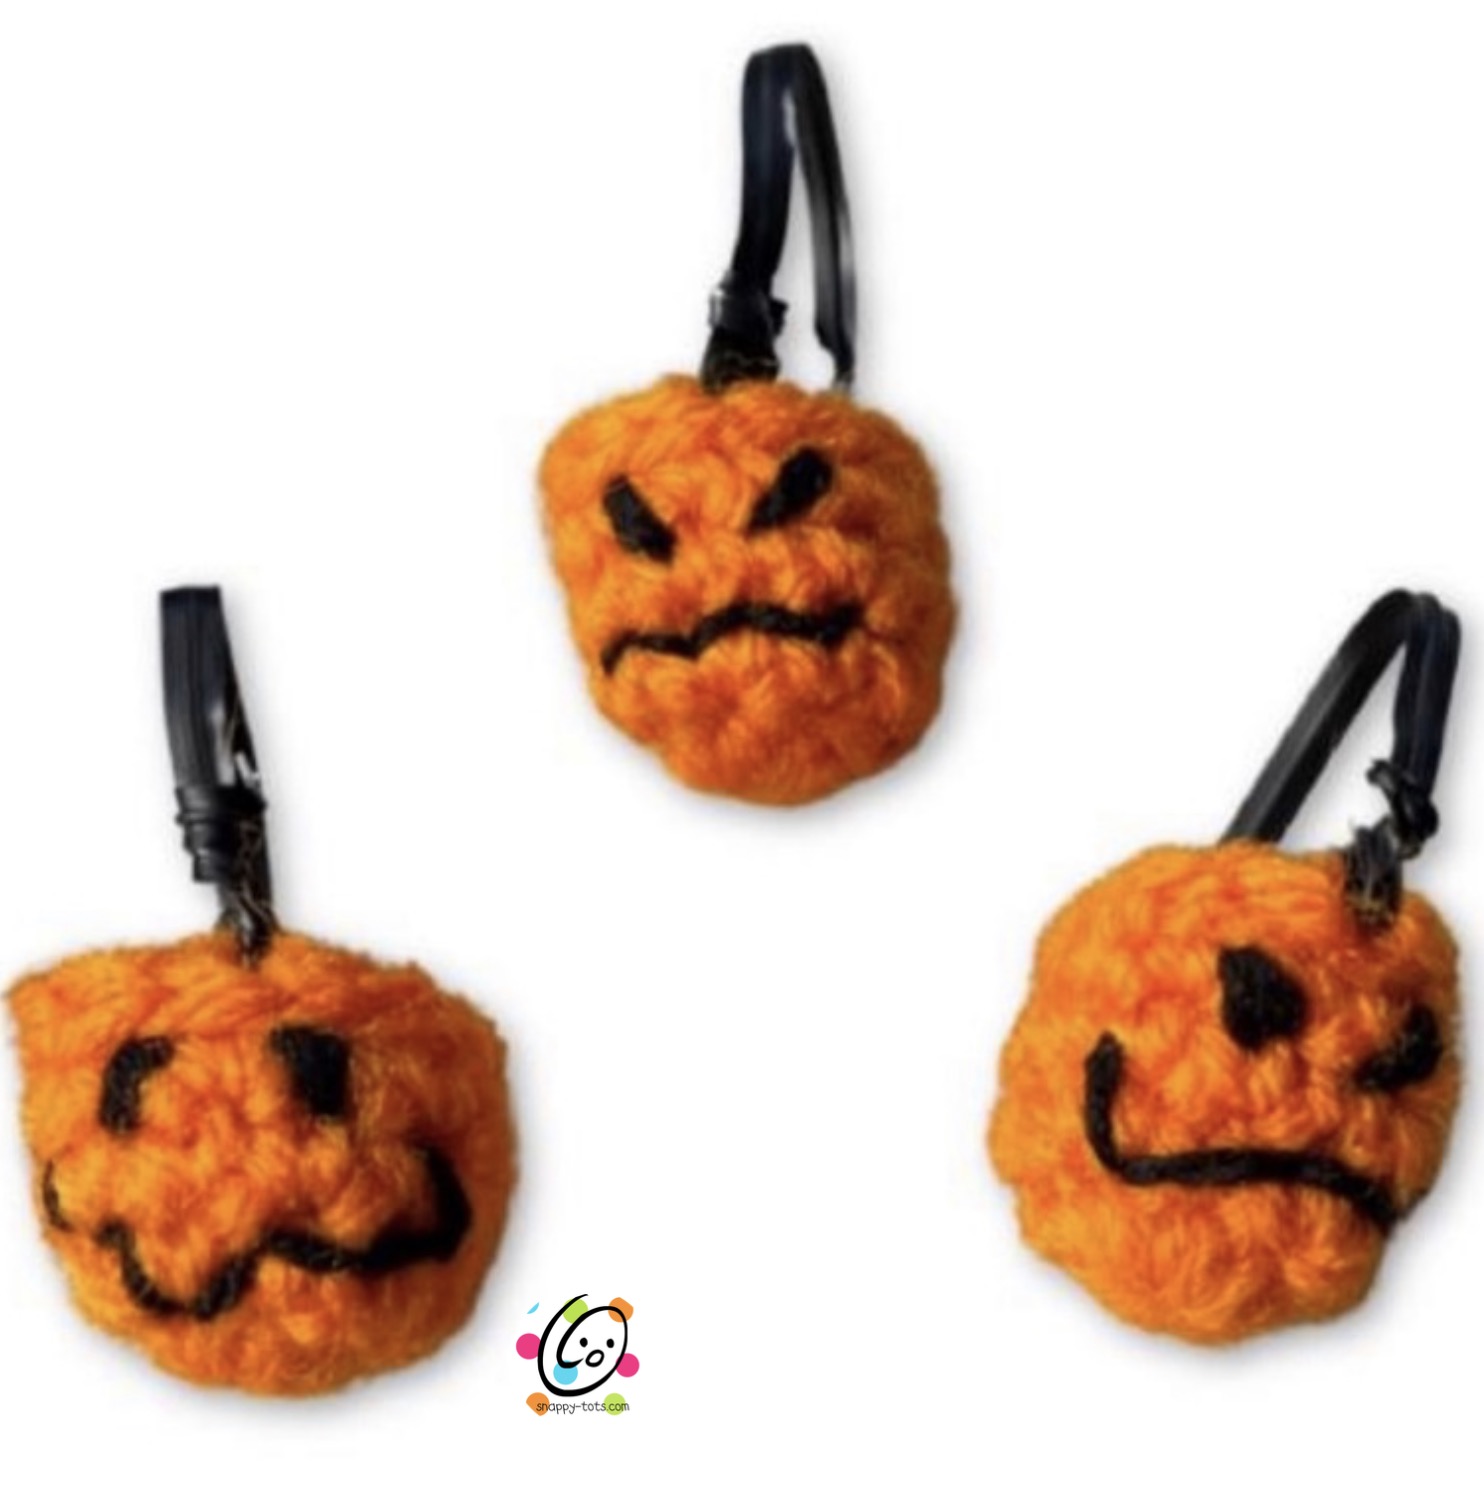
1. With an H hook and orange ww yarn, start with a magic circle of 8 sc sts (or preferred method for creating a circle of 8 sc sts), pull closed and place a marker for working in the round. (8sts)
2. *sc, 2sc in the next st*, repeat to end of round. (12sts)
3-4. Sc in each st to end of round.
5. Sl st in each st to end of round. Finish off and weave in ends.
With a yarn needle and black yarn, stitch 2 black eyes and a mouth in place.
Handle: Insert one end of the handle (twist tie or black yarn) in a st above the face and tie to itself. Repeat for the opposite end. Note: It is important to add the handle centered on the face so you will see it when it hangs on the branch.
Ghost Tassel
Cut 20 pieces of white yarn 12” long and 2 pieces of white yarn 6” long. Fold the strands in half and wrap one of the 6” pieces around the middle of the strands. Tie so it is snug around the white strands.
Wrap the other 6” piece of white yarn around the white yarn pieces approximately 1” from the top. Trim the bottom edges.
With a yarn needle and black yarn, stitch 2 black eyes in place.
Skirt/Striped Mat
This is designed for the tree to sit on or it can be slipped over the tree to look more like a tree skirt.
1. With an H hook and purple ww yarn, ch 33, sc in the 2nd ch from hook and in each ch across. (32sts)
2. Finish off the current yarn and change to orange yarn. Ch 1, turn, hdc in the same st, hdc 2, 2hdc in the next st, *hdc 3, 2hdc in the next st*, repeat to end of row. (40sts)
3. Finish off the current yarn and change to purple yarn. Ch 1, turn, hdc in the same st, hdc 2, 2hdc in the next st, *hdc 3, 2hdc in the next st*, repeat to end of row. (50sts)
4. Finish off the current yarn and change to orange yarn. Ch 1, turn, hdc in the same st, hdc 3, 2hdc in the next st, *hdc 4, 2hdc in the next st*, repeat to end of row. (60sts)
5. Finish off the current yarn and change to purple yarn. Ch 1, turn, hdc in the same st, hdc 4, 2hdc in the next st, *hdc 5, 2hdc in the next st*, repeat to end of row. (70sts)
6. Finish off the current yarn and change to orange yarn. Ch 1, turn, sc in the same st, sc 5, 2hdc in the next st, *sc 6, 2hdc in the next st*, repeat to end of row. (80sts)
7. Ch 1, turn, sl st in the next st, *ch 1, sl st in the next st*, repeat to end of row. Finish off and weave in ends.
Tie: With an H hook, attach purple yarn to the corner of the starting edge. Ch 25. Finish off, weave in ends and tie a knot in the end. Repeat for the opposite side.
🎃 Your Spooky Tree Is Finished!
Add your pumpkin baskets and ghostly friend, arrange the striped mat and find a little spot for your Halloween scene!
🖨️ Prefer a Printer-Friendly PDF?
For a small fee, you can purchase an ad-free downloadable PDF that includes the complete Spooky Tree pattern and photos.
Visiting during 13 Days of Snappy Trick-or-Treating? Newsletter subscribers can get the PDF free in the Freebie Files during the event!
Common Crochet Abbreviations
| Abbreviation | Meaning |
|---|---|
| beg | beginning |
| ch | chain |
| sl st | slip stitch |
| st | stitch |
| sp | space |
| sc | single crochet |
| hdc | half double crochet |
| dc | double crochet |
| tr | treble/triple crochet |
| bp | back post |
| fp | front post |
| blo | back loop only |
| flo | front loop only |
| sc2tog | single crochet 2 sts together |
| hdc2tog | half double crochet 2 sts together |
| dc2tog | double crochet 2 sts together |
| * | repeat instructions |
| yo | yarn over |
SHOW OFF YOUR PROJECT
Show Me Your Spooky Tree!
I love seeing what you make from my patterns! Share your finished project on social media and tag #snappytots so I can see your creation.
© Snappy Tots 2022. This pattern cannot be shared, copied or reproduced in part or whole. Items made from this pattern may be sold for profit.
Contact & Snappy Spots
Come hang out with Snappy Tots for new patterns, giveaways, events, goose nonsense and lots of crochet fun.
Thank you for crocheting with me!
Thank you for crocheting with Snappy Tots. I hope you have a wonderful day!