

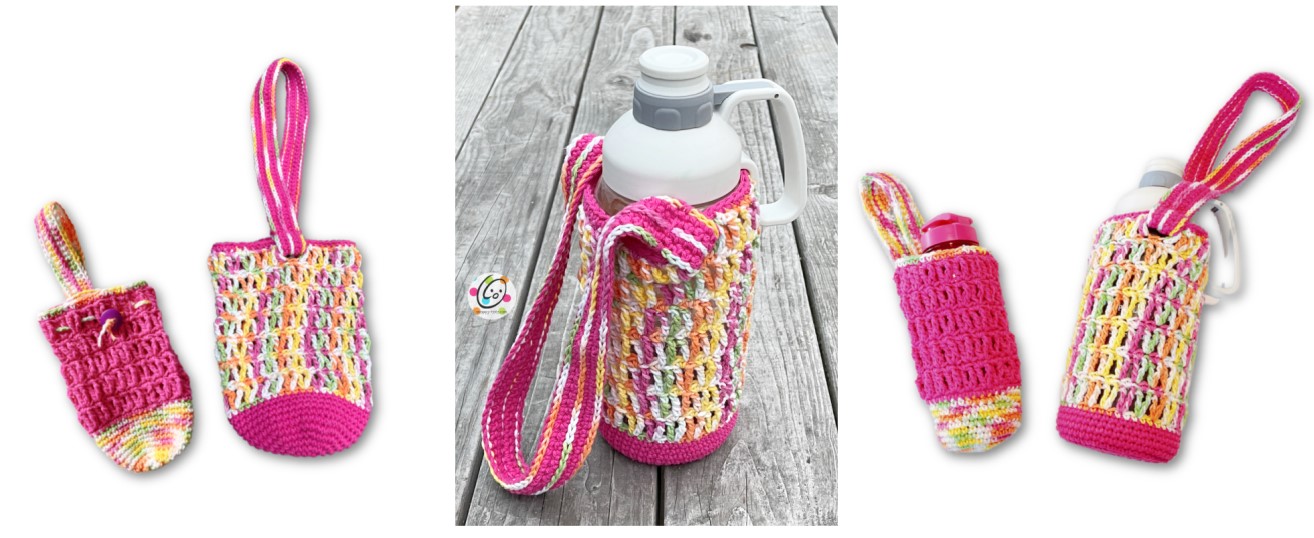
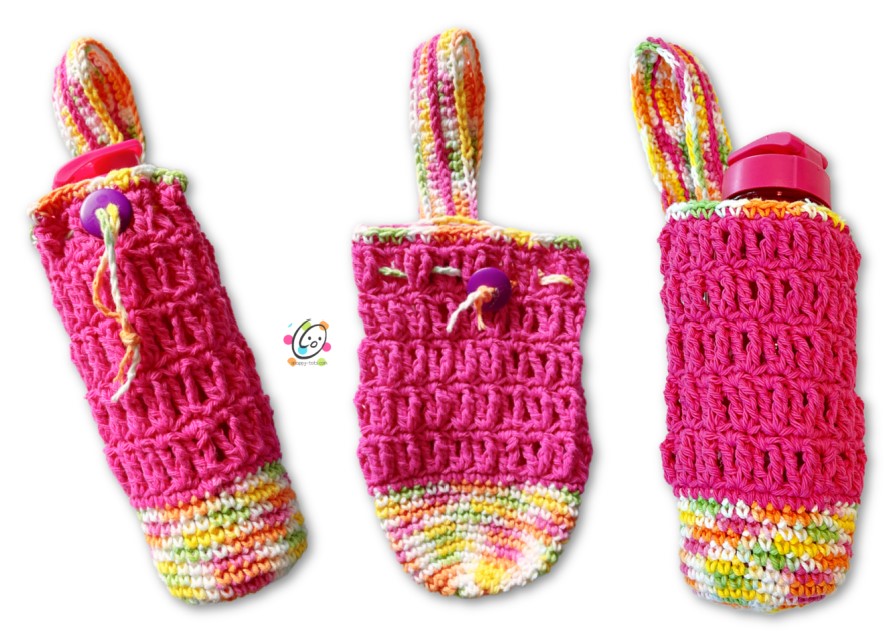
Free Pattern: All Day Water Holder
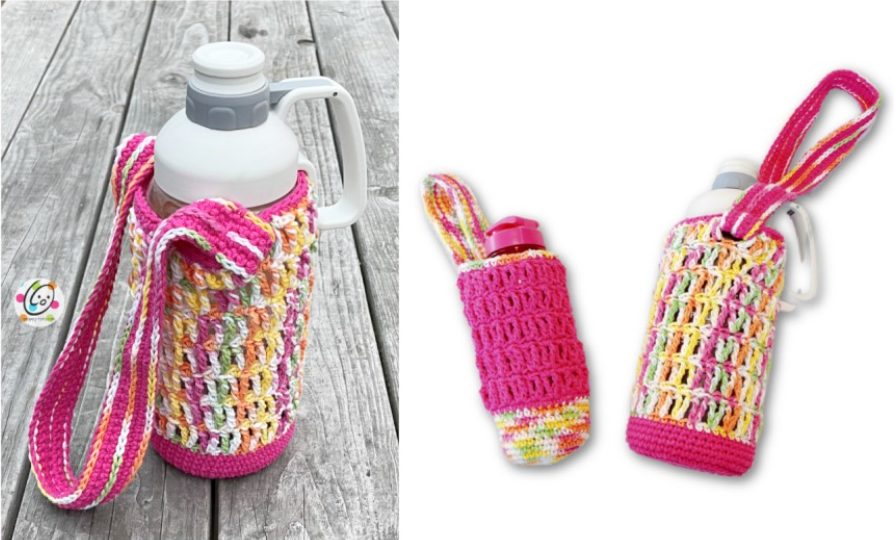
I have been on a search for a great water bottle and often use a 64 oz (½ gallon) bottle. When traveling I find it would be convenient to have a shoulder strap for it. Since not everyone wants to tote around this big of a bottle (and my grand daughter wanted one to match), I have added instructions for making a regular sized holder and instructions for custom sizes too. I hope this will encourage you to drink more water. Having mine around has helped me a ton! Since upping my water intake 5 years ago I have seen a HUGE difference. My daily goal is 64-96 ozs, but that took me awhile to build up to. Adding 8oz each day to what you currently drink is a great start.
This post contains affiliate links. I might receive a small compensation (at no added cost to you) if you make a purchase using these links.
Some of my favorite water bottles
- The large bottle shown above: (I gave this one as gifts and they all loved them! https://amzn.to/3u35PEW
- My favorite bottle! It’s a 40oz and it is a great price: https://amzn.to/3vIrBy9
- My favorite 24oz for in the car. Fits all cup holders, has a great grip, lock, and a counter: https://amzn.to/3HriHIa
- Replacement straws. Even if my bottle has a flip lid I buy these straws to use. I LOVE THEM and they bend!: https://amzn.to/4b5hP9D
- More awesome straws (non bendy): https://amzn.to/3HOZgcB
More free patterns like this one
- Snappy friend bottle holder: https://snappy-tots.com/free-pattern-snappy-friend-water-bottle-holder/
- Eclipse bottle holder: https://snappy-tots.com/pattern-eclipse-water-bottle-holder/
- Toilet paper and baggy holder (not for a water bottle, but a great gift item): https://snappy-tots.com/tpandbagholders/
How to get this pattern
- Free pattern on this page: Scroll down to see the pattern, here on this blog post, for free.
- Printable PDF: Ad-free, downloadable PDF is available for FREE as part of The Gift to Myself Crochet Along, hosted by Underground Crafter. Scroll down for more info.
How the 2024 Gift to Myself Crochet Along Works
January 23, 2024 is my day to be featured in this crochet along. The pattern will be forever free to view here on my blog, but I would like to give you the pdf for free until the end of this month. Click the button below to download this pattern.
Free on Ravelry: You can also download this to your ravelry library for free until 1/31/24. CLICK HERE, put it in your cart, enter coupon code: gift4me and make sure it changes to free.
- All of the patterns in this CAL are forever free on the blog of each designer. Visit the event page at to get all of the patterns.
- We’ve also partnered with some of our favorite companies to get some great prizes for you. Scroll down to get more details on the prizes from AndeanSun Yarns, GlassEyesOnline, Knitting Needle Outlet, and KnitPal to enter the giveaway for your chance to win one of 4 prizes by Sunday, February 4, 2024 at 11:59 p.m. Eastern.
- You can join in by crocheting the projects as you have time.
- Share your progress and post pictures of your finished projects. Tag your projects and posts #GifttoMyselfCAL on all social media.
- If you’d like to chat with other crafters, join the Underground Crafters Facebook group.
- By the end of the Crochet Along, you’ll have up to 15 awesome projects
In case you missed this event until now, the patterns are still available to view for free on the designer’s blogs:
All Day Water Holder Crochet Pattern
Materials & Details
- Yarn: 130-150 yards worsted weight yarn in 1-2 colors (total). The samples were created with 100% cotton yarn to absorb condensation.
- Crochet Hook: H (5mm)
- Miscellaneous: yarn needle
- Optional: 1 large button with large holes for a lock on the drawstring. A large bead could also be used.
- Gauge: not needed for this project. Compare measurements along the way if desired.
- Sizes available: Regular, XL, Custom
Measurements
- Regular Bottle Holder: 5.25” across x 8” tall (measured flat)
- XL Bottle Holder: 6.25” x 10” tall (measured flat)
Important Tips
- First stitch of each row is worked into the same stitch as the turning chain unless noted.
- Numbers at the beginning of each line may refer to steps and not indicate number of rows.
- Stitch count remains the same unless noted at the end of the step.
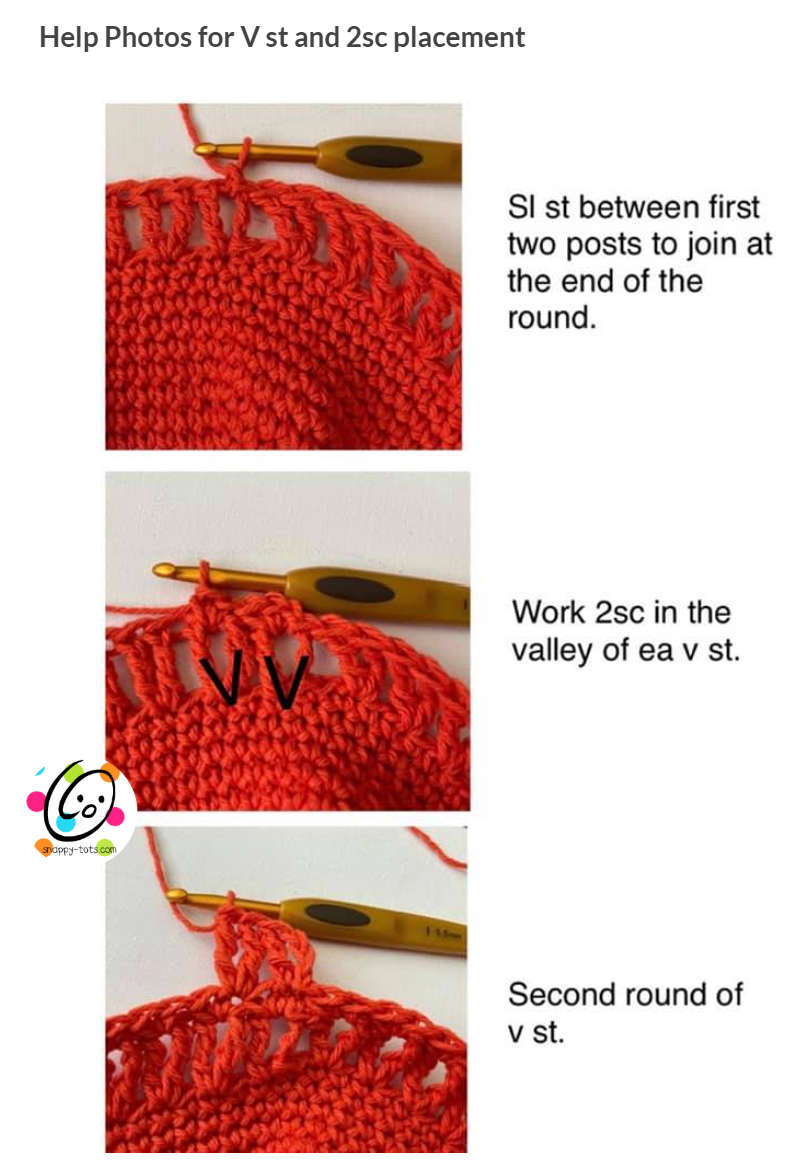
Stitch Placement Help
Regular Bottle Holder
- This is designed to fit an average sized water bottle. Sample bottle measurements: 9” tall x 3” diameter base/32 oz (fit most of the 20-36 oz bottles I tried)
For larger bottles see the XL or custom size instructions.
- Measurements are given at the end of increase rounds 5-6 for a comparison. As long as your measurements are close, this should fit a water bottle of similar measurements.
1. With an H hook and worsted weight yarn (desired color for bottom of bag), start with a magic circle of 8 sts (or preferred method for starting a circle of 8 sc sts. Pull closed and place a marker for working in the round. (8sts)
2. 2sc in each st to end of round. (16sts)
3. *sc, 2sc in next st*, repeat to end of round, sl st to join. (24sts)
4. *sc 3, 2sc in next st*, repeat to end of round, sl st to join. (30sts) 2.25” across
5. *sc 4, 2sc in next st*, repeat to end of round, sl st to join. (36sts) 2.75” across
6. Sc in each st to end of round.
7. Repeat the previous round for an additional 6 rounds.
8. Sl st in the next st. Change to a contrasting color at this point if desired. From this point on, each round will be joined at the end.
Ch 1, sc in the same st and in each st to end of round, sl st in the first st to join.
Help photos for stitch placement for the following rounds are available on page 8.
9. Ch 3 (counts as the first tr and included in the st count), tr in the same st, sk 1, *2tr in the next st, sk 1*, repeat to end of round, sl st between the first two sts to join. Note: Each 2tr will be referred to as a “V st” in future rounds.
10. Ch 1, 2sc between the 2 posts directly below (from step 9), 2sc in the valley of each V st below, sl st in the first st to join. (st count remains as 36sts)
11. Repeat steps 9-10 four more times.
12. Finish off the current yarn and change yarn color if desired. Ch 1, sc in the same st and in each st to end of round, sl st in the first st to join.
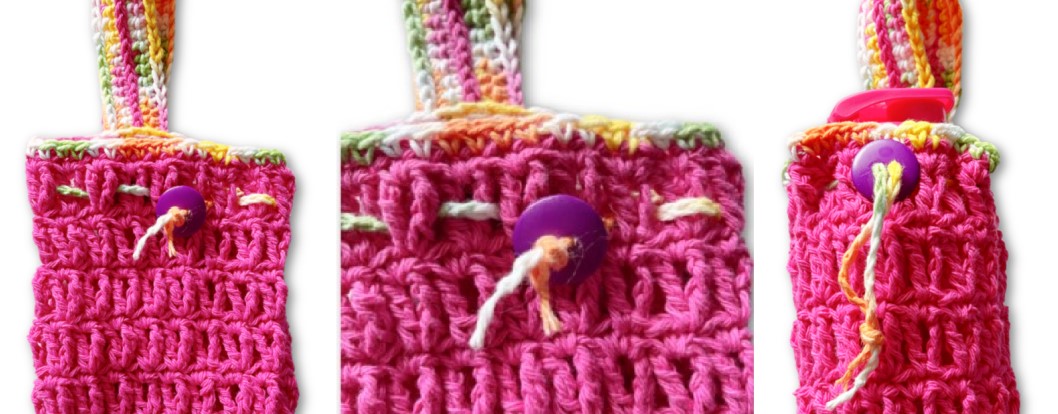
Drawstring (optional)
I added a drawstring for my grand daughter’s bottle holder to help it stay on while she was zooming around with it. I suggest doing this before adding the handle.
See photos below for help with this step.
With an H hook and ww yarn of choice, ch 75. Finish off. Weave one end in and out of the posts from the last V st round. Finish with both ends coming to the outside with a post between.
Pull each end through a hole in the button (or both through a bead with a hold of similar size). Tie a knot in the end of the drawstring.
Skip to “Handle/Strap Options”.
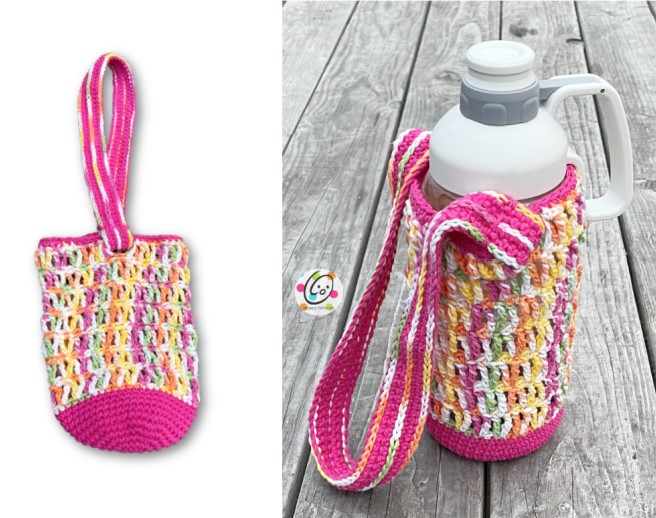
XL Bottle Holder
- This is designed to fit an extra large water bottle. Sample bottle measurements: 10-11.5” tall x 4” diameter base/64 oz
For smaller bottles see the regular or custom size instructions.
- Measurements are given at the end of increase rounds 5-6 for a comparison. As long as your measurements are close, this should fit a water bottle of similar measurements.
1. With an H hook and worsted weight yarn (desired color for bottom of bag), start with a magic circle of 8 sts (or preferred method for starting a circle of 8 sc sts. Pull closed and place a marker for working in the round. (8sts)
2. 2sc in each st to end of round. (16sts)
3. *sc, 2sc in next st*, repeat to end of round, sl st to join. (24sts)
4. *sc 2, 2sc in next st*, repeat to end of round, sl st to join. (32sts)
5. *sc 3, 2sc in next st*, repeat to end of round, sl st to join. (40sts) 3” across
6. *sc 4, 2sc in next st*, repeat to end of round, sl st to join. (48sts) 3.5” across
7. Sc in each st to end of round.
8. Repeat the previous round for an additional 4 rounds.
9. Sl st in the next st. Change to a contrasting color at this point if desired. From this point on, each round will be joined at the end.
Ch 1, sc in the same st and in each st to end of round, sl st in the first st to join.
Help photos for stitch placement for the following rounds are available on page 8.
10. Ch 3 (counts as the first tr and included in the st count), tr in the same st, sk 1, *2tr in the next st, sk 1*, repeat to end of round, sl st between the first two sts to join. Note: Each 2tr will be referred to as a “V st” in future rounds.
11. Ch 1, 2sc between the 2 posts directly below (from step 9), 2sc in the valley of each V st below, sl st in the first st to join. (st count remains as 48sts)
12. Repeat steps 10-11 six more times.
13. Finish off the current yarn and change yarn color if desired. Ch 1, sc in the same st and in each st to end of round, sl st in the first st to join.
Continue to “Handle/Strap Options”.
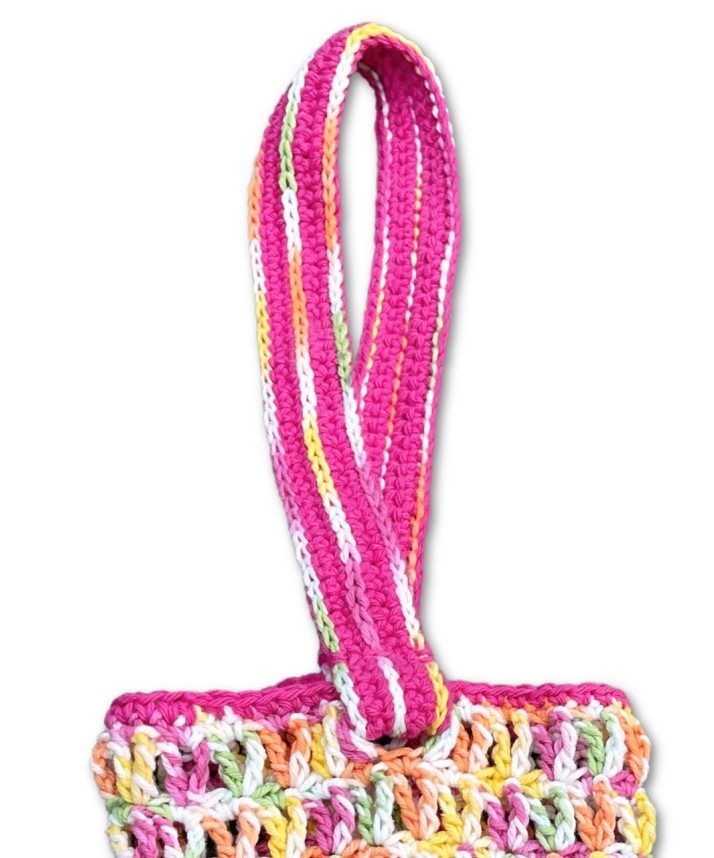
Handle/Strap Options

- For the regular bottle I added a loop to hold, rather than a shoulder strap because I didn’t want my 3 year old grand daughter putting it around her neck.
- For the XL bottle, I added a shoulder strap to make it easier for me to carry when I have all my stuff to move from place to place.
- Either size “handle” could be used for both bottle holders.
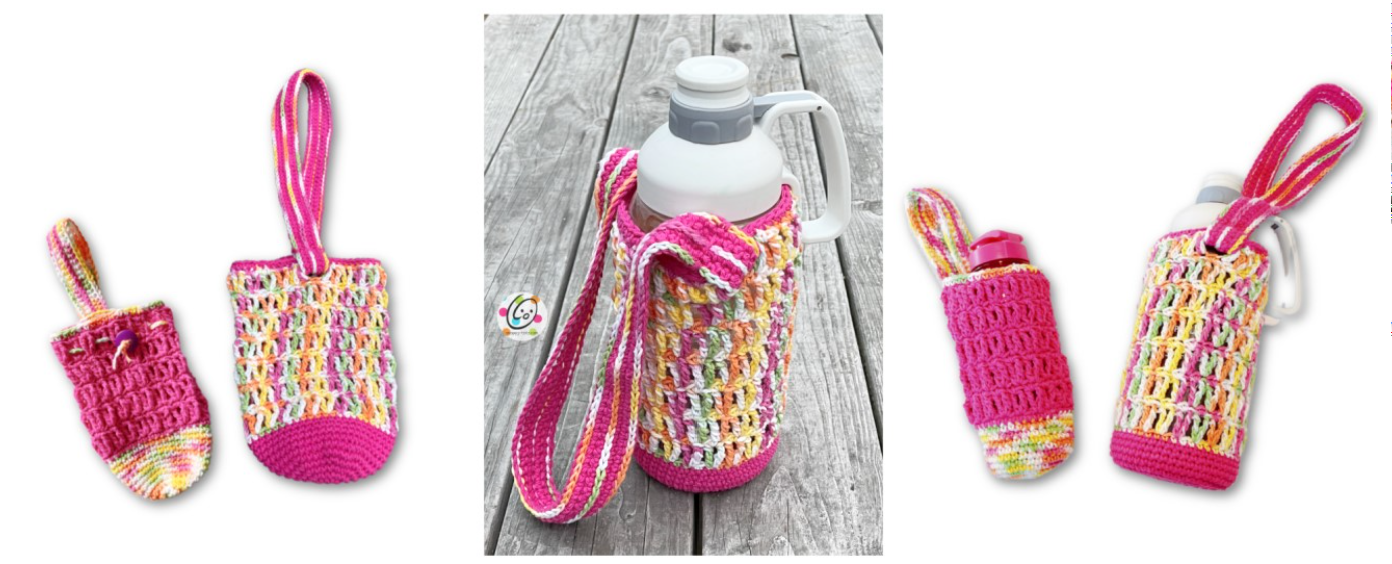
- Both sizes are created the same way and will look similar to the photo below, just different lengths.
Loop Handle
1. With an H hook and ww yarn (variegated in main bag sample), ch 55, sc in the 2nd ch from hook and in each ch across. (54sts)
2-4. Ch 1, turn, sc in the same st and in each st across.
5. The main sample was created in one color. If you would like to trim it with a contrasting color (as shown in the strap sample at the right), finish off and current yarn and change to a contrasting color. Sl st in each st around outer edge, working (sl st, ch 1, sl st) in each corner. Surface crochet down the center of the handle. Finish off and weave in ends.
Note: If a drawstring has been added to the bag, make sure the handle does not get sewn to the drawstring or affect the drawstring’s movement.
With the right side facing up (surface crochet side), fold the handle in half, matching the short ends. Place the short ends next to the outside rim of the bag (opposite of the drawstring opening if applicable).
With a yarn needle and matching yarn, sew the ends to the bag on the outside.
Shoulder Strap
28” long
1. With an H hook and ww yarn (pink in sample), ch 110, sc in the 2nd ch from hook and in each ch across. (109sts)
2-4. Ch 1, turn, sc in the same st and in each st across.
5. Finish off and current yarn and change to a contrasting color. Sl st in each st around outer edge, working (sl st, ch 1, sl st) in each corner. Surface crochet down the center of the strap. Finish off and weave in ends.
Note: If a drawstring has been added to the bag, make sure the strap does not get sewn to the drawstring or affect the drawstring’s movement.
With the right side facing up (surface crochet side), insert one end of the strap between posts of the last round of V sts. Pull through until approximately 1” of the strap overlaps itself on the inside of the bag.
With a yarn needle and matching yarn, securely sew the two layers together.
Repeat for the opposite end of the strap directly across the bag.
Custom Size Bottle Holder
Bottles come in a huge variety of sizes. Please follow the suggestions below if a custom size is needed.
Start with the instructions for the size closest to your bottle. For example, if a smaller holder is needed than the regular size, start with the regular size holder instructions. If a larger holder is needed than the XL size, start with the XL size and make adjustments from there.
For more narrow holders: On the regular holder instructions, after step #4 (with 30sts), skip to step #6. Your holder should have 30sts on each round from that point on. Continue with the pattern as written.
For wider holders: On the XL holder instructions, after step #6 (with 48sts), add more increase rounds. The next round would be: *sc 5, 2sc in next st*, repeat to end of round, sl st to join. (56sts) Increase the underlined number by one each round after that, adding 8 sts per round. PLEASE NOTE: it might not look like it is getting much bigger, but increasing by 8 sts each round your holder will quickly grow. 1-2 rounds should be plenty even for gallon jugs. After the increase rounds, your stitch count will remain the same from that point on. Continue with the pattern as written.
For shorter/taller holders: On the holder instructions for the size closest to your bottle, adjust the amount of times you repeat the 2 rounds that make up the body of the bag (V st round + sc round). Less pairs for a shorter holder and more pairs for a taller holder.
Pin To Save For Later


Heidi, thank you for adding a link and the instructions for getting this on Ravelry. 🙂
” I will be adding this to Ravelry for you to download to your library for free by 5pm mt today, 1/23/24, if you would like to. ”
I tried from 4:30-5:00 PM MTN time, but this was not available on Ravelry. Did it end early, was there a problem on Ravelry, or is there some other reason it wasn’t available? I would love to have this in my Ravelry library, if possible.
Thanks!
Not on Ravelry. 8:35 PM MST. Will you be extending the date? Thanks!