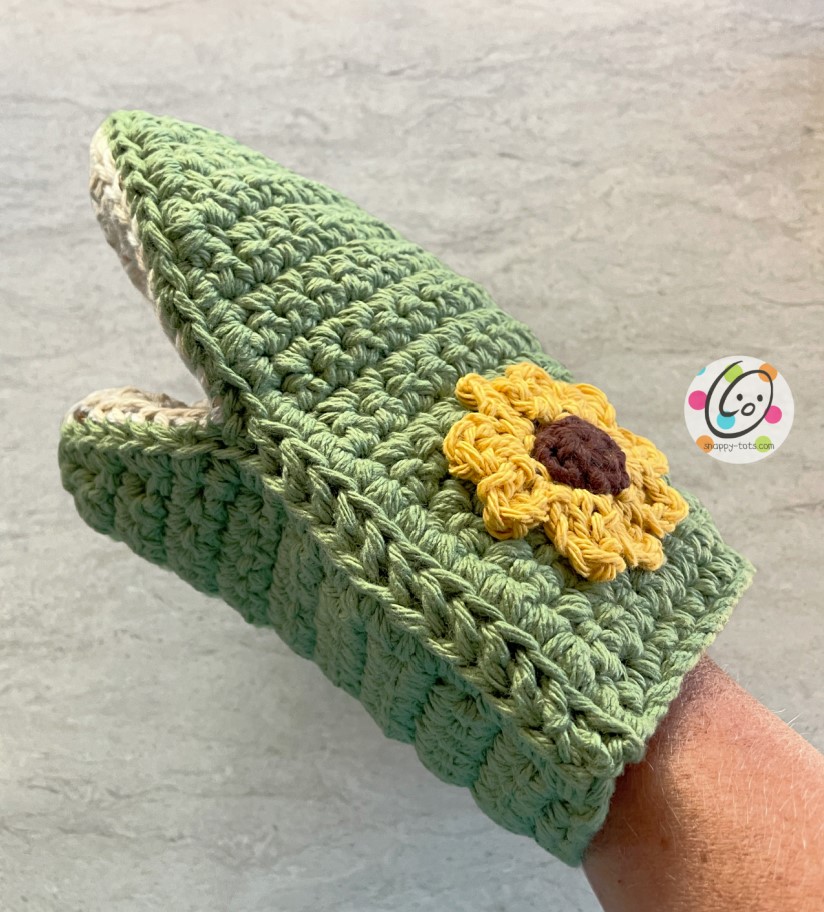
Helping Hand Mitt
I love when snappy friends create amazing things from my patterns and send me a photo. Look at this goosey version of this mitt! It’s funny to think that just a change in color and a goose is born!

Do you use hot pads or oven mitts? I have always used hot pads. I think I am too lazy to slip that mitt on… yes, I know it takes very little effort. My youngest son has always preferred oven mitts and that is the only thing he will use. I think it comes from burning his hand twice (10 minutes apart) when making cookies at a friend’s house when he was little. He asked me why I never make them, so here it is! I made one for my oldest son (without the sunflower) to use when dutch oven cooking.

I thought this would be a fun piece for a fall blog hop. It will be great for end of season cook outs and then keep it around for Thanksgiving. It would be a great hostess gift too!
Similar Patterns You Might Enjoy
- Pan Grabbers (paid pattern)
- Monster Bath Mitt (free on my blog)
Helping Hand Mitt Crochet Pattern
The pattern is available to follow along below. An ad-free, downloadable pdf is also available to purchase for a small fee. https://www.ravelry.com/patterns/library/helping-hand-mitt
Description: This is designed to use as a pan grabber/hot pad. It could also be used in the bath as a scrubby mitt. I am currently making a scrubby version with Bernat Blanket yarn and a K hook. I will share pix when available.
Materials and Details
- Yarn: 200-250 yards worsted weight COTTON yarn in color(s) of choice
- Crochet Hooks: H (5mm), J (6mm)
- Miscellaneous: yarn needle, pins for holding pieces together for assembly
- Measurement: 8” long x 6” wide
- Gauge: 4” with 2 strands and a J hook = 12 sc sts, 13 rows sc
Tips
- The number at the beginning of each line refers to the step and not the number of rows.
- Stitch counts remain the same unless noted at end of row.

Directions
- It is important to use yarn that can handle heat. I have found 100% cotton yarn works great.
- This project is includes 3 pieces for the mitt. These 3 pieces are each made using 2 strands of yarn held together.
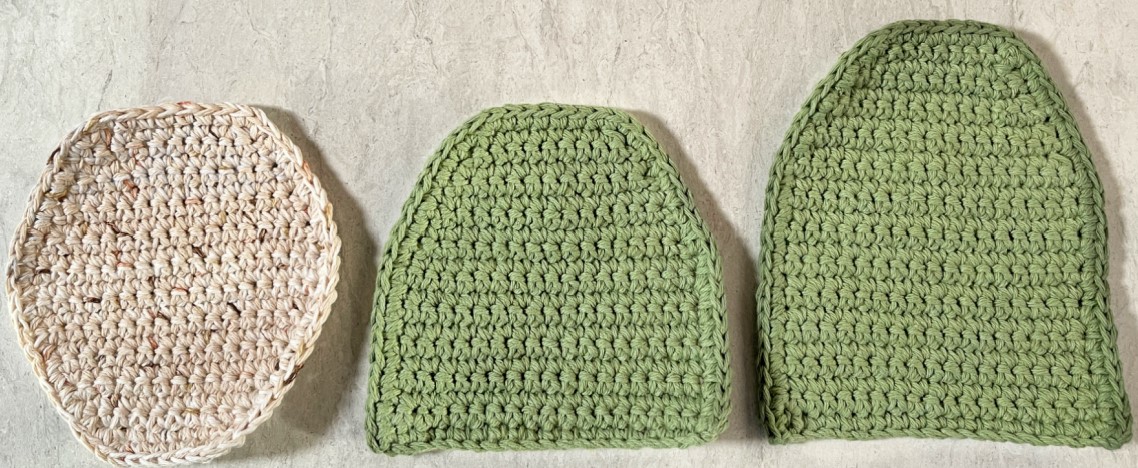
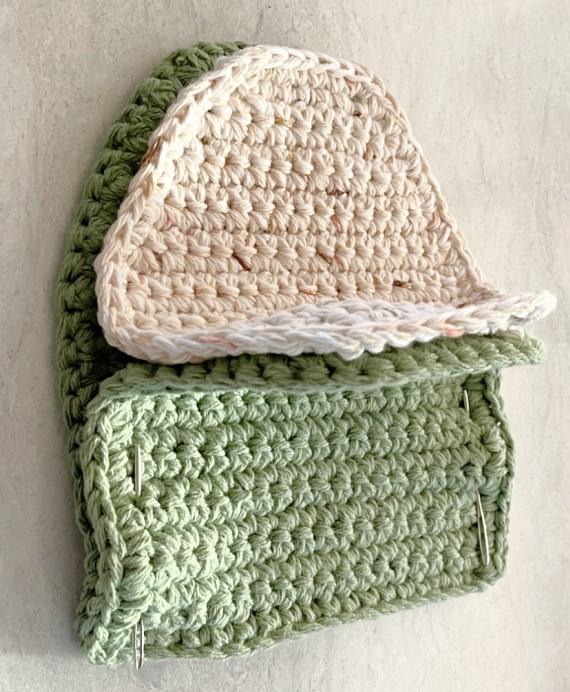
Tall Piece (above right)
1. With a J hook and 2 strands worsted weight cotton yarn (green in sample), ch 19, sc in the 2nd ch from hook and in each ch across. (18sts)
2. Ch 1, turn, sc in the same st and in each st to end of row.
3. Repeat the previous row for an additional 14 rows.
4. Ch 1, turn, sc2tog, sc in each st until 2 sts remain, sc2tog. (16sts)
5. Ch 1, turn, sc in the same st and in each st to end of row.
6. Ch 1, turn, sc2tog, sc in each st until 2 sts remain, sc2tog. (14sts)
7. Ch 1, turn, sc in the same st and in each st to end of row.
8. Ch 1, turn, sc2tog, sc in each st until 2 sts remain, sc2tog. (12sts)
9. Ch 1, turn, sc in the same st and in each st to end of row.
10. Ch 1, turn, sc2tog, sc in each st until 2 sts remain, sc2tog. (10sts)
11. Ch 1, turn, sc2tog, sc in each st until 2 sts remain, sc2tog. (8sts) Finish off and weave in ends.
12. This step is worked around the outer edge of the piece.
With a J hook, attach 2 strands of the same yarn to the bottom right corner to work up the side of the piece (NOT across the row). Ch 1, sc in the same st, evenly sc up the side of the piece (one sc at the end of each row).
2sc in the first st of the last row (step #11), sc 6, 2sc in the last st, evenly sc down the side of the piece (one sc at the end of each row). Finish off and weave in ends. Set aside.
Short Piece (photo above, middle)
1. With a J hook and 2 strands worsted weight cotton yarn (green in sample), ch 19, sc in the 2nd ch from hook and in each ch across. (18sts)
2. Ch 1, turn, sc in the same st and in each st to end of row.
3. Repeat the previous row for an additional 9 rows.
4. Ch 1, turn, sc2tog, sc in each st until 2 sts remain, sc2tog. (16sts)
5. Ch 1, turn, sc in the same st and in each st to end of row.
6. Ch 1, turn, sc2tog, sc in each st until 2 sts remain, sc2tog. (14sts)
7. Ch 1, turn, sc in the same st and in each st to end of row.
8. Ch 1, turn, sc2tog, sc in each st until 2 sts remain, sc2tog. (12sts)
9. Ch 1, turn, sc in the same st and in each st to end of row.
10. Ch 1, turn, sc2tog, sc in each st until 2 sts remain, sc2tog. (10sts)
11. Ch 1, turn, sc2tog, sc in each st until 2 sts remain, sc2tog. (8sts) Finish off and weave in ends.
12. This step is worked around the outer edge of the piece.
With a J hook, attach 2 strands of the same yarn to the bottom right corner to work up the side of the piece (NOT across the row). Ch 1, sc in the same st, evenly sc up the side of the piece (one sc at the end of each row).
2sc in the first st of the last row (step #11), sc 6, 2sc in the last st, evenly sc down the side of the piece (one sc at the end of each row). Finish off and weave in ends. Set aside.
Middle Piece (photo above, left)
1. With a J hook and 2 strands worsted weight cotton yarn (green in sample), ch 9, sc in the 2nd ch from hook and in each ch across. (8sts)
2. Ch 1, turn, 2sc in the same st, sc 6, 2sc in the last st. (10sts)
3. Ch 1, turn, 2sc in the same st, sc 8, 2sc in the last st. (12sts)
4. Ch 1, turn, sc in the same st and in each st to end of row.
5. Ch 1, turn, 2sc in the same st, sc 10, 2sc in the last st. (14sts)
6. Ch 1, turn, sc in the same st and in each st to end of row.
7. Ch 1, turn, 2sc in the same st, sc 12, 2sc in the last st. (16sts)
8. Ch 1, turn, sc in the same st and in each st to end of row.
9. Ch 1, turn, 2sc in the same st, sc 14, 2sc in the last st. (18sts)
10. Ch 1, turn, sc in the same st and in each st to end of row.
11. Repeat the previous row for an additional 3 rows.
12. Ch 1, turn, sc2tog, sc in each st until 2 sts remain, sc2tog. (16sts)
13. Ch 1, turn, sc in the same st and in each st to end of row.
14. Ch 1, turn, sc2tog, sc in each st until 2 sts remain, sc2tog. (14sts)
15. Ch 1, turn, sc in the same st and in each st to end of row.
16. Ch 1, turn, sc2tog, sc in each st until 2 sts remain, sc2tog. (12sts)
17. Ch 1, turn, sc in the same st and in each st to end of row.
18. Ch 1, turn, sc2tog, sc in each st until 2 sts remain, sc2tog. (10sts)
19. Ch 1, turn, sc2tog, sc in each st until 2 sts remain, sc2tog. (8sts) Finish off and weave in ends.
20. This step is worked around the outer edge of the piece.
With a J hook, attach 2 strands of the same yarn to the bottom right corner to work up the side of the piece (NOT across the row). Ch 1, sc in the same st, evenly sc up the side of the piece (one sc at the end of each row).
2sc in the first st of the last row (step #19), sc 6, 2sc in the last st, evenly sc down the side of the piece (one sc at the end of each row). Finish off and weave in ends. Set aside.
Assembly
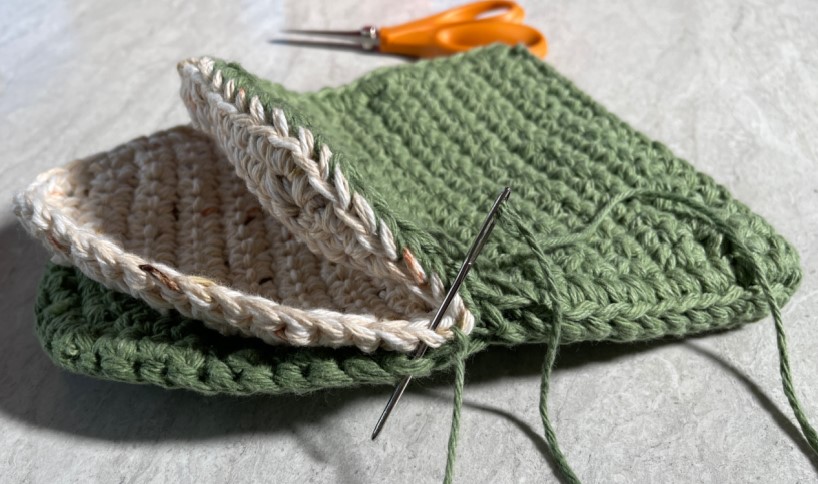
1. Place the tall and short pieces, wrong sides together, and pin the straight edges (see photo below left).
2. Pull the top edge of the small piece back (see photo below middle). With wrong sides together, place the middle piece between the tall and short pieces. Pin the top edges together.
3. Fold the small piece back in place (see photo below right)
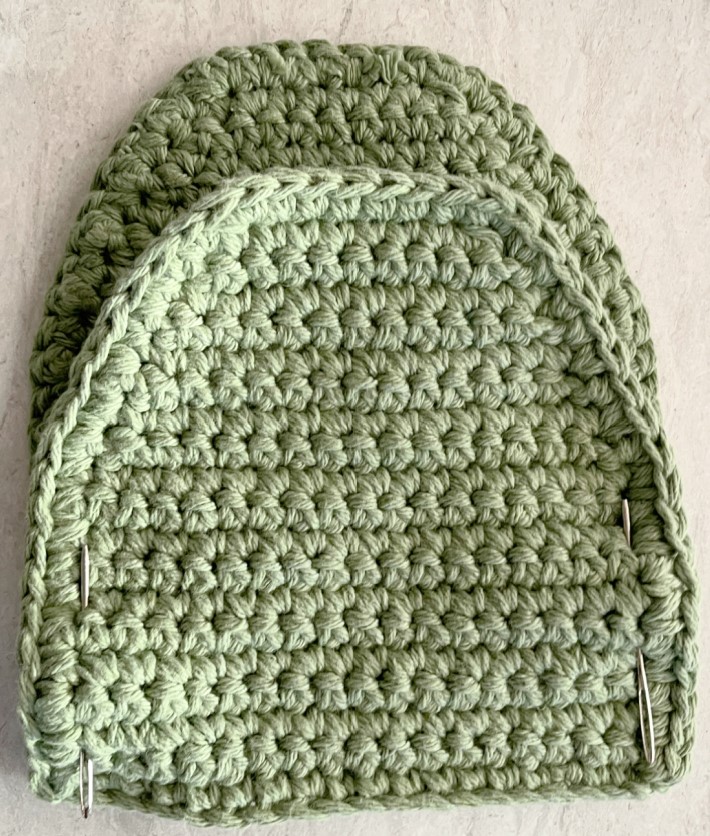

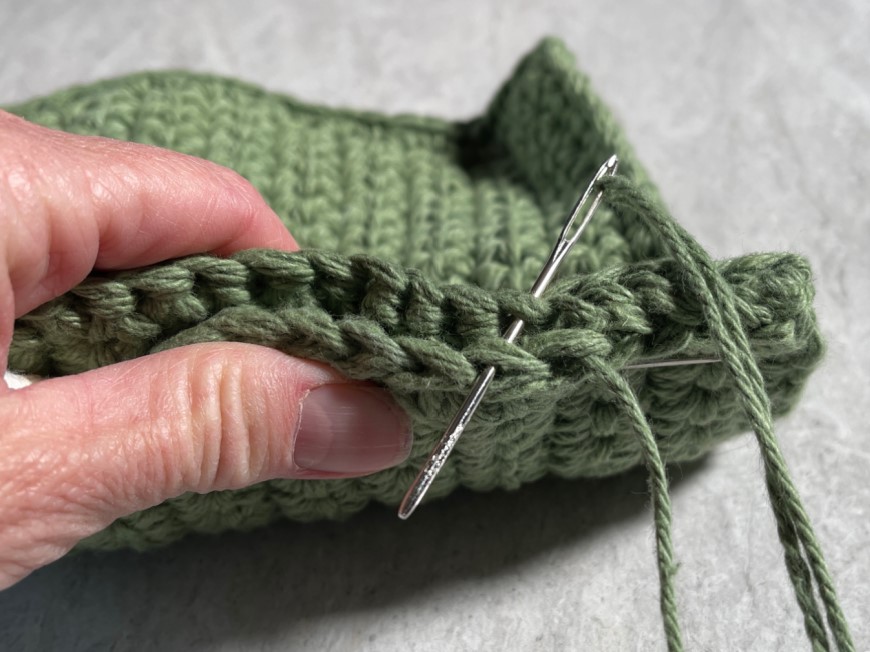
4. With one strand of matching yarn and a yarn needle, sew the straight sides of the tall and short pieces together. Tip: insert the needle through the closest loops, not the full stitch (see photo below left)
Sew the top part of the short piece to the middle piece the same way (see photo below right).
Continue to sew all of the layers together, except the bottom edge.
Sunflower
1. With an H hook and one strand of worsted weight yarn for the center (brown in sample), start with a magic circle of 5 sc sts (or preferred method of starting a circle of 5 sc sts), pull to close and sl st to join. (5sts)
2. Ch 1, 2sc in each st to end of round, sl st to join. (10sts) Finish off, leaving a long tail for sewing in place.
3. Switch to worsted weight yarn for the petals (yellow in sample). *ch 2, (dc, ch 3, sl st) in the next st*, repeat to end of round. Finish off, leaving a long tail for sewing in place.
With a yarn needle, use the yarn tail from the center of the flower to sew the center to the mitt.
Use the yarn tail from the petals to sew the middle or tips of the petals to the mitt to help the flower stay flat.