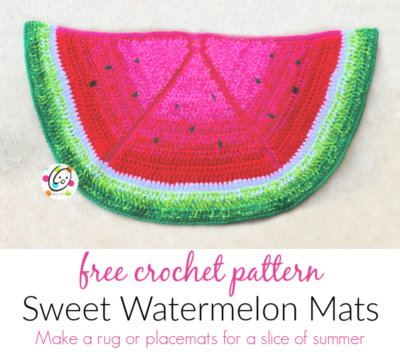
Free Pattern: Watermelon Mats
I love decorating with watermelon and citrus from late spring until I can start getting out my Halloween. I have always thought a watermelon rug would be cute for the front porch so this year I made one. It turned out just how I imagined… which rarely happens.
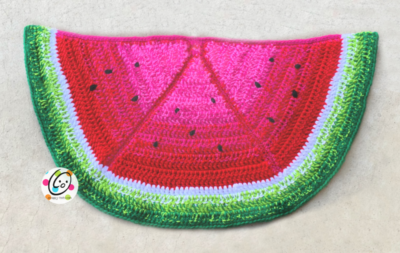
I used to tole paint a lot and when painting melons I would always start with pink in the middle and work my way to deeper reds toward the rind. I created that same look here by using three strands of yarn and changing the colors at different points.
If you make a sweet rug or placemat I hope you will share pix. I am working up a melon wedge as a washcloth and it is turning out super cute too! I will add more pix soon. Tag your projects with #CelebrateMomBlogHop and #snappytots when sharing on social media.
Sweet Watermelon Mats
Instructions included to make a watermelon placemat, doormat or pillow.
An ad-free, downloadable PDF which includes all of the photos and instructions is available to purchase from my
Ravelry store.Materials
- Worsted Weight Yarn: yarn totals are for the large melon rug. 300 yards light pink, 300 yards medium pink, 300 yards red, 200 yards white, 300 yards lime green, 200 yards dark green
- Sample colors: Light Pink – RHSS Pretty N Pink; Medium Pink – RHSS Shocking Pink; Red – RHSS Cherry; RHSS White; Lime Green – RHSS Spring Green; Dark Green – RHSS Paddy Green
- Crochet Hooks: H (5mm), I (5.5mm), J (6mm)
- Notions: Yarn needle, stuffing (optional for pillow version)
- Optional: Measuring tape, scissors
Measurements
- Finished Measurements: Full Melon in 3 strands with a J hook – 35” across x 16” high
- Gauge: not needed for this project.
Tips – Please read before you begin the project.
- First stitch of each row is worked into the same stitch as the turning chain.
- Numbers at the beginning of each line may refer to steps and not indicate number of rows.
- Stitch count remains the same unless noted at end of row/round.
- Changing yarn color: Throughout the pattern, yarn colors are changed frequently. Sometimes ⅓ of the strands remains. Make sure to leave at least 3” long yarn tails for weaving in later.
- If you have any questions about this pattern please contact [email protected].
Directions
- Doormat (make one full melon/ 3 wedges)
- Pillow (make two full melons/ 6 wedges)
- Placemat: Use an H or an I hook and follow instructions for creating one full melon/ 3 wedges)
Watermelon wedge (make 3 per full melon)
- With a J hook and 2 strands light pink yarn plus 1 strand medium pink yarn, ch 3, 3dc in last ch. (3sts)
- Ch 2, turn, 2dc in same st, dc, 2dc in last st. (5sts)
- Ch 2, turn, 2dc in same st, dc 3, 2dc in last st. (7sts)
- Ch 2, turn, 2dc in same st, dc 5, 2dc in last st. (9sts)
- Ch 2, turn, 2dc in same st, dc 7, 2dc in last st. (11sts)
- Ch 2, turn, 2dc in same st, dc 9, 2dc in last st. (13sts)
- Ch 2, turn, 2dc in same st, dc 11, 2dc in last st. (15sts)
- Ch 2, turn, 2dc in same st, dc 13, 2dc in last st. (17sts)
- Change to 1 strand light pink yarn plus 2 strands medium pink yarn. Ch 2, turn, 2dc in same st, dc 15, 2dc in last st. (19sts)
- Ch 2, turn, 2dc in same st, dc 17, 2dc in last st. (21sts)
- Change to 2 strands medium pink yarn plus 1 strand red yarn. Ch 2, turn, 2dc in same st, dc 19, 2dc in last st. (23sts)
- Ch 2, turn, dc in same st and in each st to end of row.
- Ch 2, turn, 2dc in same st, dc 21, 2dc in last st. (25sts)
- Change to 2 strands red yarn plus 1 strand medium pink yarn. Ch 2, turn, dc in same st and in each st to end of row.
- Ch 2, turn, 2dc in same st, dc 23, 2dc in last st. (27sts)
- Change to 3 strands red yarn. Ch 2, turn, dc in same st and in each st to end of row.
- Ch 2, turn, 2dc in same st, dc 25, 2dc in last st. (29sts)
- Ch 2, turn, dc in same st and in each st to end of row. Cut 2 strands of the red yarn.
- This step is worked around the outer edge of the wedge. Pick up one strand of medium pink yarn with the remaining red yarn. Ch 1, pivot piece to the left to work across the edge. Sc evenly to the tip of the wedge (approximately 36sts), 3sc in tip of wedge. Sc evenly down the second edge of the wedge, working the same amount of sts as the first edge. (sc, ch 1, sc) in the first st of the bottom edge, sc in each st across until 1 st remains, (sc, ch 1) in last st, sl st in first st of round. Finish off and weave in ends.
Assembly Instructions
TIP: When sewing the wedges together, It helps if the tip of the center wedge extends past the other wedges slightly.
With right sides together, line up one side edge of two pieces. Use a yarn needle and medium pink yarn to sew the two layers together along one side only.
Open the piece up. Lay the third piece on top of one of the wedges, right sides together. Use a yarn needle and medium pink yarn to sew the two layers together along one side only.
NOTE: The wedges may bulge a little after pieces are sewn together. Give the whole piece some tugs to shape.
Top Edge: With a J hook, attach 3 strands of medium pink yarn to the right corner of the top edge. Ch 1, sc in same st, sc in each st across first wedge. Hdc2tog (start in tip of first wedge and end in seam between 1st and 2nd wedges). 2hdc in tip of middle wedge. Hdc2tog (start in seam between 2nd and 3rd wedges and end in tip of third wedge). Sc in each st to end of row. Finish off and weave in ends.
Rind
- Pivot the piece to work across the rounded, bottom edge of the melon. With a J hook, attach 3 strands of white yarn to the right corner of the bottom edge (right next to where the top edge ended). Ch 2, dc in same st, dc 9, 2dc in next st, dc 10, 2dc in next st, dc 9, dc2tog (at seam), dc 10, 2dc in next st, dc 10, 2dc in next st, dc 9, dc2tog (at seam), dc 10, 2dc in next st, dc 10, 2dc in next st, dc 10. (102 sts)
- Change to 1 strand white plus 2 strands lime green. Ch 2, turn, dc in same st, dc 5, *2dc in next st, dc 11*, repeat to end of row. (110sts)
- Change to 2 strands lime plus 1 strand dark green. Ch 2, turn, dc in same st, dc 9, 2dc in next st, *dc 10, 2dc in next st*, repeat to end of row. (120sts)
- Change to 1 strand lime plus 2 strands dark green. Ch 2, turn, dc in same st, *2dc in next st, dc 16*, repeat to end of row. (127sts)
- Change to 3 strands dark green. Ch 1, turn, sc in same st, *2sc in next st, sc 17*, repeat to end of row. (134sts). Finish off and weave in ends.
Seeds
With a yarn needle, use a long strand of black yarn to create the seeds by taking a few stitches in a tear shape. Place these randomly across the melon.
Pin For Later