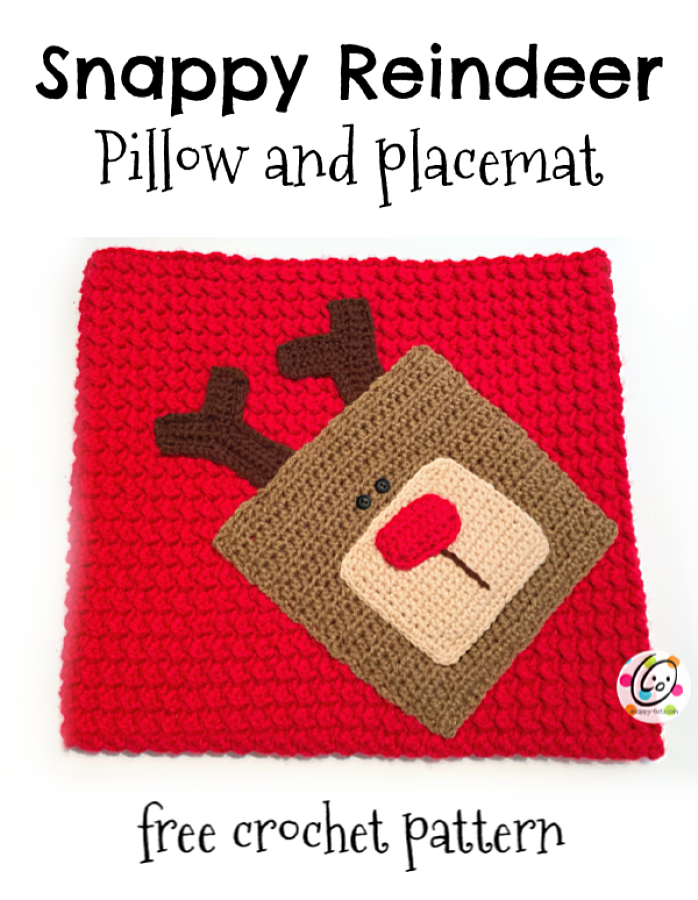
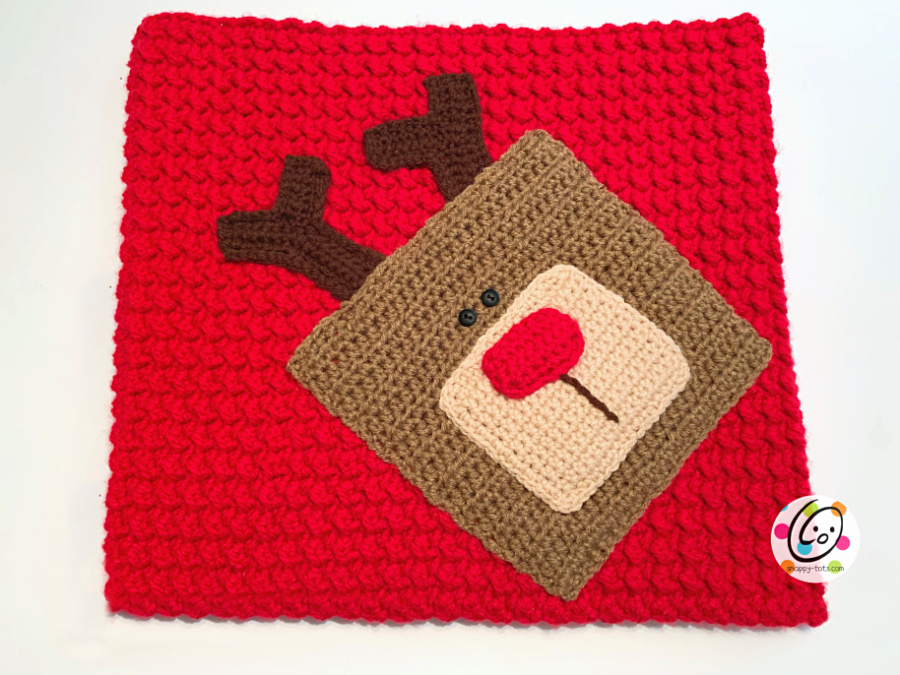
This fall I made a wrap for my patriotic throw pillows so they would be more fall and cozy. Now that I am putting out my Christmas decorations I wanted a more festive look for those same pillows. A simple reindeer and nubby texture did the trick! (wait til you see the one for the other end of my couch!)
Snappy Reindeer Pattern
An ad-free, downloadable PDF which includes all of the photos and instructions is available to purchase from my Ravelry Shop: Click HERE
Materials and Details
- Yarn: 350 yards bulky weight red yarn, 100 yards medium brown, 50 yards light brown, 50 yards dark brown, small amount of bulky weight or worsted weight red yarn.
Sample: Red Heart Super Saver Chunky yarn – 2.25 skeins Holly Berry. Red Heart Super Saver Cafe Brown, Tan, Coffee - Crochet Hook: I, J
- Notions: Removable wrap version – 6 buttons (1.5-2″), yarn needle for weave in ends, 4-6 sew on snaps (size 4)
Notions: Pillow Version – 15″ square pillow/pillow form - Measurement (flat, unfolded): 15″ wide x 35.5″ long
Tips
- The first stitch of each row is worked into the same st as the turning chain.
- Stitch counts remain the same unless noted at end of row.
Pillow Base – Choose from one of the following options:
Pillow Wrap (removable version)
1. With a J hook and bulky weight yarn, ch 47, sc in 2nd ch from hook and in each ch across. (46sts)
2. Ch 1, turn, sc in same st and in each st to end of row.
3-7. Ch 1, turn, sc in same st and in each st to end of row.
8. Ch 2, turn, hdc in same st, *sl st in next st, hdc in next st*, repeat until 1 st remains, sl st in last st.
Note: Be careful to not work the sl st too tight.
9. Repeat previous row until piece measures 34″ from beginning edge.
10-11. Ch 1, turn, sc in same st and in each st to end of row.
12. Ch 1, turn, sk first st, sl st in each st to end of row, making sure to not work the sts too snug. Finish off and weave in ends.
Pillow
1. With a J hook and bulky weight yarn, ch 47, sc in 2nd ch from hook and in each ch across. (46sts)
2. Ch 1, turn, sc in same st and in each st to end of row.
3. Ch 2, turn, hdc in same st, *sl st in next st, hdc in next st*, repeat until 1 st remains, sl st in last st.
Note: Be careful to not work the sl st too tight.
4. Repeat previous row until piece measures 32″ from beginning edge.
5. Ch 1, turn, sc in same st and in each st to end of row.
6. Ch 1, turn, sk first st, sl st in each st to end of row, making sure to not work the sts too snug. Finish off leaving a long yarn tail in the end.
Features
Reindeer Head
1. With an I hook and medium brown yarn, ch 28, sc in 2nd ch from hook and in each ch across. (27sts)
2. Ch 2, turn, hdc in same st and in each st to end of row. (27sts)
3. Repeat previous row for an additional 17 rows.
4. Ch 1, turn, sc in same st and in each st to end of row. Finish off, leaving a long tail for sewing.
Muzzle
1. With an I hook and light brown yarn, ch 18, sc in 2nd ch from hook and in each ch across. (17sts)
2. Ch 1, turn, sc in same st and in each st to end of row.
3. Repeat previous row for an additional 12 rows.
4. Ch 1, turn, sc in same st and in each st until 1 st remains, 2sc in last st. (18sts) Finish off, leaving a long tail for sewing.
Nose
1. With a J hook and red bulky yarn (from pillow base) or 2 strands ww red yarn, ch 8, sc in 2nd ch from hook and in each ch across. (7sts)
2. Ch 1, turn, 2sc in same st, sc 5, 2sc in last st. (9sts)
3. Ch 1, turn, sc in same st and in each st to end of row.
4. Ch 1, turn, sc2tog, sc 5, sc2tog. (7sts) Finish off, leaving a long tail for sewing.
Antlers (make 2)
1. With an I hook and dark brown yarn, ch 18, sc in 2nd ch from hook and in each ch across. (17sts)
2. Ch 1, turn, sc in same st and in each st to end of row.
3. Ch 1, turn, sc in same st, sc 7, hdc 6, dc 3.
4. Ch 2, turn, hdc in same st, hdc 3, sc 5, sl st in next st. This step creates a “branch”. Ch 8, sc in 2nd ch from hook and in each ch back towards trunk, sl st in next st on trunk.
5. Ch 1, turn, sc in same st and in each st to end of branch.
6. Ch 1, turn, sc in same st and in each st down branch and trunk toward short end.
7. This step is worked around the outer edge of the branch.
First branch: Ch 1, sl st in each st around outer edge, working (sl st, ch 1, sl st) in each corner. At end of round, finish off, leaving a long tail for sewing.
Second branch. Ch 1, turn, sl st in each st around outer edge, working (sl st, ch 1, sl st) in each corner. At end of round, finish off, leaving a long tail for sewing.
Assembly
Place the pieces on the pillow base to find placement. With a yarn needle, use each yarn tail to sew each piece in place, starting with the head piece.
The reindeer in the sample is sewn at a diagonal. For the button version, the head could be sewn so the button flap overlaps the side of the reindeer.
Eyes: With a sewing needle and black thread, sew each button in place.
Mouth: With a yarn needle and dark brown yarn, stitch the mouth line in place.
Closure: Pillow Wrap Version
Note: For a full time pillow instead of a removable cover, skip down to “full time pillow”.
The buttons can be sewn the the beginning section and slipped through the last cluster row. For the sample, I chose to sew the buttons on the outer edge and used snaps to connect the layers. Why? It kept the layers together from edge to edge and more secure.
With a sewing needle and matching thread, sew each button to the outer edge (last rows). Sew one half of snaps to the opposite side of where the buttons are sewn.
Fold the ends toward each other to check placement of the other half of the snaps. Sew the other half of the snaps on the opposite end and side of the piece.
Wrap the piece around a pillow and snap into place. Project complete.

Full Time Pillow
Fold piece in half with right sides together. With a yarn needle and matching yarn, sew 2 of the edges together.
Turn piece right side out and insert pillow form or stuffing.
Sew remaining edge closed.
Variation
Placemat: Follow main instructions for the “pillow” version. Repeat step #4 until piece measures 20” or desired length.
Pin To Save For Later