

The first crochet patterns I wrote as Snappy Tots were these birds. My neighbor’s little boy loved the game and wanted the set. It was fun and I hope you will enjoy these free patterns.
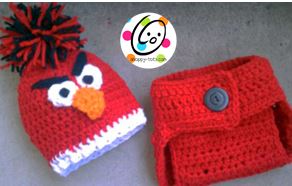
Red Bird Diaper Set
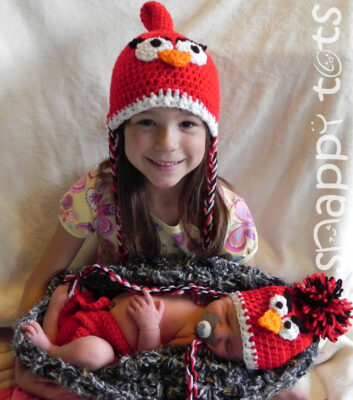
All sizes for the hat are included, but the diaper cover is only for sizes up to 24 months.
Materials:
Worsted weight yarn, in red, black, white and orange
Hooks: H, I
Yarn needle
For smaller sizes, F or G hook could be used for some facial features.
Important Note: There are three variations for the top. Two begin here, with the long tail. At the end, either attach a pompom and leave it down or follow instructions and sew it up for top “feathers”. For the pompom top variation (as shown above) begin with the “basic beanie” instructions below.
Directions for all sizes:
Note: Do not join at the end of each round, unless stated. This hat is worked in a continuous round to avoid a “seam” look.
Starting at the tail: With red yarn and size H hook, ch 6,
join to form ring (or use a magic loop).
Sc each stitch until 3” in length. Do not join at the end of each row.
2sc in next stitch. Sc each stitch for one inch repeat. Piece should measure approx 5” now.
Change to size I hook. Place a marker (small piece of contrasting yarn works great). 2 sc in next stitch (7sts). Continue to sc around for an additional 6” (2-4” for smaller sizes) (measure from marker).
Move marker to current position.
Increase rounds: (move marker after each round to keep track of first st of round)
1. 2sc, sc 3, 2sc, sc 2,. (9sts)
2-3. sc to end of round.
4. 2sc, sc 4, 2sc, sc 3. (11sts)
5-6. sc to end of round.
7. 2sc, sc to end of round (12sts)
8. sc 1, 2 sc in next sc, repeat to end of round. (18sts)
9. sc 2, 2 sc in next sc, repeat to end of round. (24sts)
10. sc 3, 2 sc in next sc, repeat to end of round. (30sts) newborn
11. sc 4, 2 sc in next sc, repeat to end of round. (36sts) 3-6 mths
12. sc 5, 2 sc in next sc, repeat to end of round. (42sts) 6-12 mths
13. sc 6, 2 sc in next sc, repeat to end of round. (48sts) 12-24 mths
14. sc 7, 2 sc in next sc, repeat to end of round. (54sts) Child/preteen
15. sc 8, 2 sc in next sc, repeat to end of round. (60sts) Teen/Adult
16. sc 9, 2 sc in next sc, repeat to end of round. (66sts) Large adult
When increase rows for desired size have been reached, do not join. Remove marker and hdc each stitch until hat (measure from top of rounded hat, as if the tail were not there) is the following length:
Newborn: 4”; 3-6 mths: 5”; 6-12 mths: 6”; 12-24 mths: 6.5”; Child/preteen: 7”; Adult: 7.5-8”
End current row with a sl st and cut red yarn, leaving a 2” tail. Using safety pins (or visually) divide hat into thirds. This does not have to be exact.
With white yarn, ch 2. Hdc each stitch in the first third section, covering red tail along the way. Dc each stitch of the second second. Hdc each stitch of the third section, join at end of round.
Ch 2, FPDC (front post double crochet) in next st then, BPDC (back post double crochet) in next st, repeat to end of round. Repeat if larger band is desired, or if hat is too short. If it is too long, simply fold the bottom up.
Note: Use an H hook unless noted (for toddler size and smaller, an F or G hook may be used if features are too big).
Eyes (make 2): With white, Ch 5 (or magic loop), join and pull closed. Ch 1, 2sc in each stitch around (10sts). Ch 2, hdc, 2hdc repeat to end of round. (15sts). Finish off, leaving a long tail for attaching. Refer to picture and using the remaining yarn and yarn needle, stitch around the outside of each eye.

Brows (make 2): With black, Ch 9, turn and sc in first ch from hook next 2 chs. Sl st in remaining chs to end. Finish off, leaving a long tail for attaching. Refer to picture for placement of eyebrows and pin in place if necessary. Its important these are placed at a slant. Use remaining yarn to stitch in place.
Beak: With orange, chain 7. Turn and working across chain, sc2tog, sc 2, sc2tog. Turn, ch 1, sc across. Turn, Ch 1, yo, pull up a loop in first st (do not pull yarn through any sts on the hook yet), then again in 2nd and 3rd sts. Now, pull yarn through all loops on the hook. Cut, leaving a long tail for attaching to hat. In the sample, only the top of the nose was sewn. This way the beak sticks out. It could be stitched all the way around if desired.
Pupils (make 2): With G hook and black, leave a 3” tail and Ch 3 (or magic loop), join and pull closed. Finish off, leaving a 3” tail for attaching. Place pupil in middle of eye. Pull strands down through middle, each yarn slightly apart from the other so it doesn’t pull right through. From the inside of the hat, tie the two ends into a secure knot. Tight, but not so tight it pulls them in.
Attaching features: Using a yarn needle and long tail of each item, stitch in place. .
Top Feathers: Slightly tug at the tip of the hat to straighten it. To create the feathers, this tail part will be looped twice and stitched in place. Play with it a couple of times before stitching to get your feathers the way you want them…I did the first one longer than the second and left a small tail sticking out. I used a long length of red yarn and a yarn needle to sew them in place. It hides well and cannot be seen. I DID NOT sew completely through the fattest part of the tail (part closest to the top of beanie. Stitch until secure. Look at patterns for placement. Remember, birds feathers are all different and they do not take hours to style them. No stress.
Tail: Fold hat in half, in between the eyes, to find the middle of the back. With two strands of black and H hook, slip st around a stitch approximately 2” up from the bottom. Use tail to tie a knot close to the sl st, then pull the remaining tail to the inside of the hat. Ch 12, turn and sc in first ch from the hook and across. Sl st in a st on the hat next to the first one, being careful not to twist the chain (first loop/feather). Ch 11, turn and sc in first ch from the hook and across. Sl st in a st on the hat next to the first two. Watch placement so the loops sit well together. Ch 10, turn and sc in first ch from the hook and across. Sl st in same st and finish off. Pull end to inside and tie a firm knot. Weave in ends.
Braids (optional): My son said these look like legs. I used 2, 20” strands of each: red, white, black. Fold hat in half to find placement. Use a yarn needle to pull end through one side. Pull through until even with other end and braid. Repeat for other side.

PomPom
Hold one strand of each color, and wrap 20-30 times around the palm of your hand (wrap more times for a thicker pom). Carefully slide the yarn off your hand and wrap an 8” length of yarn around the center, pulling tight and knotting to hold in place. Do NOT cut this piece of yarn. Cut loops of pompom. Sometimes I leave a few or all loops uncut for a whimsical pompom. Thread end of the yarn you tied around the pom through a yarn needle. Pull through end of hat. Firmly tie a knot next to the hat. Trim pompom as desired. A piece of cardboard or pompom maker may also be used.
Note: The pompom in the picture is loosely attached and looks messier than normal.
For a whimsy pom: Include a novelty yarn, such as fun fur, in your beginning wrap. When trimming pom, only cut some loops.
By changing colors and stripe patterns, this hat takes on a fun new look. Great for Christmas hats or for sports fans in their team colors too!
Basic Beanie (start here for pompom top variation)
With desired color and H hook, Ch 6 (or magic loop), join and pull closed. 2sc in each stitch around (12sts).
Start with row #8 above and follow instructions to end.
~~~~~~~~~~~~~~~~~~~~~~~~~~~~~~~~~~~~~~~~~~~~~~~~~~~~~~~~~~~~~~~~~~~~~
<h2 data-tadv-p="keep">Diaper Cover</h2>
<strong>Materials and Details</strong>
Worsted weight yarn in red and black
H hook (I hook for bigger babies)
1 – 1 ½” Button
Yarn needle
Sewing needle and thread (to attach button)
Note: The pattern is written for brand new babies, with larger sizes in parenthesis (3-6mths, 6-12mths, 12-24mths). Use an I hook, following the same instructions, for babies larger than average if needed.
Directions:
1. Ch 47 (53, 59, 71), turn, sc in 2nd ch from hook and in each st across, turn.
2. Ch 2, dc to end of row, turn.
3. Ch 1, sc to end of row, turn.
4. Sc 12 (14, 16, 21), ch 1, hdc in same space as last sc. Hdc 27 (29, 31, 33), turn. (this row creates the tabs that will fold over.)
From this point on, only work the center 28 (30, 32, 34) sts.
5. Ch 1, hdc to end of row, turn.
6. Ch 1, hdc2tog, hdc across to last 2 sts, hdc2tog. (26, 28, 30, 32 sts).
7. Ch 1, hdc to end of row, turn.
8. Ch 1, hdc2tog, hdc across to last 2 sts, hdc2tog, turn. (24, 26, 28, 30 sts).
9-12. Repeat rows 7 and 8, ending with 20 (22, 24, 26) sts after row 12.
13. Ch 1, hdc2tog, hdc across to last 2 sts, hdc2tog, turn. (18, 20, 22, 24 sts).
14. Repeat row 13. (16, 18, 20, 22 sts).
*15-25 (15-32; 15-35; 15-39). Ch 1, hdc to end of row, turn.
Next row. Ch 1, hdc to end of row.
Do not turn. Ch 1 and sc around outside edge of cover, placing 2-3 sc in each corner/turn.
*This may be too long for brand new babies. Measure if possible. I would suggest eliminating 2 rows if using for brand new, average sized babies.
Tail (optional): Fold cover in half, to find the middle of the back. With two strands of black and H hook, slip st around a stitch in the center of cover. Use tail to tie a knot close to the sl st, then pull the remaining tail to the inside of the cover. Ch 12, turn and sc in first ch from the hook and across. Sl st in a st on the cover next to the first one, being careful not to twist the chain (first loop/feather). Ch 11, turn and sc in first ch from the hook and across. Sl st in a st on the cover next to the first two. Watch placement so the loops sit well together. Ch 10, turn and sc in first ch from the hook and across. Sl st in same st and finish off. Pull end to inside and tie a firm knot. Weave in ends.
~~~~~~~~~~~~~~~~~~~~~~
Common Crochet Abbreviations
Ch – chain Sl st – slip stitch
St – stitch Hdc – half double crochet
Sp – space; sps – spaces Dc – double crochet
Sc – single crochet Trc –treble/triple crochet
** – repeat instructions between, as many times as indicated
This pattern is copyrighted to snappytots and may not be copied for resale in part or whole. It is illegal to post this pattern online or share with others without written consent from Heidi Yates. Items created from this pattern MAY be sold. Please include a link to snappy-tots.com if selling online.