

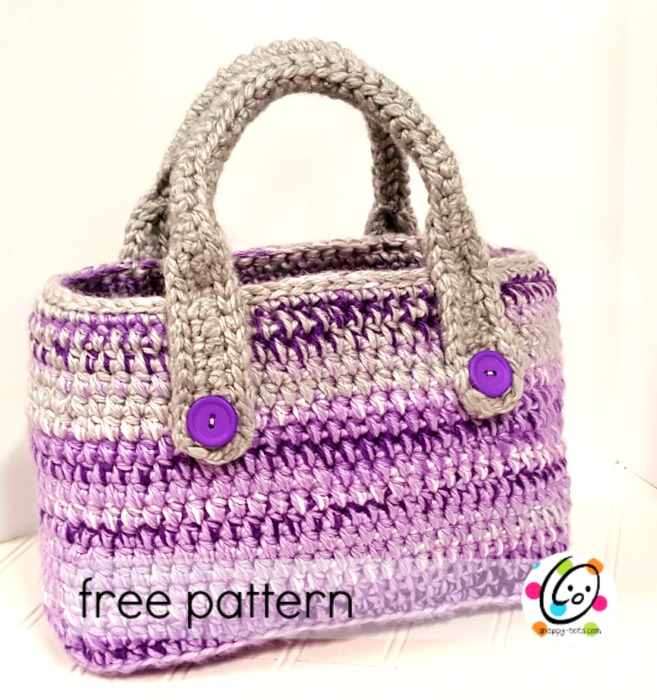
Every once in awhile the planets align and a project turns out even better than imagined. I am LOVING the new Red Heart Soft Essentials yarn and had some purple skeins to use. I LOVE bags and have been wanting “the perfect project tote”. One that I can just grab and take in the car. Big enough for a skein or two, my travel supply bag and the project, but not flimsy or too big. I thought WHAT THE HECK and dove into the essentials skeins. OH MY HECK! ok… in case you missed my excitement… OH MY HECK! I LOVE how it turned out. This cutie patootie is sturdy, the PERFECT size AND the colors… LOVE THEM.
BIG NEWS: A downloadable pdf is now available!

This post contains affiliate links.
Looking for something similar?
- Snappy Party Tote: an extra large and super sturdy tote.
- Made from same yarn: Essential Slippers
Essential Project Tote Crochet Pattern
This pattern is available to follow along below, plus you can purchase an ad-free version from my Ravelry shop.
Project Info
- Project Description: A sturdy tote, just the right size to grab and go.
- Skill Level: Basic crochet skills are needed and must be able to read a crochet pattern.
- Completion Time (how long it takes the designer to make one): 3 hours Of course this time will vary, but hopefully gives an idea. I always like to know approximately how long to plan for a project.
Materials and Details
- Yarn: 4 skeins Red Heart Soft Essentials (2 stripes/variegated and 2 solids) (size 5) Sample was made with 2 skeins Purple Stripe, 1 skein Greyhound, 1 skein Sugarplum Substitution: Three strands Red Heart worsted weight yarn (held together) could be used instead. See photo at end of post.
- Crochet Hook: K hook
- Miscellaneous: yarn needle, 4 buttons approximately 1”, sewing needle and thread (to sew on buttons)
- Gauge: 4” = 10.5 hdc sts x 9 rounds. Not necessary for this project.
- Measurements: 12” wide x 7.5” tall (without handles) x 4” deep
Instructions
Project starts at the base and is worked holding 2 strands of yarn together throughout entire project. Color changes for sample: Start with 1 strand Purple Stripe + 1 strand Sugarplum. When those yarns run out, continue with 1 strand purple stripe + 1 strand Greyhound.
- With K hook and 1 strand variegated and 1 strand solid yarn, ch 11, sc in 2nd ch from hook and in each ch across. (10sts)
- Ch 1, turn, sc in same st and in each st to end of row.
- Ch 1, turn, 2sc in same st, sc 8, 2sc in last st. (12sts)
4-29. Ch 1, turn, sc in same st and in each st to end of row.
- Ch 1, turn, sc2tog, sc 8, sc2tog. (10sts)
- Ch 1, turn, sc in same st and in each st to end of row.
- This step is worked around the outer edge of the base. Pivot piece to work across the long side of the base. 2sc in same st, sc 28 sts evenly along edge, leaving room for one more st. 2sc in next st. Pivot piece to work across the starting edge. 2sc in next st, sc in each st until 1 st remains, 2sc in last st, repeat once. Sl st in first st to join. (88 sts and 10.5” x 4.5”) Note: Stitch count and base measurements might vary slightly. This is fine.
- Work in BLO for this round. Work sts a little more snug than usual for this step to help turn the sides. Ch 1, sc in same st and in each st to end of round, sl st to join. (st count remains the same)
Note: When possible I like working in the round to avoid a seam appearing up the side. The next step will make the adjustment for working in the round. If preferred (or if you will be changing colors for stripes) sl st to join at the end of each round and begin each round with a ch 2.
- Sc in next st Hdc in each st to corner, hdc2tog, hdc2tog at corner, repeat to end of round, do not join. Place marker for working in the round. (80 sts)
- Hdc in next st, Hdc in each st to corner hdc2tog at corner, repeat to end of round. (76 sts)
- From this point on work all sts in the space between posts from previous round. Hdc in each space to end of round.
- Hdc in each space to end of round.
- Hdc in each space to corner hdc2tog at corner, repeat to end of round. (72 sts)
39-44. Hdc in each space to end of round.
- Hdc in each space to corner hdc2tog at corner, repeat to end of round. (68 sts)
46-48. Hdc in each space to end of round.
- Sc in each space to end of round.
- Sl st in each st to end of round. Be careful to not work these stitches too snug. Finish off and weave in ends. Set aside.
Handles (make 2) 1. With K hook and 2 strands grey yarn, ch 55, sc in 2nd ch from hook and in each ch across. (54sts) 2-3. Ch 1, turn, sc in each st to end of row.
- This step is worked around the outer edge of the handle. Be careful to not work these stitches too snug. Pivot to the left. Sl st across the short end of the handle (approximately 2-3 sts). Sl st in each st to end of row, repeat once. Finish off, leaving a long tail for attaching to bag.
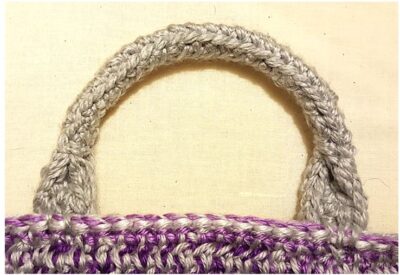
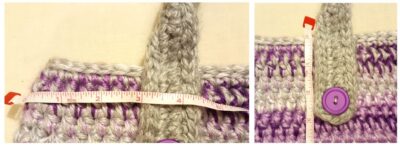
Lay handle on a flat surface and measure 4” from each end. Place a marker at each point. The edges of the remaining part of the handle will be stitched together to create a rounded, tube like handle. Fold handle in half, matching long edges. With yarn needle and matching yarn, sew the edges together from each point (4” in from each end). Secure and finish off. Repeat for second handle. Lay the bag on a flat surface and flatten top edge so it is centered over the base. Place one handle end on the bag so the outer edge is 3” in from the side and 3” down from the top edge. With yarn needle and matching yarn, securely sew the handle to the bag. Repeat for other end of handle. With sewing needle and thread, sew one button on top of each handle end. Repeat for second handle. I hope you enjoyed making this quick and easy project. I would love to see your creations. Please add your project to Ravelry and/or share online and include #snappytots. Thanks for crocheting with me! ~ Heidi
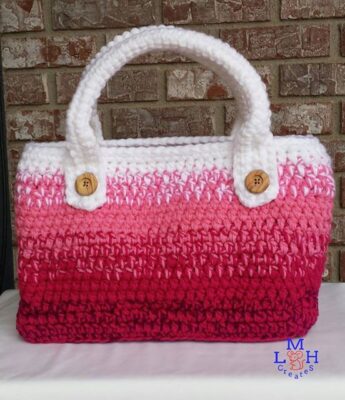
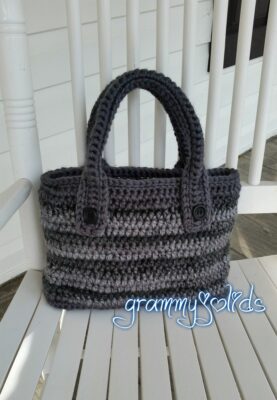
Samples
Please follow Snappy Tots on your favorites social media sites for giveaways, new release announcements, events and fun.
Facebook, Pinterest, Instagram, Twitter
Check out my shop for almost 500 patterns!
Shop Now
Stay Up to Date with all things Snappy by receiving our weekly newsletter.
Get The Newsletter
If you have any questions, comments or suggestions please
send me an email
< p style=”text-align: center;”>I will see that quicker than in the comments below.
<
p style=”text-align: center;”>