

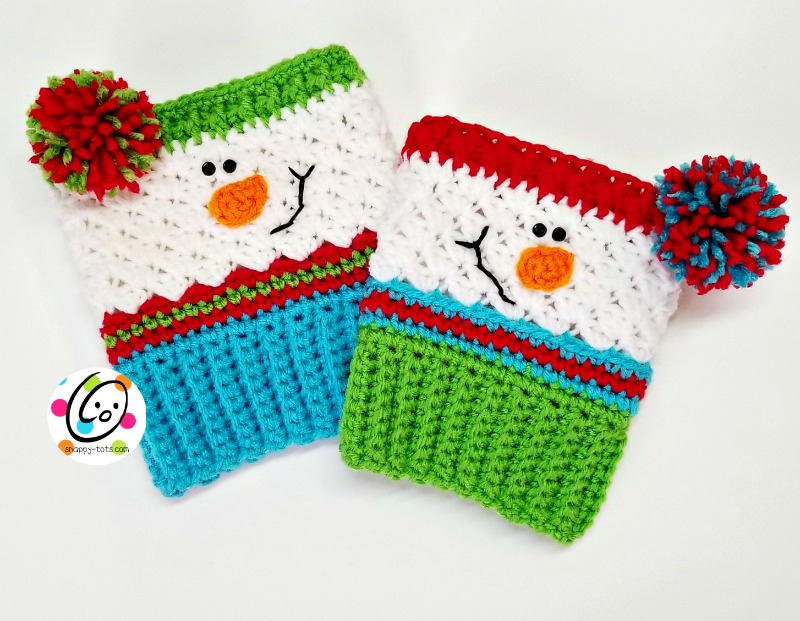
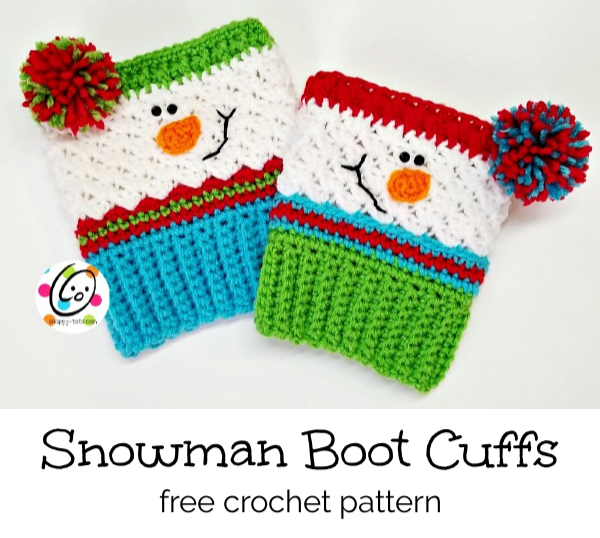
Free Pattern: Sampler Snowman Boot Cuffs
I LOVE snowmen. Their cute little faces make me smile. One of my most favorite (and popular) designs is my “Sampler Snowman Scarf“.
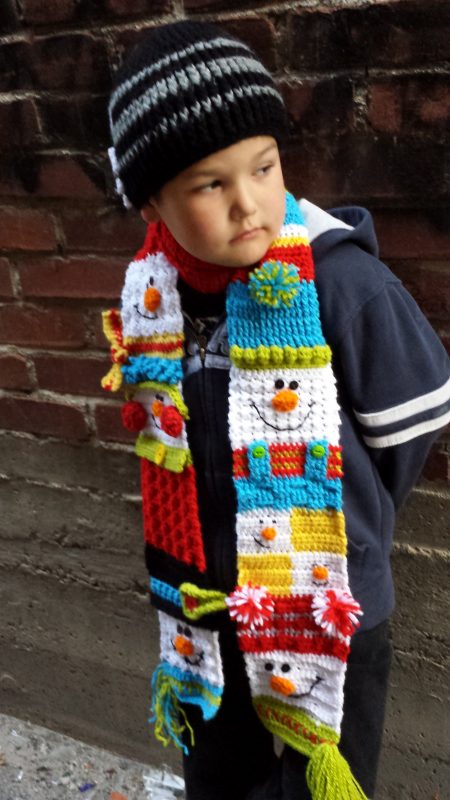
Since its creation in 2013 many people have made cute versions of the scarf. I always love seeing what people make based on my patterns.
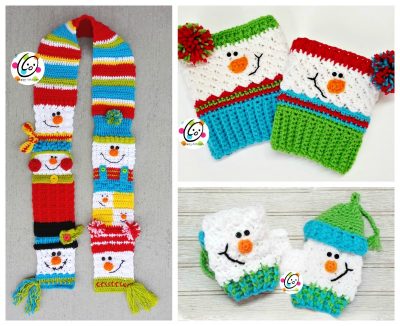
Recently, a snappy peep, Kathy Velte, made this wonderful set.
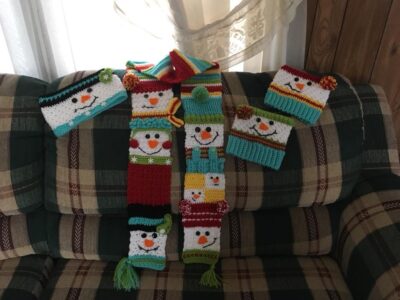
She made matching boot cuffs and a headband. Tons of people have loved what she made and asked for the pattern. Since they were based on my scarf, I offered to make a pattern for the boot cuffs and she agreed. I hope you will enjoy making them too. The pattern is below and includes two sizes, Child and Adult.
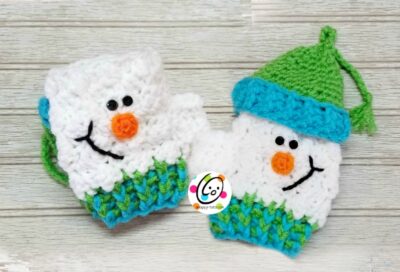
Snowman Headbands, Hats, Decor
I already have a few snowman headband patterns so you can whip up one of those too. You’ll find those at the link below.
I hope you will check out my other snowman patterns.
More Snow Is Coming!
I’ve been wanting to make mitts and mittens to match my snowmen and my “Santa’s Reindeer Scarf”. A pack with sizes for the whole family is also available in my shop (click here). It includes snowmen, penguin and reindeer in 3 options: fingerless mitts, convertible mitts to mittens and full mittens.
I think they make a great set!
How will you know about these new patterns? Scroll down and sign up for email notifications when these are released. Plus, watch my facebook page for updates.
Sampler Snowman Boot Cuffs
An ad-free, downloadable PDF of this pattern with all of the photos is available for a small fee. Ravelry | Etsy
Materials and Details
- Yarn- worsted weight yarn in Red Heart Super Saver: White, Pumpkin, Cherry, Spring Green, Turqua, Bright Yellow, Black (optional for smile)
- Crochet Hook: H, I
- Misc: yarn needle, stitch markers, scissors, measuring tape, 4 small black buttons for eyes, sewing needle, black sewing thread, black embroidery floss (optional for smile)
- Gauge: Follow measurements on each size.
- Sizes: Child, Teen/Adult; Tips for custom widths included at end of pattern.
Disclaimer: Small children should not be left alone with small buttons. Consider stitching eyes in place with yarn instead.
Tips
- First stitch of each row is worked into the same stitch as the turning chain unless noted.
- Numbers at the beginning of each line may refer to steps and not indicate number of rows.
- Reminder: “hdc 2” = work one hdc in each of the next 2 sts; “2hdc in next st”= an increase, work 2 hdc in one st.
- The shape of the boot cuff will vary depending on size. The smaller sized cuff will appear more tall and skinny than the main photo.
- The bottom edge could be sewn shut and a handle added for a little treat bag.
Directions
Child Large (approximately 5-12 years) – make 2
Since children’s calf size can vary greatly, please check measurements and adjust size according to “Custom Sizing” tips at end of pattern.
Finished cuff measurements: 6.5” tall x 5.5” wide Pattern is worked from bottom to top. Substitute colors as desired. 1. With an H hook and turquoise yarn, ch 10, sc in 2nd ch from hook and in each ch across. (9sts)
Note: for the following rows, the first and last sts will be worked as regular sts. The middle sts are worked in BLO.
2. Ch 1, turn, sc in same st, sc 7 in BLO, sc in last st.
3-42. Ch 1, turn, sc in same st, sc 7 in BLO, sc in last st.
Finished strip: 2.25” wide by 11” long. Add or subtract rows at this point to match length if needed.
43. Ch 1, turn. At this point we are ready to seam the short ends together. Fold the beginning edge (first row), up behind the current (last) row and match up the sts. Sl st in the BLO of the front layer and into the first st of the back layer. Continue to sl st through both layers across, finishing with 9 sts.
44. Turn the piece right side out so the seam is on the inside. Ch 1, pivot to work across the long edge. Sc 42sts evenly across the long edge, sl st to join. (42sts)
Tip: Use st markers to divide the round in half and then again in qtrs. Work 10-11 sts between each st marker. This will help place the sts evenly. You should be able to sc one st at the end of each short row.
45. Change to red yarn (for first round of scarf). If you tend to work single crochet sts more snug than others you will want to use an I hook for the following 3 rounds.
Note: “scarf” for second cuff could be done in different colors if desired.
Ch 1, sc in each st to end of round, sl st to join.
46. Change to lime green yarn. Ch 1, sc in each st to end of round, sl st to join.
47. Change to red yarn. Ch 1, sc in each st to end of round, sl st to join.
Make sure your cuff does not cinch in at this point or your cuff may not fit.
48. Change to white yarn. Work this round in BLO. Ch 1, (sc, hdc, dc) in same st, sk 2, *(sc, hdc, dc) in next st, sk 2*, repeat to end of round, sl st to join.
49. Ch 1, (sc, hdc, dc) in same st, sk 2, *(sc, hdc, dc) in next st, sk 2*, repeat to end of round, sl st to join.
50-53. Repeat previous round.
54. Change to lime green yarn. Ch 2, hdc in each st to end of round, sl st to join.
55. Ch 2, *fphdc around next post, bphdc around next post*, repeat to end of round, sl st to join. Finish off and weave in ends.
Teen/Adult – make 2
Since calf sizes can vary greatly, please check measurements and adjust size according to “Custom Sizing” tips at end of pattern.
Finished cuff measurements: 7” tall x 6.25” wide Pattern is worked from bottom to top. Substitute colors as desired. 1. With an H hook and turquoise yarn, ch 10, sc in 2nd ch from hook and in each ch across. (9sts)
Note: for the following rows, the first and last sts will be worked as regular sts. The middle sts are worked in BLO.
2. Ch 1, turn, sc in same st, sc 7 in BLO, sc in last st.
3-48. Ch 1, turn, sc in same st, sc 7 in BLO, sc in last st.
Finished strip: 2.25” wide by 12.5” long. Add or subtract rows at this point to match length if needed.
49. Ch 1, turn. At this point we are ready to seam the short ends together. Fold the beginning edge (first row), up behind the current (last) row and match up the sts. Sl st in the BLO of the front layer and into the first st of the back layer. Continue to sl st through both layers across, finishing with 9 sts.
50. Turn the piece right side out so the seam is on the inside. Ch 1, pivot to work across the long edge. Sc 48sts evenly across the long edge, sl st to join. (48sts)
Tip: Use st markers to divide the round in half and then again in qtrs. Work 12 sts between each st marker. This will help place the sts evenly. You should be able to sc one st at the end of each short row.
51. Change to red yarn (for first round of scarf). If you tend to work single crochet sts more snug than others you will want to use an I hook for the following 3 rounds.
Note: “scarf” for second cuff could be done in different colors if desired.
Ch 1, sc in each st to end of round, sl st to join.
52. Change to lime green yarn. Ch 1, sc in each st to end of round, sl st to join.
53. Change to red yarn. Ch 1, sc in each st to end of round, sl st to join.
Make sure your cuff does not cinch in at this point or your cuff may not fit.
54. Change to white yarn. Work this round in BLO. Ch 1, (sc, hdc, dc) in same st, sk 2, *(sc, hdc, dc) in next st, sk 2*, repeat to end of round, sl st to join.
55. Ch 1, (sc, hdc, dc) in same st, sk 2, *(sc, hdc, dc) in next st, sk 2*, repeat to end of round, sl st to join.
56-60. Repeat previous round.
61. Change to lime green yarn. Ch 2, hdc in each st to end of round, sl st to join.
62. Ch 2, *fphdc around next post, bphdc around next post*, repeat to end of round, sl st to join.
63. Ch 1, sc in each st to end of round, sl st to join. Finish off and weave in ends.
Features
Nose: 1. With an H hook and orange yarn, start with a magic circle of 6sts (or preferred method for starting a circle of 6 sc sts), sl st to join. (6sts) 2. Do not ch 1. (hdc, dc) in next st, ch 2, sl st in 2nd ch from hook, sc in post of previous dc, sl st in next st on beginning circle. Finish off, leaving a tail for sewing in place. With yarn needle and yarn tail, sew nose in place.
Mouth and eyes: With yarn needle and black yarn or black embroidery floss, stitch mouth in place. With a sewing needle and black thread, sew buttons above nose.
PomPom: attach a large pompom to the top band of the cuff.
Custom Sizing
Since calf sizes vary greatly, here are some tips for creating a custom size.
Follow pattern as written, making the following adjustments:
- Measure around the widest part of the calf.
- Work beginning rows until the piece measures 1” SMALLER than calf measurement from starting edge.
- Make sure the number of sts worked around the top edge of the beginning rows is divisible by 3. This is BEFORE the scarf rounds begin.
- Decrease or Increase number of rounds in the white snowman section to adjust the height.
If you make some of these, I hope you will share pix.
Pin To Save For Later


The snowman scarf is one of my very very very favoritest patterns.It made me smile the second I saw it. I grabbed it and put it in my cart right away!!