Growing up I had a “worry stone” to rub when we traveled because I would get so worried about everything.
Lately I have realized how much more there is to worry about. Whether it is my kids being far away or friends struggling with illness or just life in general, there seems to be a lot of stressors. It is so easy to let life take over.
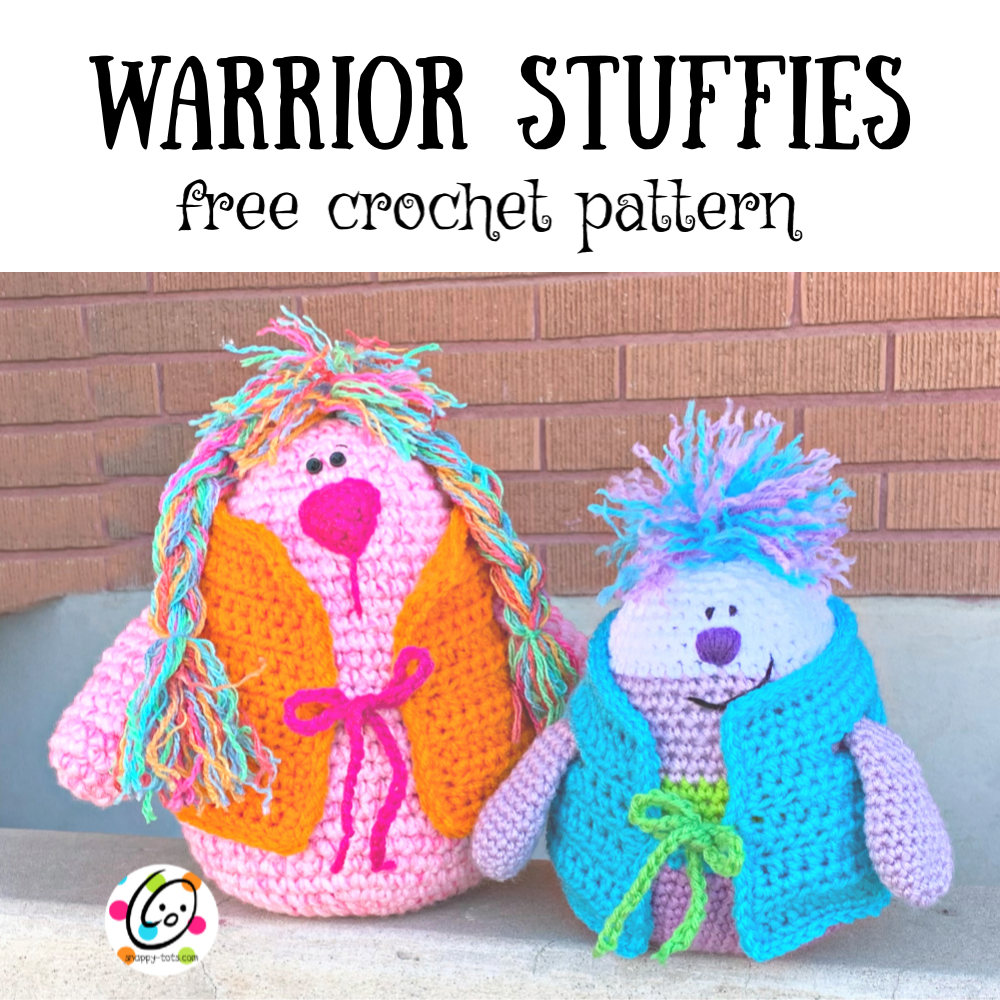
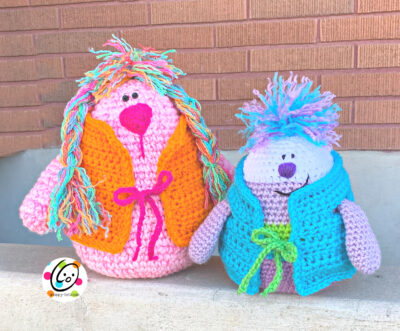
As I was making these they took on personalities and I realized they could be my worry warriors. They can absorb our stressors and help us conquer hard times and bring joy into life. I hope you will create a warrior of your own or for a friend.
I think these would also be cute as penguins or different animals. I will be adding variations in the future so we can keep making different ones for different people.
Thank You
Several people posted amazing comments in our facebook group when I shared pix of these guys. The comments really touched my heart so I decided to offer this pattern for free in hopes they can be made by more people. I hope you will make one or some for yourself and friends.
Warrior Stuffies
An ad-free, downloadable PDF which includes all of the photos and instructions is available for only $2.
CLICK HERE for the download: Ravelry Listing
Materials
- Yarn
Large – 220 yards worsted weight yarn. Sample: Red Heart Super Saver Petal Pink + Tourmaline, Red Heart Papaya Pooling
Small – 150 yards worsted weight yarn. Sample: Red Heart Super Saver Orchid, Pale Plum, Spring Green, Turqua
- Crochet Hooks: G, (4.5mm), I (5.5mm)
- Notions: Yarn needle for weaving in ends, 2 small black buttons, black thread, sewing needle, stuffing
- Optional: Measuring tape, scissors, 1-2 cups popcorn or rice for a weighted stuffie + nylon sock
Measurements
- Finished Measurements: Large – 9” x 9”; Small – 6” x 6”
- Gauge: not needed for this project.
Tips
- First stitch of each row is worked into the same stitch as the turning chain.
- Numbers at the beginning of each line may refer to steps and not indicate number of rows.
- Stitch count remains the same unless noted at end of row/round.
- If you have any questions about this pattern please contact [email protected].
- For the large stuffie I used two strands of pink yarn. One (tourmaline) is a slightly variegated yarn so it helped create a variety of colors. For the small stuffie I added stripes of color. Please use your imagination and create any color you like.
Body – Both Sizes
- Large: use 2 strands worsted weight yarn and an I hook. Small: use 1 strand worsted weight yarn and a G hook.
- This starts at the bottom of the of the stuffie and worked in continuous rounds to the top.
- Start with a magic circle of 8 sc sts (or preferred method for creating a circle of 8 sc sts), pull closed and place a marker for working in the round. (8sts)
- 2sc in each st to end of round. (16sts)
- *sc, 2sc in next st*, repeat to end of round. (24sts)
- *sc 3, 2sc in next st*, repeat to end of round. (30sts)
- *sc 4, 2sc in next st*, repeat to end of round. (36sts)
- *sc 5, 2sc in next st*, repeat to end of round. (42sts)
- *sc 6, 2sc in next st*, repeat to end of round. (48sts)
- *sc 7, 2sc in next st*, repeat to end of round. (54sts)
- Sc in each st to end of round.
- Repeat previous round for an additional 8 rounds.
- *sc 25, sc2tog*, repeat once. (52sts)
- *sc 24, sc2tog*, repeat once. (50sts)
- *sc 23, sc2tog*, repeat once. (48sts)
- Sc in each st to end of round.
- *sc 22, sc2tog*, repeat once. (46sts)
- *sc 21, sc2tog*, repeat once. (44sts)
- Sc in each st to end of round.
- *sc 20, sc2tog*, repeat once. (42sts)
- *sc 19, sc2tog*, repeat once. (40sts)
- Sc in each st to end of round.
- *sc 18, sc2tog*, repeat once. (38sts)
- *sc 17, sc2tog*, repeat once. (36sts)
- Sc in each st to end of round.
- *sc 7, sc2tog*, repeat to end of round. (32sts) Stop here and add the weight (optional- see note below). Stuff firmly to this position.
- *sc 6, sc2tog*, repeat to end of round. (28sts)
- *sc 5, sc2tog*, repeat to end of round. (24sts) Stop here and add the face.
- *sc 2, sc2tog*, repeat to end of round. (18sts) Add more stuffing.
- *sc, sc2tog*, repeat to end of round. (12sts)
- *sc, sc2tog*, repeat to end of round. (8sts) Finish off, leaving a yarn tail for finishing off the top.
With a yarn needle, use the yarn tail to weave in and out of remaining sts. Pull to cinch closed. Secure yarn tail.
Weighted Body (optional)
I added weight to the body before stuffing to help it stand and be roly poly.
I put unpopped popcorn (Large – 1.5 cups, Small – .5 cup) in a nylon sock. I tied a knot in the end and place it inside the body before stuffing.
Instead of popcorn, you could use dried rice, beans or bean bag pellets.
Arms (make 2)
- Large: use 2 strands worsted weight yarn and an I hook. Small: use 1 strand worsted weight yarn and a G hook.
- This starts at the “hand” and worked in continuous rounds to the top.
- Start with a magic circle of 6 sc sts (or preferred method for creating a circle of 6 sc sts), pull closed and place a marker for working in the round. (6sts)
- 2sc in each st to end of round. (12sts)
- *sc 3, 2sc in next st*, repeat to end of round. (15sts)
- Sc in each st to end of round.
- Repeat previous round for an additional 3 rounds.
- *sc2tog, sc 3*, repeat to end of round. (12sts)
7-8. Sc in each st to end of round.
- *sc2tog, sc 4*, repeat once. (10sts)
- Sc in each st to end of round. Insert a small amount of stuffing in the bottom/hand.
- *sc2tog, sc 3*, repeat once. (8sts)
- Sc in each st to end of round. Finish off, leaving a yarn tail for sewing to body.
With a yarn needle, use the yarn tail to sew the top edge of the arm to the body. See main photos for placement.
Large Nose
- With an H hook and one strand ww yarn, ch 5, sc in 2nd ch from hook and in each ch across. (4sts)
- Ch 1, turn, sc2tog, sc2tog. (2sts)
- Ch 1, turn, sc2tog.
- This step is worked around the outer edge of the nose. Ch 1, sc evenly around nose, working 2sc in each corner. Sl st in tip of nose to end. Finish off, leaving a yarn tail for sewing nose in place.
With a yarn needle, use the yarn tail to sew the nose to the top, front of the body. Stitch the mouth line if desired.
Small Nose: With a yarn needle and contrasting ww yarn, stitch a nose to the top, front of the body.
Smile: With a yarn needle and black yarn, stitch a smile in place.
Eyes: With a sewing needle and black thread, sew 2 buttons in place above the nose.
Hair
Frizzy Top: Create a large pompom and attach to the center top of the head. Pull all or most of the yarn pieces apart to create the frizzy look. Trim as desired.
Frizzy Braids: Add a “frizzy top”. Cut 12 pieces of yarn 18” long. Pull one set of ends through a st at the top of the head, near the center of the pompom. Pull the ends until they are even. Pull each yarn piece apart to create the frizzy look. Divide pieces and loosely braid. Tie a piece of matching yarn around the bottom part of the braid. Repeat for second braid.
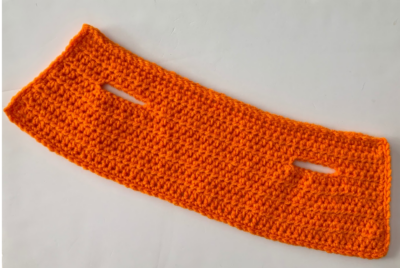
Large Vest
- With an I hook and yarn color of choice, ch 47, sc in 2nd ch from hook and in each ch across. (46sts)
2-3. Ch 2, turn, hdc in same st and in each st to end of row.
- Ch 2, turn, hdc in same st, hdc 5, ch 8, sk 6, hdc 22, ch 8, sk 6, hdc 6.
- Ch 2, turn, hdc in same st, hdc 5, hdc 8 in ch, hdc 22, hdc 8 in ch, hdc 6. (50sts)
- Ch 2, turn, hdc in same st and in each st to end of row.
- Ch 2, turn, 2hdc in same st, hdc 48, 2hdc in last st. (52sts)
- Ch 2, turn, hdc in same st and in each st to end of row.
- Ch 2, turn, 2hdc in same st, hdc 50, 2hdc in last st. (54sts)
10-11. Ch 2, turn, hdc in same st and in each st to end of row.
- This step is worked around the outer edge of the vest. Ch 1, pivot to work up the side of the vest. Sc 14 sts evenly up side, (sc, ch 1, sc) in corner, sc in each st until 1 st remains, (sc, ch 1, sc) in last st, sc 14 sts evenly down side of vest, (sc, ch 1, sc) in corner, sc in each st to end of row.
- Ch 1, sl st in each st around vest with ch 1 at each corner. Finish off and weave in ends.
Ties: Attach yarn to center front of one vest edge. With an I hook and contrasting yarn, ch 28. Finish off and trim end. Repeat for opposite side. Tie in a bow.
Small Vest
- With an I hook and yarn color of choice, ch 43, sc in 2nd ch from hook and in each ch across. (42sts)
- Ch 2, turn, hdc in same st and in each st to end of row.
- Ch 2, turn, hdc in same st, hdc 3, ch 6, sk 5, hdc 24, ch 6, sk 5, hdc 4.
- Ch 2, turn, hdc in same st, hdc 3, hdc 6 in ch, hdc 24, hdc 6 in ch, hdc 4. (44sts)
- Ch 2, turn, hdc in same st and in each st to end of row.
- Ch 2, turn, 2hdc in same st, hdc 42, 2hdc in last st. (46sts)
- Ch 2, turn, hdc in same st and in each st to end of row.
- This step is worked around the outer edge of the vest. Ch 1, pivot to work up the side of the vest. Sc 12 sts evenly up side, (sc, ch 1, sc) in corner, sc in each st until 1 st remains, (sc, ch 1, sc) in last st, sc 12 sts evenly down side of vest, (sc, ch 1, sc) in corner, sc in each st to end of row.
- Ch 1, sl st in each st around vest with ch 1 at each corner. Finish off and weave in ends.
Ties: Attach yarn to center front of one vest edge. With an I hook and contrasting yarn, ch 24. Finish off and trim end. Repeat for opposite side. Tie in a bow.
Pin To Save For Later