

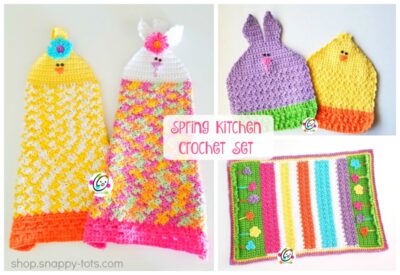
Spring is a great time to bring sunshine into our homes and what a better way than through colorful crochet towels. I designed these as part of a crochet along in 2018 so there is a video too. You can make them right along with me so grab some fun cotton yarns and get started.

Matching Patterns
- Free cloths
- Free placemat: coming soon
- Purchase pdf: An ad-free, downloadable PDF which includes all of the photos and instructions for the hanging towels, matching washcloths and placemat is available to purchase. Ravelry Shop: Click HERE
Materials
- Yarn: Red Heart Scrubby Smoothie Cotton Yarn
Chick Sample colors: Brite Orange (20 yds), Sunshine Ombre (153 yds), Lemony (40yds); Bunny Sample Colors: Brite Pink (20 yds), Popsicle Brights (153 yds), White (40 yds) - Crochet Hooks: G, H, I
- Miscellaneous: Yarn needle for weaving in ends, one ¾” button
- Optional: 2 small black buttons for eyes, sewing needle and thread, embroidery floss or crochet cotton for smile
Details
- Finished Measurements: 19” long x 9” wide (when folded)
Tips
- First stitch of each row is worked into the same stitch as the turning chain.
- Numbers at the beginning of each line may refer to steps and not indicate number of rows.
Directions
Towel
Directions begin at bottom edge of towel and work towards top of bunny head.
1. With an I hook and yarn for bottom stripe (pink in sample), ch 45, sc in 2nd ch from hook and in each ch across. (44sts)
2. Ch 1, turn, sc in each st to end of row.
3. Ch 2, turn, hdc in same st, sk 1, 3hdc in next st, *sk 2, 3hdc in next st*, repeat until 2 sts remain, sk 1, hdc in last st. (14 clusters/44sts) Note: the repeated section creates two skipped sts together.
4-6. For this step, “space” refers to the area just below the stitch, between posts.

Ch 2, turn, hdc in space before first cluster, *3hdc in space between next two clusters*, repeat until last cluster. Work 3hdc in space after last cluster. Hdc in the last st. Double check your cluster and stitch counts. (14 clusters/44sts)

7. Change yarn to desired color for the main section of the towel (variegated in sample). Ch 2, turn, hdc in same st, *sk 1, (sc, dc) in next st*, repeat until 1 st remains, hdc in last st.
8. Repeat step 7 until cloth is 13” from starting edge.
9. Ch 2, turn, hdc in each st to end of row. Finish off and weave in ends.
10. Lay towel on a flat surface, right side down. Check your beginning edge for the “right side”. Fold in the sides, overlapping 11sts at the right edge.

11. With an I hook, attaching yarn for top of towel in the first sts at the right. For this step we will work through the stitches on both layers of the towel.

Ch 1, sc in each st until 1 st remains before the center opening.
Insert the hook in the first st of the second half, in the last st of the current half and in the next st on the back layer. See photo below.

Sc in each st to end of row. (21sts)
12. Ch 1, turn, 2sc in same st, sc in each st to end of row. (22sts).
13. Ch 1, turn, sc in each st to end of row.
14. Change to an H hook. Ch 1, turn, sc in each st to end of row.
15. Ch 1, turn, sc in each st to end of row.
16. Ch 1, turn, sc2tog, sc 18, sc2tog. (20sts)
17. Ch 1, turn, sc in each st to end of row.
18, Ch 1, turn, sc2tog, sc 16, sc2tog. (18sts)
19. Ch 1, turn, sc in each st to end of row.
20, Ch 1, turn, sc2tog, sc 14, sc2tog. (16sts)
21. Ch 1, turn, sc2tog, sc 12, sc2tog. (14sts)
22, Ch 1, turn, sc2tog, sc 10, sc2tog. (12sts)
23. This step creates the button hole. Ch 1, turn, sc2tog, sc 3, ch 2, sk 2, sc 3, sc2tog. (10sts)
24. Ch 1, turn, sc2tog, sc, sk 1, sc 4 around chain, sk 1, sc, sc2tog. (8sts)

For the chick and everyday versions: Finish off and weave in ends. Continue to page 6.
For the bunny version, continue below.
25. This step creates the first ear. Ch 1, turn, sc 4. Leave remaining sts unworked.
26. Ch 1, turn, sc 3, 2sc in last st. (5sts)
27. Ch 1, turn, sc in each st to end of row.
28. Ch 1, turn, sc 4, 2sc in last st. (6sts)
29-31. Ch 1, turn, sc in each st to end of row.
32. Ch 1, turn, sc2tog, sc 2, sc2tog. (4sts)
33. Ch 1, turn, sc2tog, sc2tog. (2sts)
34. Ch 1, turn, sc2tog. Finish off and weave in end.
35. Attach yarn to first st at edge of last row on head. Ch 1, sc in same st, sc 3. (4sts)
Repeat steps 26-34.

Flower
1. With an H hook and yarn color of choice, ch 8, sl st in last ch from hook to form a circle.
2. *ch 6, sl st around chain*, repeat until 9 loops have been made. Finish off, leaving a tail for sewing to cloth.
With a yarn needle and yarn tail, sew the center ring to the cloth so it encircles the button hole. Leave space around the buttonhole so the button will slip through the towel layer and be surrounded by the flower. If the flower is too close to the buttonhole the button may not stay on top of both layers unless it is a shank button.
Face (optional)
With a yarn needle and yarn color choice, stitch the nose/beak in place.
With a sewing needle and thread, sew the small buttons in place for eyes.
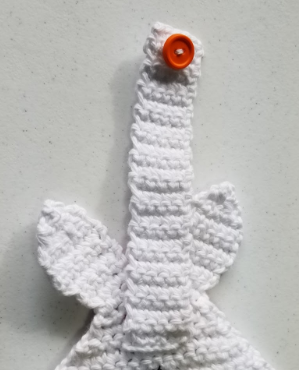
Hanger
1. With a G hook and matching yarn, ch 6, sc in 2nd ch from hook, sc 4. (5sts)
2. Ch 1, turn, sc 5.
3. Repeat previous row until hanger is approximately 6” or desired length. Finish off, leaving a yarn tail at one end for sewing to cloth.
With a yarn needle and yarn tail, sew one short end to the back of the cloth, approximately 1” from the buttonhole opening. Make sure not to sew through the flower petals.
With a sewing needle and thread, sew the button to the opposite end of the hanger tab.

Pin To Save For Later

