

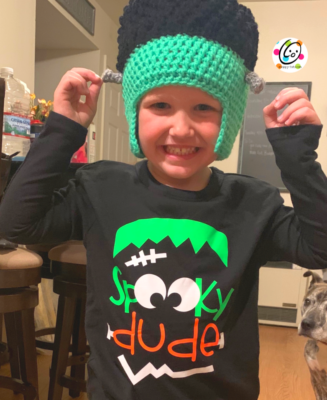
I wanted to send my grandson something fun for Halloween. He is 4 1/2 and I knew he would love a frankenstein beanie. I designed one my very first year, but I wanted even bigger hair for this one. I love how it turned out and was super tickled to get this picture of him in his new frank beanie. That smile is priceless. Shipping crunched the screws but just some finger shaping helped the one stand back out.

This pattern has been well tested so you can whip one up in a night. I know how it is when you need a last minute costume.

Frank Beanie Pattern
This pattern is available below for free. You can get an ad free downloadable pdf with all of the instructions and photos from one of my shops below:
Materials
- Yarn: Red Heart Super Saver Black (150 yards), Glowworm (150 yards), small amount of grey
- Crochet Hooks: G (4-4.5mm), H (5mm), I (5.5 mm)
- Notions: Yarn needle for weaving in ends, measuring tape, stitch markers (or a scrap of yarn)
Details
- Gauge with I hook: 4” = 15 rounds and 14 sts
- Sizes: Child Small (3-6 years), Child (8 -12 years), Teen/Adult
Tips for all sizes
- Stitch count remains the same unless noted at the end of the round.
- Hat starts at the top.
Child Small (3-6 Years)
- With an I hook and black yarn, start with a magic circle of 8 sts (or preferred method for starting a circle of 8 sc sts), pull closed and sl st to join. (8sts)
- Ch 1, 2sc in each st to end of round, sl st to join. (16sts)
- Ch 1, *hdc, 2hdc in next st*, repeat to end of round, sl st to join. (24sts)
- Ch 1, *hdc 2, 2hdc in next st*, repeat to end of round, sl st to join. (32sts)
- Ch 1, *hdc 3, 2hdc in next st*, repeat to end of round, sl st to join. (40sts)
- Ch 1, *hdc 4, 2hdc in next st*, repeat to end of round, sl st to join. (48sts)
- Ch 1, *hdc 5, 2hdc in next st*, repeat to end of round, sl st to join. (56sts)
- This step starts the hair section and is worked from the wrong side/inside of the piece. This way the “bumps” will be on the right side/outside of the piece. Ch 1, TURN. Sc in same st, tr in next st, *sc in next st, tr in next st*, repeat to end of round, sl st to join.
- Ch 1, tr in same st, sc in next st, *tr in next st, sc in next st*, repeat to end of round, sl st to join.
- Ch 1, sc in same st, tr in next st, *sc in next st, tr in next st*, repeat to end of round, sl st to join.
- Ch 1, tr in same st, sc in next st, *tr in next st, sc in next st*, repeat to end of round, sl st to join.
- Ch 1, turn to work from the right side of the hat. Sc in each st to end of round, sl st to join. Finish off black.
- Change to green yarn. Ch 1, hdc in each st to end of round, sl st to join.
- Repeat previous step until hat measures 7.5″ from starting edge.
To find this measurement, lay the hat on a flat surface and measure from the starting circle.
- This step creates the opening for the face. Ch 2, hdc in same st, hdc 39. (40sts)
- From this point on, work the first and last st of each row IN the st (as usual). Work the rest of the sts between the posts from the previous row. This will eliminate ridges usually created when working back and forth in rows.
Ch 2, turn, hdc in same st, hdc 39. (40sts)
17-20. Ch 2, turn, hdc in same st, hdc 39. (40sts)
- Ch 1, turn, sc in each st along bottom edge of hat, including the face opening, working (sc, ch 1, sc) in each front outer corner and sc2tog at each inner corner, sl st to join at end of round. Finish off and weave in ends.
Skip to the pattern for the screws.
Child Large (7-12 Years)
- With an I hook and black yarn, start with a magic circle of 8 sts (or preferred method for starting a circle of 8 sc sts), pull closed and sl st to join. (8sts)
- Ch 1, 2sc in each st to end of round, sl st to join. (16sts)
- Ch 1, *hdc, 2hdc in next st*, repeat to end of round, sl st to join. (24sts)
- Ch 1, *hdc 2, 2hdc in next st*, repeat to end of round, sl st to join. (32sts)
- Ch 1, *hdc 3, 2hdc in next st*, repeat to end of round, sl st to join. (40sts)
- Ch 1, *hdc 4, 2hdc in next st*, repeat to end of round, sl st to join. (48sts)
- Ch 1, *hdc 5, 2hdc in next st*, repeat to end of round, sl st to join. (56sts)
- Ch 1, *hdc 13, 2hdc in next st*, repeat to end of round, sl st to join. (60sts)
- This step starts the hair section and is worked from the wrong side/inside of the piece. This way the “bumps” will be on the right side/outside of the piece. Ch 1, TURN. Sc in same st, tr in next st, *sc in next st, tr in next st*, repeat to end of round, sl st to join.
- Ch 1, tr in same st, sc in next st, *tr in next st, sc in next st*, repeat to end of round, sl st to join.
- Ch 1, sc in same st, tr in next st, *sc in next st, tr in next st*, repeat to end of round, sl st to join.
- Ch 1, tr in same st, sc in next st, *tr in next st, sc in next st*, repeat to end of round, sl st to join.
- Ch 1, sc in same st, tr in next st, *sc in next st, tr in next st*, repeat to end of round, sl st to join.
- Ch 1, turn to work from the right side of the hat. Sc in each sto to end of round, sl st to join. Finish off black.
- Change to green yarn. Ch 1, hdc in each st to end of round, sl st to join.
- Repeat previous step until hat measures 8″ from starting edge.
To find this measurement, lay the hat on a flat surface and measure from the starting circle.
- This step creates the opening for the face. Ch 2, hdc in same st, hdc 39. (40sts)
- From this point on, work the first and last st of each row IN the st (as usual). Work the rest of the sts between the posts from the previous row. This will eliminate ridges usually created when working back and forth in rows.
Ch 2, turn, hdc in same st, hdc 39. (40sts)
19-24. Ch 2, turn, hdc in same st, hdc 39. (40sts)
- Ch 1, turn, sc in each st along bottom edge of hat, including the face openging, working (sc, ch 1, sc) in each front outer corner and sc2tog at each inner corner, sl st to join at end of round. Finish off and weave in ends.
Skip to the pattern for the screws.
Preteen-Adult
1. With I hook and black yarn, start with a magic circle of 8 sts (or preferred method for starting a circle of 8 sc sts), sl st to join and pull closed. (8sts)
2. Ch 1, 2sc in each st to end of round, sl st to join. (16sts)
3. Ch 1, *hdc, 2hdc in next st*, repeat to end of round, sl st to join. (24sts)
4. Ch 1, *hdc 2, 2hdc in next st*, repeat to end of round, sl st to join. (32sts)
5. Ch 1, *hdc 3, 2hdc in next st*, repeat to end of round, sl st to join. (40sts)
6. Ch 1, *hdc 4, 2hdc in next st*, repeat to end of round, sl st to join. (48sts)
7. Ch 1, *hdc 5, 2hdc in next st*, repeat to end of round, sl st to join. (56sts)
8. Ch 1, *hdc 6, 2hdc in next st*, repeat to end of round, sl st to join. (64sts)
9. This step starts the hair section and is worked from the wrong side/inside of the piece. This way the “bumps” will be on the right side/outside of the piece. Ch 1, TURN. Sc in same st, tr in next st, *sc in next st, tr in next st*, repeat to end of round, sl st to join.
10. Ch 1, tr in same st, sc in next st, *tr in next st, sc in next st*, repeat to end of round, sl st to join.
11. Ch 1, sc in same st, tr in next st, *sc in next st, tr in next st*, repeat to end of round, sl st to join.
12. Ch 1, tr in same st, sc in next st, *tr in next st, sc in next st*, repeat to end of round, sl st to join.
13. Ch 1, sc in same st, tr in next st, *sc in next st, tr in next st*, repeat to end of round, sl st to join.
14. Ch 1, tr in same st, sc in next st, *tr in next st, sc in next st*, repeat to end of round, sl st to join.
15. Ch 1, turn to work from the right side of the hat. Sc in each sto to end of round, sl st to join. Finish off black.
16. Change to green yarn. Ch 1, hdc in each st to end of round, sl st to join.
17. Repeat previous step until hat measures 8.5″ from starting edge.
To find this measurement, lay the hat on a flat surface and measure from the starting circle.
18. This step creates the opening for the face. Ch 2, hdc in same st, hdc 45. (46sts)
19. From this point on, work the first and last st of each row IN the st (as usual). Work the rest of the sts between the posts from the previous row. This will eliminate ridges usually created when working back and forth in rows.
Ch 2, turn, hdc in same st, hdc 45. (46sts)
20-25. Ch 2, turn, hdc in same st, hdc 45. (46sts)
26. Ch 1, turn, sc in each st along bottom edge of hat, including the face opening, working (sc, ch 1, sc) in each front outer corner and sc2tog at each inner corner, sl st to join at end of round. Finish off and weave in ends.
Continue to the screws.
Screws
Make 2. Use a G hook for Child Small. Use an H hook for larger sizes.
- With hook and grey yarn, start with a magic circle of 8 sts (or preferred method for starting a circle of 8 sc sts), pull closed and place a marker for working in the round. (8sts)
- In back loops only, sc in each stitch to end of round.
- *sc 2, sc2tog*, repeat once. (6sts)
- *sc, sc2tog*, repeat once. (4sts)
- Sc in each stitch around for 2 rounds, pulling tight as you go. Finish off, leaving a tail to attach to hat.
With a yarn needle, use the yarn tail to sew the tip of each screw to the side of the hat. See main photo for placement.
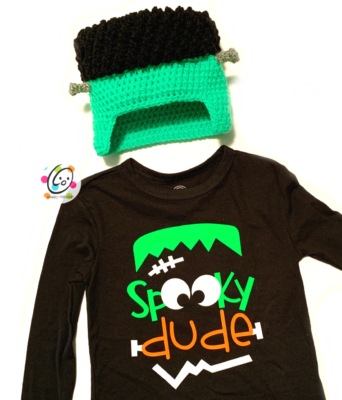
Matching Shirt
I found this super cute “Spooky Dude” iron on design by PerfectStylishCuts and just had to make him a shirt to go with his new beanie. You can make one too in any size. Check out how I did it and get the free cut file: CLICK HERE
Pin To Save For Later
