

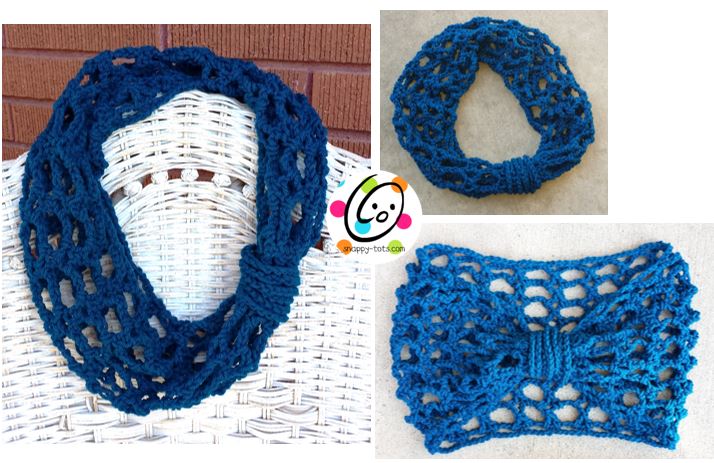
As a knitter, I often try to recreate knit stitches in crochet. I have been playing with one lately and I love how it turned out in this cowl. I guess it could be called an infinity scarf because it is kind of in between.
I rarely make things for myself, but I love how this turned out. I’m sure I will be making myself some more in other colors. It also will be a great Christmas gift for my daughter and daughter in law.
Since I dont have a long neck I tend to stay away from wearing cowls. I rarely wear infinity scarves because I get them hooked on things. So this is the best of both worlds! Long enough to not feel like I am being strangled or swallowed up by a cowl and hopefully short enough it wont hook me!
This is also the right width for kids to wear around their shoulders as a shrug.
Swiss Cheesy Quick and Easy Cowl
An ad-free, downloadable PDF which includes all of the photos and instructions is available for only $2.
Materials and Details
- Yarn: worsted weight in choice of color.
- Note: ANY size yarn could be used for this pattern. Size and appearance will vary, but will give fun results.
- Crochet Hook: K
- Miscellaneous: yarn needle for weaving in ends
- Gauge: not necessary for this project
- Finished size: 16” x 10” (measured flat)
Directions
Keep it loose. After the original chain, project will be joined for working in continuous rounds.
1. With K hook and yarn, loosely ch 90, sl st in last ch from hook to join in a circle. Be careful to make sure chain is not twisted. (90sts)
2. *ch 4, sk 4, sc*, repeat to end of round. Note: Round will end with an sc in last st, next to beginning chain. (18 loops)
3. Note: See photo tutorial at end of pattern for this step.
*ch 7, YO, pull up a loop in same sp, YO, pull through 2 loops on hook, YO, pull up a loop in NEXT space, YO, pull through 2 loops on hook, YO, pull through all loops on hook*, repeat to end of round.
4. At end of round, place a marker. Repeat step #3 seven more times or until cowl is desired width.
5. *ch 4, sc in next space*, repeat to end of round. Do NOT finish off.
6. This step creates the band of chains around the cowl. Ch 160. Finish off yarn, leaving a 3” yarn tail. Wrap the long chain around the cowl 8 times (less times for a looser band or more times to cinch the cowl tighter). Use the yarn tail to attach the end of the chain to the cowl approximately 2” from the start of the chain. See arrows in photo below. These mark the start and finish of the chain.

Note: I attached the end of the chain to the same edge of the cowl as the beginning of the chain (the last round) so I didn’t have to line up edges to make sure it would hang evenly.
How To Do Body of Cowl
*ch 7, YO, pull up a loop in same sp,


Pin To Save For Later

