

Update: Jazlyn LOVED her new hat! 🙂 I hope you do too.

There are a lot of patterns for long-tailed baby hats around and that’s because they are so dang cute on wee ones. When a close friend of mine called this week and asked if I had time to whip up a couple hats for her baby due any day I jumped at the chance. I LOVE making newborn hats. They are quick and the pix are always adorable.
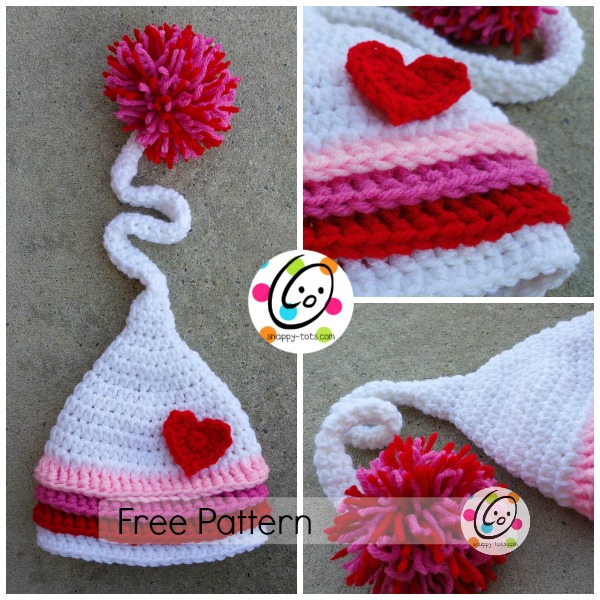
Since she doesn’t know if the baby will come before Valentine’s Day I made the heart so it buttons on and can be removed if they choose. I am tickled with how the rounds of layered color turned out. I played around with a few rounds and LOVE the look.
This pattern is written for newborn size with a long tail. A rounded top version and full range of sizes is also available. Click HERE for the “Jake Beanie“. I wanted to get this posted in case you have a little one and would like a fun new hat for Valentine’s Day. It really works up quickly and is totally doable in less than 2 hours.
Jazlyn’s Baby Hat
Click HERE to add this pattern to your Ravelry library and favorites. THANKS!
Materials & Details
Yarn: Worsted Weight Yarn in choice of colors. The sample was made with Red Heart White, Baby Pink, Shocking Pink and Cherry Red
Crochet Hook: H (5mm)
Misc: Yarn needle, 1/2″ button for the back of heart or size needed to slip between two posts (optional), sewing needle and matching thread (optional for attaching button)
Gauge: 2″ = 4.75 rounds and 6.5 hdc sts
Size: Newborn (larger sizes coming)
Special Stitches
FPDC – Front post double crochet; Click HERE for how-to video from Red Heart yarns.
BPHDC – Back post half double crochet; Click HERE for how-to video from Bob Wilson 123.
Note: these videos demonstrate both front and back post stitches. We will only be using one (front OR back) per round.
Disclaimer: The hat is written with a tail of 12″. It can be made longer if desired. PLEASE be aware of the choking hazard involved with long tails on children’s hats. NEVER leave a child unattended with a long tail hat or buttons.
Directions:
1. With an H hook and worsted weight yarn, start with a magic circle of 6 sts (or preferred method for starting a circle of 6 sc sts), place marker for working in the round. (6sts)
2. Sc in each st around until hat tail measures 2″ long. Note: it can be tricky working 6 sts in the round. Just be patient. (6sts)
3. Hdc in each st around until hat tail measures 12″ long from starting edge. You can add more length here if desired. (6sts)
4. *2hdc in the next st, hdc 2*, repeat once. (8sts)
5. *2hdc in the next st, hdc 3*, repeat once. (10sts)
6. Hdc in each st to end of round.
7. *2hdc in the next st, hdc 4*, repeat once. (12sts)
8. *2hdc in the next st, hdc*, repeat to end of round. (18sts)
9. *2hdc in the next st, hdc 2*, repeat to end of round. (24sts)
10. Hdc in each st to end of round.
11. *2hdc in the next st, hdc 3*, repeat to end of round. (30sts)
12. *2hdc in the next st, hdc 4*, repeat to end of round. (36sts)
13. Hdc in each st to end of round.
14. *2hdc in the next st, hdc 5*, repeat to end of round. (42sts)
15. *2hdc in the next st, hdc 13*, repeat to end of round. (45sts)
16. *2hdc in the next st, hdc 14*, repeat to end of round. (48sts)
17. Up until this point, the hat has been worked in continuous rounds to avoid a seam look. Now we need to start joining at the end of each round for the color changes. Hdc in next st, sc in next st, sl st in next st. This is our new starting point. Change to light pink yarn. Ch 2, FPDC in each st to end of round, sl st to join. (48sts)
18. Ch 2, BPHDC around each post to end of round, sl st to join.
19. Change to dark pink yarn. Ch 2, FPDC around each post to end of round, sl st to join.
20. Ch 2, BPHDC around each post to end of round, sl st to join.
21. Change to red yarn. Ch 2, FPDC around each post to end of round, sl st to join.
22. Ch 2, BPHDC around each post to end of round, sl st to join.
23. Change to white yarn. Ch 2, FPDC around each post to end of round, sl st to join.
24. Ch 1, sc in each st to end of round, sl st to join. Finish off and weave in all end securely.
Pompom
I make my own pompoms, but you could also use a pompom maker.
To make your own, hold two strands of yarn. Spread your fingers apart as wide as possible. Wrap the two strands of yarn around the widest part of your fingers 50 times. This will create a thick pompom. Carefully slide the yarn off your hand. Wrap a matching piece of yarn around the center of the strands, tie a knot and pull secure. Wrap around and knot again. Hold onto this yarn. Cut the remaining strands and trim as desired.
Pull one end of the center yarn through the tip of the hat. Tie a secure knot. Pull through the hat again and tie another knot.
Fiber Flux has a great video on making pompoms. Click HERE.
Heart
I wanted to add a heart, but make it so the hat could be worn without it as well. I added a button to the back of the heart that slips through the stitches.
1. With H hook and red yarn, start with a magic circle of 8 sts (or preferred method for starting a circle of 8 sc sts), sl st to join. (8sts)
2. Sl st in next st, (sc, hdc, dc 2, hdc) in next st, hdc 2, (hdc, ch 2, sl st in 2nd ch from hook, hdc) in next st, hdc 2, (hdc, dc 2, hdc, sc) in next st, sl st in next sp (between posts) to join. Finish off,
leaving a tail for sewing in place.
With yarn needle and yarn tail, sew heart to hat.
NOTE: For a removable button, finish off the yarn tail at the end of round #2. Make sure your button will slip between 2 posts on the hat. With matching thread and a sewing needle, sew the button to the BACK of the heart. Slip this button between stitches on the hat.
Check out my article on how I add the button to the back.