

For Mother’s Day my sister and I always try to come up with something extra special for our mom. She loves handmade things (LUCKY US!) and has lots of fun things in her yard. Planters made from tires have been popular for a while and I’ve been wanting to make her one. It seemed like a perfect Mother’s Day gift!
As I searched online I found some cute ladybugs and decided the bright red would be super cute in her yard…. of course, it seemed like a great gift for my mother in law too… and I would have to have one in my yard right?
I am beyond tickled with how cute they turned out! Read on to see how “dog-proofing” mine turned into 2 more versions.
The first step was to find tires. A friend of mine had recently moved and was unable to take her tire planters so SCORE! My husband and Hayden (youngest son) helped me get the tires and it was a reminder of just how much they have gotten used to my crazy craft things. They both just loaded the tires and didn’t question my latest adventure…at least out loud. lol
The Project Comes To Life
I gathered the supplies and WAIT! I found out something I had never known before. Trying to get water out of the inside of a tire is HARD! No, really. I think it needs to be a “minute to win it” event. I finally looked on youtube and found out I wasn’t the only one unable to do this. It really is a hard thing! lol. Most people suggested swinging the tire and bouncing it on the ground. This worked for most of the water, but we ended up scooping out the rest.
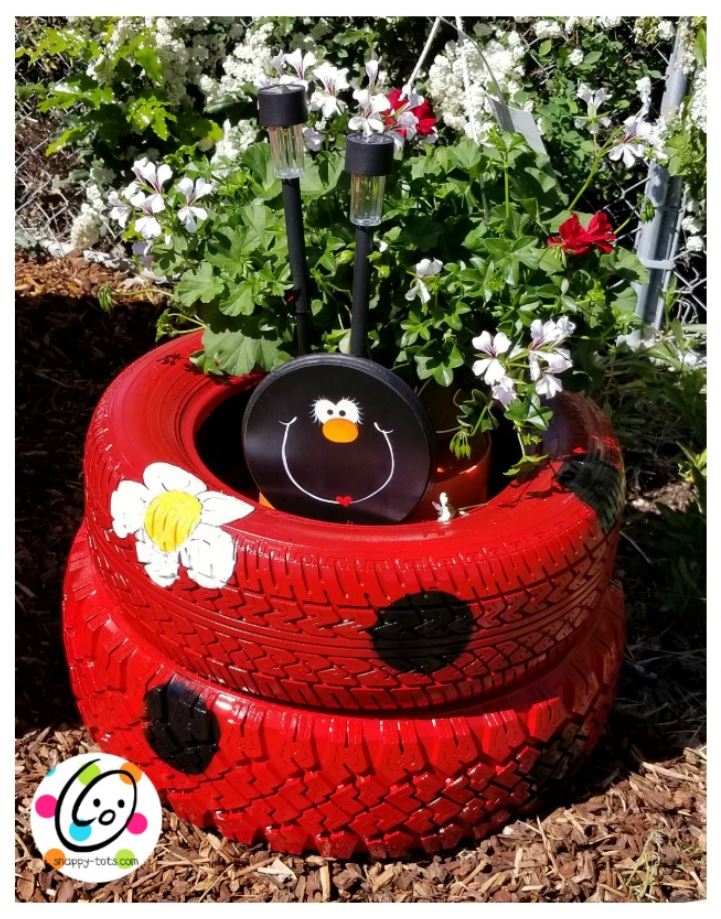
As I sprayed the tires…and sprayed the tires…and sprayed them some more I kept thinking about how I was going to do the face. I wanted more of a dimensional face instead of just painting on the tires. PLUS I knew it would be MUCH easier to paint a face on flat wood vs a textured tire.
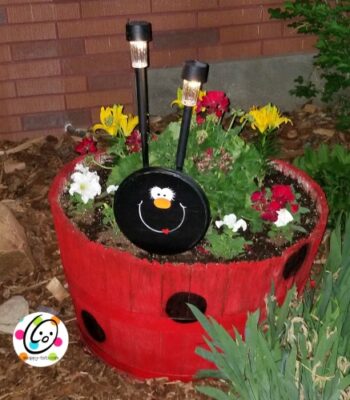
Once I’d purchased the round wood the dilemma became how to attach it to the tires. Since we were going to fill the tires with dirt and plant flowers I went with a plant stake contraption. Then, what about antennas? WELL, you now I have this obsession with solar lamps so they became the antennas! … and my sister added that they turn into fireflies at night. How cute is that?
I have this thing about spray paint. I could seriously spray paint everything I own! I love how it brings new life to an item. With this project I realized I (usually) live in the perfect spray paint climate. I am used to spraying a thick layer, waiting 15 minutes and repeat. Well… of course, a rare rain storm hit Utah for the 4 days I needed to paint. Holy Moly! The stuff never dries when there is moisture in the air! Luckily, my husband has a gigantic fan in the garage so the tires, once sprayed out under the patio, were placed in the garage to dry. It took MUCH longer than when the Utah sun dries the paint!
This was a really fun and easy project. One last hurdle, the delivery. My sister lives across the country so she contributed money for a giant bag of potting soil and a large hanging plant. I originally planned on having my mom’s all planted before she saw it. BUT I didn’t want to fill them up with dirt and flowers because I wanted them to be able to move them. SO, I placed a bucket inside the stacked tires and sat the potted plant on top. My mom decided she would leave it like this so it would be easy to move. We drilled holes in the bottom of the bucket for drainage and the pot fit perfectly on the top rim. I placed a couple of bricks on the ground between the bucket and inside of tires so the plant stake could stand on that and be at the right height.
It fits right in with her yard.
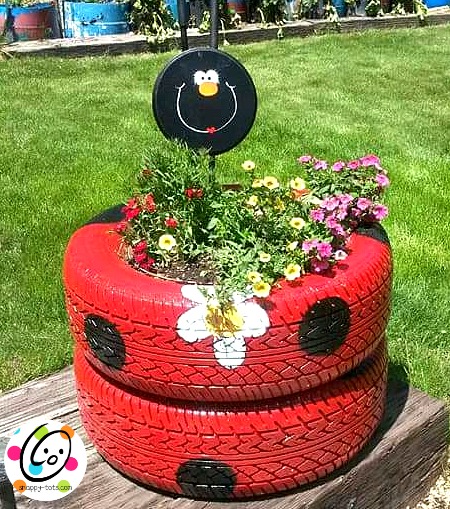
My mother-in-law decided to fill hers with dirt and planted the flowers. It is cute like this too.
More Uses
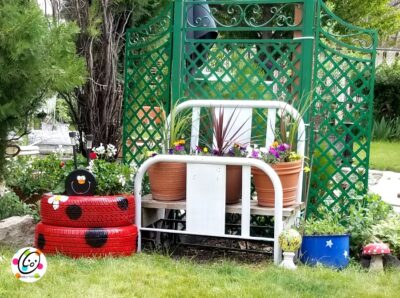
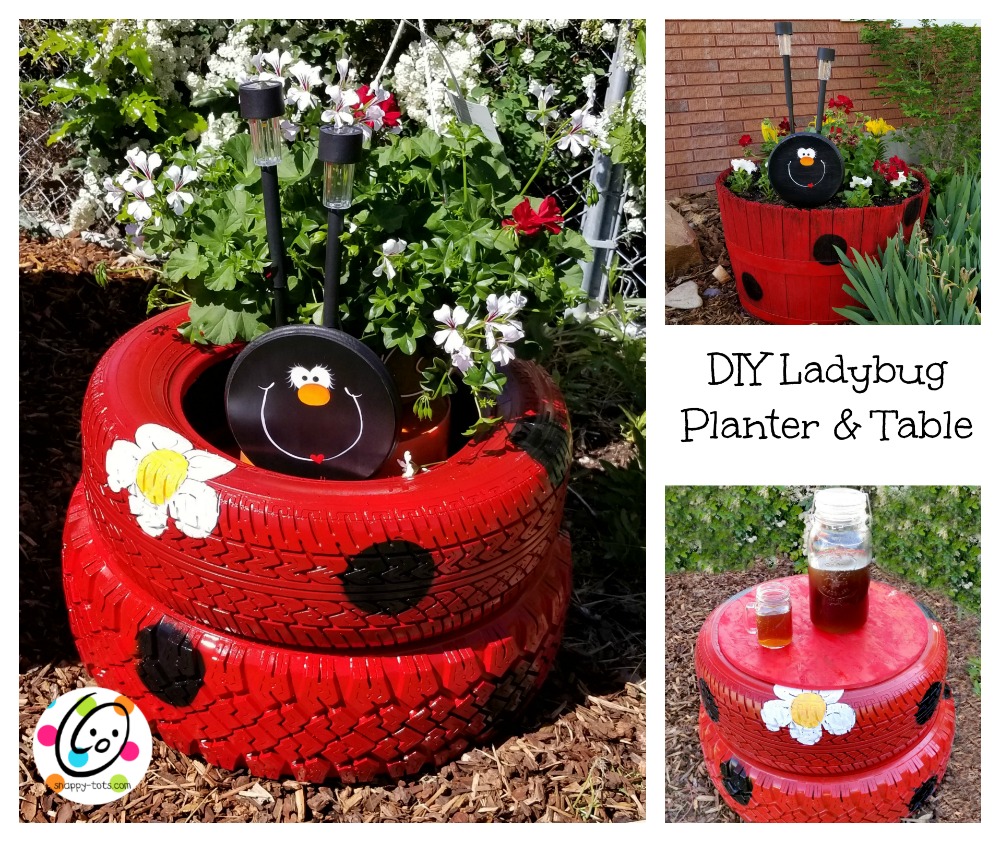
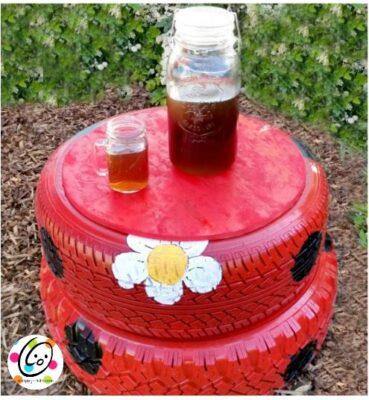
Now for my yard. I have a black lab, Oila, that is still in the chew everything stage. She has been known to bring us sprinkler heads and solar lights in the past. I knew the antennas wouldn’t last long in my back yard, but I wanted to use the tires by my new red swing. We have been wanting a little table by the swing to sit drinks so I had my husband cut a board to fit the top. It works great!
I already had purchased the flowers for my planter and had the plant stake head so I decided to paint the whisky barrel planter in my front yard and make it into a bug. This way my neighbors can see her cuteness too!
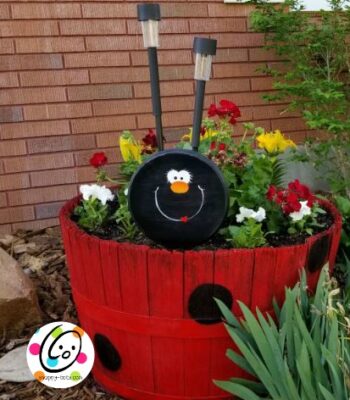
And those antennas worked just as planned.
Supplies Needed
2 tires (either the same size or one a little bigger than the other)
1 large round disk for ladybug head
2 dowels that fit in the base of the solar lamps (take them to the hardware store to check the fit)
2 solar lamps (I got mine at Walmart for 97 cents each!)
Spray Primer – 1 can
Red Spray Paint – 2 cans or more
Decoart Americana Paint: 2 bottles Lamplight Black, 1 bottle Titanium White, 1 bottle Bright Yellow, a touch of Golden Brown (optional for shading daisy), small amount of Pumpkin (for nose and dots on daisy), a touch of Cherry Red.
#10 or 1/2″ brush – I suggest Loew Cornell Golden Taklon Brushes 10 shader 7300
10/0 liner brush (or preferred brush for fine lining)
Sponge brushes
Paper towels
Large round stencil (or cardstock and scissors to cut your own)
E600 glue (to attach dowels to back of head)
Table version only: Plywood to cut a 17″ circle for top of tires
Face pattern: Click here to download and print the pattern
White graphite paper to transfer the face to the wood.
How To Paint The Face
- Paint the large round wood piece solid black. Allow to dry.
-
Print the pattern for the face so it fills the paper. Printing at 100% should make it the right size.
-
Place the piece of white graphite paper on the large round wood piece, then place the face pattern on top, centered on the circle.
-
With a flat #10 or 1/2″ brush base coat the eyes with white paint until opaque.
-
With a flat #10 or 1/2″ brush base coat the nose with orange paint until opaque.
-
With a liner brush, white paint and a small amount of water, paint the eyelashes and smile.
-
Use the end of a brush or similar and fresh black paint to dot the pupils in the eyes.
-
Use the same item as step 7 and fresh red paint to create the heart lips. This is done by making two paint dots, side by side and then pulling them into a point at the bottom.
-
Optional: shade the top of the nose with the flat brush and orange plus a touch of red or a darker orange. For tips on shading, see this video: https://www.youtube.com/watch?v=on7AA2M8FeQ
-
Optional: highlight the bottom of the nose with the flat brush and a touch of yellow. You can even add yellow to the orange if to harsh.
Spots: Use a sponge brush and black paint to paint the black “spots” in random places around the tires or planter.
Daisies
Use a sponge brush and white paint to paint 1 white circle where you want the middle of your daisy to be. Paint 5 white circles around the first circle to create the petals.
When dry, use a sponge brush and yellow paint to paint over the center circle. Note: The reason I paint the center white first is because yellow paint doesn’t cover as well.
With black paint, a touch of water and a liner brush outline the daisy.
Finish
Spray the entire project with at least two coasts of clear varnish. Allow the pieces to dry thoroughly between coats.
Pin To Share and Save For Later
